Thursday, August 30, 2012

Thanksgiving in August: Grilled Turkey with a Balsamic BBQ Sauce


I'm so excited about tonight!

Why?  Cause I'm going to a cooking class to learn how to cook Giada's food.  Don't you just love Giada?  I do.  Her simple Italian style that's family friendly and a little updated has always drawn my attention.  I'm so happy to be learning Giada's style of cooking, and getting to try out her recipes first hand!

I can't wait to come back and share with you the wonderful dishes that we will make.  Wish me luck, it should be an outstanding night!


Now you're really going to think I'm crazy.  But I'm not.  Swear.  I told you how I wanted summer to last and I'm not ready for fall yet.  But what I am ready for is Thanksgiving.  I love the dishes of Thanksgiving.  The standard dishes like the juicy turkey, some green beans, a little dressing.  So why not have Thanksgiving in August?  You can you know!  I won't tell.

So how about Thanksgiving in August with a summer twist?  You can prepare all your dishes with summer techniques.  I'll show you how!

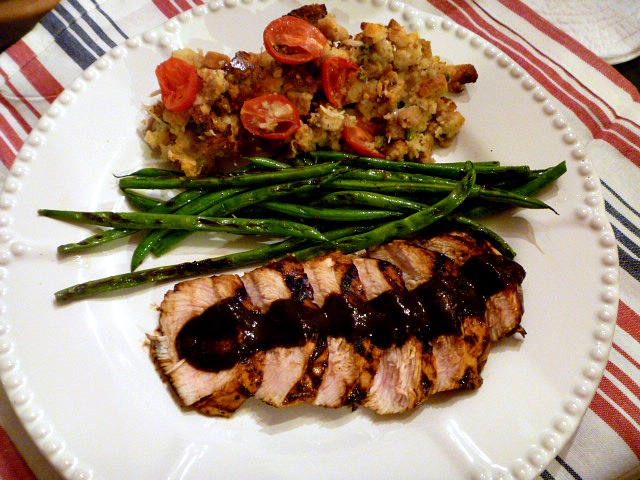
How does this sound?  Grilled Turkey with a wonderful, wonderful Balsamic BBQ Sauce.  Grilled Green Beans.  Lastly, Tomato Dressing, using summer ripe tomatoes and fresh summer flavors. (The Balsamic BBQ sauce is killer but the Tomato Dressing is da bomb!)


Sounds good huh?  See! You can have Thanksgiving in August, at the least the basis of Thanksgiving anyways.  The flavors are perfect with the summer twist, and let's face it...most of don't cook a turkey that often, do we?  But I do love it!  So why not?  

Try this out and you will thank me for it later!  First up is the recipe for the Grilled Turkey and Balsamic BBQ Sauce.  I'll be posting the killer Tomato Dressing recipe next!


Enjoy Thanksgiving in August.  I know I'm "thankful" that I can enjoy these wonderful flavors more than once a year!


Grilled Turkey with a Balsamic BBQ Sauce

Serves 4

½ c diced yellow onion
1 T olive oil
1 c balsamic vinegar
¾ c ketchup
1/3 c brown sugar
2 T Worcestershire sauce
2 T Dijon mustard
salt & pepper
2 turkey tenderloins

Preheat grill to medium heat.

Saute onion in olive oil over medium heat until soft, about 5 minutes.  Stir in vinegar, ketchup, sugar, Worcestershire sauce, mustard, and salt and pepper.  Bring to a boil.  Reduce heat and simmer until reduced to 1 ½ cups, about 10 minutes.  Set aside 1 cup for serving.  Brush the tenderloins with some of the remaining sauce.

Grill turkey over medium heat for 4 minutes, then turn and grill for 4 minutes more.  Baste tenderloin with sauce and turn and cook another 4 minutes.  Baste second side of turkey, turning for another 2 minutes or until meat reaches 165 degrees.  Let rest 5 minutes before slicing.  Drizzle sauce over sliced turkey and serve with remaining sauce.

Source: Cuisine Grilling


Shared with:  Weekend Potluck
Foodie Friends Friday

Tuesday, August 28, 2012

Watermelon Milkshakes


This is not my typical drink.

I know, I know...I usually make smoothies.  I've made lots and lots of them, sharing them all with you.  But sometimes you just gotta be bad.  Not the suffering guilty bad, just a little cheat drink.  You know what I mean?  So today instead of putting my wonderful summer fruit in a smoothie, I went a little decadent and put it in a milkshake!

Watermelon...juicy, fruity and light tasting.  Such a summer flavor that I love.  So what better way to relax on the patio or by the pool in this still hot weather, than with a decadent milkshake!  Let me tell you, when I made these they didn't last long.  MGG had ours by the pool and I think he must loved his.  He was making yummy noises while he was drinking it.  And when I looked away and then looked back it was gone!  


So since this is MGG approved I'm sure your family and kids will love this as well.  

Take some time out to be a little bad...it feels soooo good!


Watermelon Milkshakes

serves 2

2 c vanilla ice cream or vanilla frozen yogurt
8 oz cubed watermelon
1 cup milk

Add ice cream , watermelon chunks, and milk to a blender. Blend on high for 1 – 2 minutes.   Serve immediately.


Shared with:  Weekend Potluck

Sunday, August 26, 2012

Southern Sundays


Welcome to Southern Sundays!

Everyone keeps talking about the end of summer.  Here in Southern California we are still in full swing.  It's still hot and will most likely be hot well into September.  I just love that, because I'm not ready for the end of summer.  I don't want to lose the long evenings.  I'm not ready for fall colors, clothes, or flavors.  Nope, not yet.  I want to savor the summer fruits and vegetables until the very last moment!  

So to give you a little taste of summer in Southern California here are some beautiful pics to feast your eyes upon.  Summer, don't go away.....


Summer Sailing

This little guy is sunbathing!


Another wonderful sunset...


On to the party!  Last week was a blast.  We had three great dishes stand out from the crowd.


Congratulations on your featured recipe!


by Flour Me With Love


by The Chic Geek


by With A Blast 

Congratulations again!  

So let's party!  I can't wait to see what you all bring this week.  Make sure to tell all your friends so they can join the party as well!

Guidelines:
Please become a follower by joining my site with Google Friends Connect in the right side bar.
Link back to your specific recipe and not to your main site.
Link back to Southern Sundays either in your post, or grab my Southern Sundays Button located in the right side bar.
Please visit a few of the links in the post and say hello to your fellow bloggers!
Enjoy, have fun, cook lots of food, and relish your Southern Sunday!


Saturday, August 25, 2012

Diner Night: Old Fashioned Steak Fingers


On the menu: Old Fashioned Steak Fingers with Roasted Oven Fries and some milk gravy as a dipping sauce.  Simple, deliscious, comfort food! - Slice of Southern


Friday night was "Diner Night" at our house.

I was surfing some great blogs when I came across a recipe on Miz Helen's Country Cottage that just brought back memories of visiting my relatives in Texas and Oklahoma and eating diner food. We used to drive from California when I was little to go see my relatives and stop at many diners along the way.  The more toward Texas or Oklahoma we got the bigger the food, and the more Steak Fingers I ate.  Or chicken fried steak for that matter!  

Steak Fingers was always a popular dish growing up.  My Mom to this day loves Steak Fingers, and often gets them at a local drive thru.

So feeling nostalgic I thought I'd whip up some good ole diner food at home.  On the menu: Old Fashioned Steak Fingers with Roasted Oven Fries and some milk gravy as a dipping sauce.  


On the menu: Old Fashioned Steak Fingers with Roasted Oven Fries and some milk gravy as a dipping sauce.  Simple, deliscious, comfort food! - Slice of Southern


Simple, delicious, comfort food.  What a great way to end the week!  Makes you feel all warm and cozy inside eating a meal like this.  So bringing back all the memories was a blast.  MGG enjoyed my stories of travels and all the good times me and my family had.  And let's not forget the food!


On the menu: Old Fashioned Steak Fingers with Roasted Oven Fries and some milk gravy as a dipping sauce.  Simple, deliscious, comfort food! - Slice of Southern


Thanks Miz Helen for the wonderful incentive to remake this comforting dish!!!  Make sure to go visit her and say "hi!" She has such a terrific site!

Go here for the recipe on the Roasted Oven Fries.

So tell me, what is your favorite dish you remember from your past that just brings back good memories?


Old Fashioned Steak Fingers

Adapted from Miz Helen's Kitchen

1 pound cube steak, cut into strips
2 cups flour (of your choice)
1 cup yellow cornmeal
2 teaspoons salt
2 teaspoons pepper
1 teaspoon garlic powder
dash cayenne pepper
2 eggs, beaten
Canola oil for frying

Mix the flour, cornmeal, garlic powder, salt and pepper in a dish or pie pan. Beat 2 eggs and place in a separate dish or pie pan.

Heat oil to the depth of about ¼ inch in a large skillet until hot over medium –high heat.

Dip the steak into the flour and cornmeal mixture. Shake off any excess. Then dip it into the egg. Next dip it back into the flour mixture.

Add your Steak Fingers to the oil at a time and cook for about 2-3 minutes on each side or until golden brown. The heat should be a little on the high side (medium high) so that the meat, which is thin, cooks pretty quickly, crisps well, and does not absorb a lot of oil.

Remove and drain on a paper towel. Serve alongside oven roasted fries and milk gravy as a dipping sauce.


Shared with: Weekend Potluck


On the menu: Old Fashioned Steak Fingers with Roasted Oven Fries and some milk gravy as a dipping sauce.  Simple, deliscious, comfort food! - Slice of Southern

Friday, August 24, 2012

Cheese Focaccia Panzanella with Grilled Ratatouille


Here's another wonderful salad perfect for summer!

This salad is a take on the traditional Italian dish, Panzanella, which is a salad made with ingredients such as tomatoes and bread.  I love Panzanella and I first tried it when my Mom and I went to Italy.  So popular in Rome, this dish made such an impression that I've been making a traditional version for years.  But...this time I wanted to twist it up a bit by adding grilled vegetables.  Ones that you would typically find in a Ratatouille.  The combination is outstanding!

To make it interesting I used a cheese focaccia bread that I grilled and then cubed.  It gives the salad extra flavor and a little flair!  If you can't find the cheese focaccia, a good crusty Italian country bread will be perfect, or crusty french bread for that matter.  


The grilled vegetables bring depth of flavor to the salad.  Eggplant, zucchini, red onion, bell pepper, and tomatoes taste wonderful grilled.  Other special additions are little cubes of mozzarella and a killer vinaigrette.  There is nothing better than bringing fresh seasonal ingredients together in a different combination that allows their flavors to just shine and be the star of the dish!

All together this salad is a winner!  You can put this together in under 30 minutes.  It's great for a weeknight meal and for those that want to enjoy a meatless dish. 


I hope you love this dish as much as we did!


Cheese Focaccia Panzanella with Grilled Ratatouille


Makes: 4 servings

½ lb. assorted sweet peppers, halved and seeds and membranes removed
1 eggplant, cut into ½ inch thick slices
½ lb zucchini, cut lengthwise into thin strips
½  red onion, cut into 1/2-inch-thick slices
2 Roma tomatoes, halved and seeded
1/3 of a loaf of cheese foccacia, split in half and cut each half in to 4 pieces (8 pieces total) 
2 T olive oil
¼ t salt
¼ t ground black pepper
1 clove garlic, halved
1/3 c olive oil
2 T red wine vinegar
1 T finely shredded lemon peel
6 oz fresh mozzarella cheese, cubed
Salt & pepper
½ c chopped parsley

Lightly brush all sides of the peppers, eggplant, zucchini, onion, tomatoes, and bread slices lightly with the 2 tablespoons oil.  Sprinkle with salt and pepper.   Grill vegetables in a grill pan over medium heat until vegetables are crisp-tender, turning occasionally.   About 10 minutes total.  Remove vegetables from grill.   Allow to cool enough to handle.  Cut vegetables into 1-inch pieces.   Set aside.

Grill bread about 4 minutes or until browned and crisp, turning occasionally.   Cool slightly.   Rub bread with cut sides of garlic.  Cut into 1 inch pieces. 

Place grilled vegetables in a large bowl.  Add bread to vegetables.

For dressing, in a small mason jar add 1/3 cup oil, the vinegar, and lemon peel.  Shake to blend.   Season to taste with salt and black pepper.   Add the dressing to the grilled vegetables and bread.  Add your cubed mozzarella.   Toss gently to combine.   Toss with parsley and serve.

linked to:  Full Plate Thursday
Weekend Potluck

Wednesday, August 22, 2012

Peach Cobbler Smoothie


I'm dying for peach cobbler...

But I don't have time to make it.  My work schedule is keeping from this wonderful dessert.  I have such a craving for it...what to do?


Let's make a smoothie!

My Peach Cobbler Smoothie will take care of my cravings right away!  Plus it is quicker to make!

I made this smoothie and took to work with me in one of my favorite travel containers.  I think I've showed they containers before.  They are actually glasses, called "working glasses".  Perfect for everyday drinkware and the best part is they come with a lid that allows you to take them with you, filled with your favorite drink, or pasta salad, fruit, potato salad, or even a dessert.  What ever you can imagine!  I know I get excited about these container, but they truly are handy.


Back to the smoothie.  This smoothie has all the flavors of peach cobbler, so I'm sure if you love the dessert you will love my smoothie.  It even has a secret ingredient...I'm not telling what it is...oh, okay you can find out by reading the recipe.  It just puts it over the edge a bit and given it that cobbler taste!

Give it a whirl in your blender, it's fast and easy to make.  A great treat for you kids as well.  The best part is since it's summer, peaches are delishhh right now!   So use some fresh peaches, and leave the skin on so you get some extra fiber and nutrients!  It's good for you.  (If you can't find fresh peaches, frozen will work just as well.)


Enjoy some summer peach cobbler in a smoothie!


Peach Cobbler Smoothie

Serves 2

1 6 oz container lite vanilla yogurt
½ banana
¼ t cinnamon
1 peach, cut into chunks
¼ c milk
5 vanilla wafers
1 c ice cubes

Place all ingredients in a blender and blend on high until smooth.  Pour in 2 glasses and serve.


Shared with:  Weekend Potluck

Monday, August 20, 2012

Grilled Pork and Nectarine Salad


Do you have a favorite restaurant?

MGG and I visited one of our favorite restaurants a few nights ago and I'm always amazed with the eclectic selection of dishes they have on the menu.  It's a restaurant/micro-brewery with dishes that range in flavors from MexicanItalian, even Cajun,  They serve everything from steaks, chicken and fish, to tacos and pasta.  All of the food is excellent, and unique in the flavor combinations.  

One of the dishes I love is a salad that they serve with pork medallions and grilled nectarines.  It's such a wonderful blend of pork and fruit, with a slightly sweet dressing, served over a bed of arugula and spinach.


So I thought I'd make my version of this salad at home.  Since it's summertime I decided to grill pork chops instead of making little pork medallions out of pork tenderloin. (too much work!)  I added a wonderful citrus blend I came up with.  I use this so often on all types of meat.  It's fantastic!  I call it California Citrus blend.  Great for chicken, pork, of beef.  The recipe for that is included as well.  

I added a nice spring mix of salad greens as my base and put it all together in a flash.  Another weeknight meal made in under 20 minutes.  Love that!


Hope you try this salad.  It's a tribute of one of my favorite restaurant's dishes,and it's just bursting with flavors.  


Grilled Pork and Nectarine Salad

Serves 4

4 nectarines, rip but a little firm
1 t olive oil
4 pork loin chops
4 t California Citrus blend
Salt & pepper
2 T balsamic vinegar
2 T olive oil
1 bunch spring mix salad greens

Pit nectarines and cut each one into 4 wedges.  Heat large ridged grill pan on medium until hot. Brush nectarine wedges with 1 teaspoon oil. Place nectarine wedges in grill pan and cook about 10 minutes or until charred and tender, turning wedges over once. Transfer to a plate and cover with foil to keep warm.

Sprinkle pork chops with 1 teaspoon each of California Citrus blend and rub in.  Sprinkle with salt & pepper. 

Add pork chops to the grill pan and cook about 10 to 12 minutes or until done (155 degrees) turning over once.

Meanwhile make the dressing: In small bowl, whisk vinegar, 1/8 teaspoon salt, 1/8 teaspoon freshly ground black pepper, and remaining 2 tablespoons oil until blended.  Remove 1 tablespoon dressing and set aside.

In large bowl, toss spring mix and dressing.  Divide among 4 plates.  Slice each pork chop on an angle against the grain and place on top of the salad.  Add nectarines. Drizzle pork and nectarines with reserved dressing.

California Citrus Blend

2 t lemon peel
2 t orange peel
1 t  minced parsley
1/2 t garlic powder

Mix all ingredients together.  Great on chicken, pork, or beef.


shared with:  Weekend Potluck

Sunday, August 19, 2012

Southern Sundays


Welcome to Southern Sundays!

Sorry for bringing up the party late today...swamped with cooking some new an delicious dishes to share with you!

Before we get to the party I wanted to share some georgeous places around my hometown, Los Angeles.  Take a moment to enjoy the beauty!


A beautiful tree in bloom...


A peaceful waterfall...


Ah! Serenity

Now on to the party!

Last week was a blast. So may great dishes.  I hope you all found some that you enjoyed.  We had two that really stood out from the crowd, and one that I picked as a personal favorite.


Congratulations on your featured recipe!

by Katie-Kate's Kitchen


by Mimi's Magic Apron

And a personal favorite!

Summer Squash Lasagna Finished
by Little Kitchen big Flavors


Congratulations again!  

So let's party!  I can't wait to see what you all bring this week.  Make sure to tell all your friends so they can join the party as well!

Guidelines:
Please become a follower by joining my site with Google Friends Connect in the right side bar.
Link back to your specific recipe and not to your main site.
Link back to Southern Sundays either in your post, or grab my Southern Sundays Button located in the right side bar.
Please visit a few of the links in the post and say hello to your fellow bloggers!
Enjoy, have fun, cook lots of food, and relish your Southern Sunday!


Friday, August 17, 2012

Corn Cakes


Don't you just love summer!

All the fresh fruits and vegetables.  I'm in heaven!

Today is CORN day.  It's all about corn.  I love corn, sweet, ripe, plump kernals of corn.  I would eat it every day of the summer if I could.  This year the corn is juicy and sweet, but not so plentiful because of the lack of rain for the farms.  So make sure to buy your corn now while the farmer's markets and stores still have some available.  We may run short on it before the end of the season.


Corn is such a versatile item.  You can make it many ways and create so many different dishes with it.  I love grilled corn, corn salad, corn in my salad...I've even tried sweet corn ice cream!  Sounds funny, but it is so delishhh!  


Today we are going to make Corn Cakes.  A great summer side dish.  Typically Southern, but they are popping up every where.  Great served at a brunch with a little honey.  Another great idea is to add a little cheese, or turn them in to small appetizers and add a little latin flavor with some chopped peppers.  How ever you serve them they are fresh and wonderfully tasty.  


Below is a basic recipe, but feel free to add in your favorites flavors.  Enjoy some fresh corn dishes this summer!

Here are some other great recipes with corn:
Mom's Cornbread
Heirloom Tomato and Grilled Corn Salad
Cowboy Salad


Fresh Corn Cakes

serves 4-5

1 c fresh corn kernels (about 2 ears)
1/4 c chopped chives
4 T canola oil
2 large eggs, separated
1/4 c flour
1/4 c yellow cornmeal
1/2 t salt
1/4 t freshly ground black pepper

In a food processor, pulse corn and chives until chopped but not totally smooth. Transfer to bowl and stir in 2 T oil and the egg yolks.

In another large bowl, combine flour, cornmeal, salt, and pepper.   Add to corn mixture and mix well.

In another medium bowl, whisk egg whites until soft peaks form.  Fold into corn mixture.

In a large frying pan, heat 1 T of oil over medium-high heat.   Drop large spoonfuls of the corn mixture into pan (do not spread or flatten).   Cook until edges begin to set and the bottoms are brown, about 2 minutes.   Flip and cook until cakes are brown and cooked through.   Repeat with remaining batter, adding oil as necessary.  Serve hot with a dollop of sour cream or even yogurt mixed with a little chive.  

shared on :
The Weekend Potluck


Thursday, August 16, 2012

Strawberry Freezer Jam


The last of the season's strawberries are among us.

I just went to the farmer's market and bought a HUGE amount of strawberries in order to make my love of them last.  How can it last?  By making freezer jam!

Have you made this yet?  This was my first attempt and I must say, it is easy to do.  Plus, it turned out great. The jam was chunky like I like it and not too sweet. (I cut down the sugar a bit, cause I like it a bit tart) Perfect on homemade biscuits, or on an English muffin, bagel, or toast.  

If you like jam this is perfect for you.  You can use this recipe with any fruit.  Just choose your favorite and cook away!  Next I think I'll make blackberry jam.  I spied a great source for blackberries at the farmer's market the other day.  Plus I love the tart flavor of blackberries.


What makes this easier than normal canning is the process.  You don't have to boil all the jars, and then fill and seal them in simmering water.  None of that.  Just cook the fruit, prepare the pectin, and mix them together.  Freezing your jam removes the need for the canning process.  So this is an easy take on canning.


I hope you enjoy some summer fruit by turning it into jam.  How great would it be to take a bit in January of some fresh strawberry goodness?  Pretty great, I'd say!

What's your favorite item to can?


Strawberry Freezer Jam

makes 5 (1 cup) containers

2 cups crushed strawberries (buy 1 qt. fully ripe strawberries)
3 cups sugar, measured into separate bowl
3/4 cup water
1 box SURE.JELL Fruit Pectin

Stem strawberries and place in a bowl.  Using a potato masher crush strawberries thoroughly.  Measure 2 cups prepared fruit into large bowl. Stir in sugar. Let stand 10 min., stirring occasionally.

In a small saucepan mix water and pectin.  Bring to boil on high heat, stirring constantly. Continue boiling and stirring 1 min. Add to fruit mixture; stir 3 min. or until sugar is almost dissolved.

Fill 5 1/2 pint mason jars or freezer safe containers (1 cup containers) to within 1/2 inch from the top. Wipe off top edges of containers; immediately cover with lids. Let stand at room temperature 24 hours. Jam is now ready to use. It may be stored in the refrigerator up to 3 weeks or you may freeze up to 1 year. Thaw in refrigerator before using.

Tuesday, August 14, 2012

Cherryade


Baby it's HOT outside!

I think we finally caught up to the rest of the country and joined the heat wave party!  We've been in triple digits for well over a week straight and there is no end in site.


Time for some refreshments!  

How would you like to cool off with a homemade drink made from one of the season's best fruits...cherries?   Sounds good, doesn't it.

Yesterday, we had a pool party and a grill night to keep cool in the scorching 107 degree heat.  The Cherryade was the most refreshing drink to have sitting around the pool.  It was fruity and sweet, with a splash of sparkling water.  I'm in love with this drink.


I first tried this drink a week ago during a cooking class at Williams-Sonoma where we were creating recipes with fruit.  This was a huge hit with me and I immediately put it on my "to make" list for the following weekend.  Do you have a "to make" list?  Mine is getting kinda big....I guess I need to either cook more often, or just stop eating...not sure which!

The recipe may seem a little involved, but it's really rather easy to make.   TIP #1:  Make a big batch and use what you need, by the glass.  The cherry concentrate will stay fresh in the frig for a few days.  TIP #2:  Blend the entire concentrate with ice cubes in the blender until they are crushed and you have a slushy consistency.  Then add the sparkling water just before serving.  


This is soooo refreshing, you will never want to buy store bought cherry juice again!  So buy some of this season's wonderful cherries as cherry season is almost over. Both Red and  Rainer cherries will work perfectly in this drink.  You might also want to invest in a cherry pitter.  They are handy little gadgets and make pitting cherries an easy and quick task.  Oxo make a  good one and you can purchase it here.  It's great as an olive pitter too!

Relax with your Cherryade, on the porch, trying to catch a breeze in this heat...and savor the summer...and the cherries!


Cherryade

source: Williams-Sonoma

Ingredients:

2 1/2 cups Bing or Rainier cherries, pitted
1/4 cup sugar
1 fresh thyme sprig
1/4 cup water
1/4 cup fresh lime juice
Ice as needed
Splash of club soda (soda water) (I used sparkling water)

Directions:

In a large saucepan over medium-high heat, combine the cherries, sugar, thyme and water. Cook, stirring occasionally, until the cherries have softened, about 30 minutes. Remove from the heat and let cool. Discard the thyme, then transfer the mixture to a blender and puree until smooth. Strain through a fine-mesh sieve into a pitcher. Stir in the lime juice and refrigerate for at least 30 minutes.
Fill individual Collins glasses with ice. Fill each glass one-third full with the cherry mixture and top with club soda. Serves 6 to 8.  

shared with:
The Weekend Potluck

Sunday, August 12, 2012

Southern Sundays


Welcome to Southern Sundays!

I wanted to share some of  LA's beauty with you this week.  A reminder to take a moment for yourself  and enjoy the beauty around you.  It seems that we get so wrapped up in a hurried life, that's it nice to slow down and take a look around you.  You never know what you may discover!


How majestic is this beauty?   Just look at his colors...beautiful!


How tranquil is this spot?


Wouldn't you just like to sit and reflect here....just peaceful!

So take a moment to look around and see nature's beauty.  Stop and smell the roses, as they say.

Have a wonderful week!

On to last week's party...

We had a wonderful large party last week, with such a variety of dishes!  Thank you all for joining.  I love seeing all the creativeness you bring each week.  I also can't wait to make some of these recipes, my "to make" list is overflowing!

We had several dishes that were very popular!  Take a look and stop by the creator's site and say "Hi!"


Congratulations on your featured recipe!


by Call Me PMc


Congratulations again!  

So let's party!  I can't wait to see what you all bring this week.  Make sure to tell all your friends so they can join the party as well!

Guidelines:
Please become a follower by joining my site with Google Friends Connect in the right side bar.
Link back to your specific recipe and not to your main site.
Link back to Southern Sundays either in your post, or grab my Southern Sundays Button located in the right side bar.
Please visit a few of the links in the post and say hello to your fellow bloggers!
Enjoy, have fun, cook lots of food, and relish your Southern Sunday!


LinkWithin

Related Posts Plugin for WordPress, Blogger...