Wednesday, August 31, 2011

Homemade Hamburger Buns


I love these buns! 

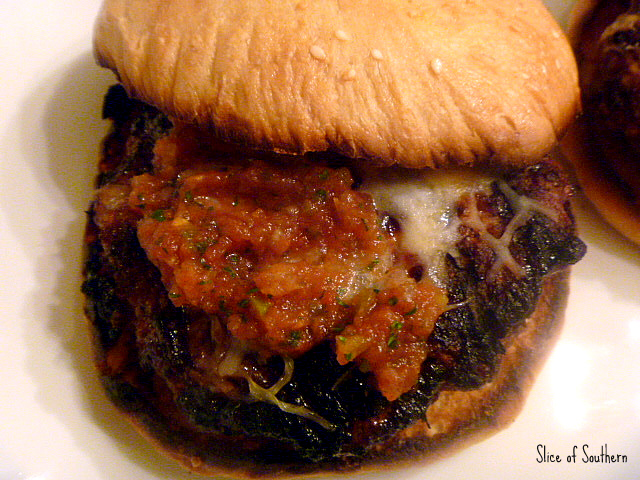
My previous post was for Grilled Santa Fe Burgers.  But what made these extra special was the homemade hamburger buns!

The other day I was perusing one of my favorite blogs Pennies on a Platter.    Nikki has the most wonderful recipes.  Make sure to go over to her blog and say Hi!!  One recipe that totally caught my eye (and there were many I tell you!)  was her Burger Buns recipe.  They looked delishhh and totally fit my plans of making hamburgers over the weekend.  Originally from a recipe in the NY Times, they're called "Light Brioche Rolls" but I call them fantastic! 

What's better than a light, airy, hamburger bun!  These just fit the bill.  The have a buttery flavor, and are a mix between challah and a buttery dinner roll.  This recipe make 8 rolls.  Great as a hamburger bun, but also wonderful as a sandwich roll.  I can see using these for grilled chicken sandwiches or french dips!  I toasted one yesterday and had a hot turkey and cheese sandwich...awesome!

One try and you'll be hooked too!

Here's what they looked like after the 2nd rising and were shaped into buns.


Don't they look wonderful??


Try these...if I can do it so can you!


Homemade Hamburger Buns

Yield: 8 buns

3 tablespoons warm milk
1 cup warm water
2 teaspoons instant yeast
2 1/2 tablespoons sugar
1 1/2 teaspoon salt
1 large egg
3 cups bread flour
1/3 cup all-purpose flour
2 1/2 tablespoon unsalted butter, softened


For topping:
1 large egg beaten with 1 tablespoon water, for egg wash
sesame seeds
Using the paddle attachment of a stand mixer, combine the milk, water, yeast, sugar, salt and egg. Mix in the bread flour and all-purpose flour. Once incorporated, mix in the butter. Switch to the dough hook attachment and knead on low speed until the dough is somewhat tacky, about 6 to 8 minutes.

Transfer dough to a bowl lightly brush with olive oil. Cover tightly with plastic wrap and let rise in a warm place until doubled in size, between 1 to 2 hours.

Line a baking sheet with parchment paper. Divide the dough into 8 equal parts. Gently roll each part into a ball and place on the baking sheet, 2 to 3 inches apart. Cover loosely with lightly oiled plastic wrap and let rise again for 1 to 2 hours. The dough is ready when nearly doubled.
Fill a large metal pan with a shallow layer of water and set on the lowest rack of the oven. Move the other rack to the center position. Preheat oven to 400˚F. Brush the tops of the buns lightly with the egg wash and sprinkle with sesame seeds. Bake buns for about 15 minutes, until golden brown, rotating halfway through. Let cool completely on a wire rack.

Tuesday, August 30, 2011

Grilled Santa Fe Burgers


They say we're going through a "cool down" here in LA.  Considering it was 108 on Sunday and 104 yesterday, I'm not quite sure what "cool down" means. 

When I hear the phrase I think of a nice breezy 76, maybe hitting 80...but certainly not a 4 degree drop! 

But that weather man keeps telling me everyday that the "cool down" continues.  Well, we'll see.  I keep hoping....it's BLAZING outside! 

So Sunday MGG and I decided to do a little maintenance on my car's headlights.  Scrubbing, scraping, buffing, sanding, polishing....and YES in the 108 degree heat!  Crazy huh??

Well this took quite a bit longer than I had planned....3 1/2 hours to be exact...until we accomplished this tedious task! 

Needless to say we were hot, tired, and HUNGRY.  So after a dip in the pool, a cold beer, and some chips and my excellent sweet onion salsa, we decided to grill BURGERS!

So as I often do, I theme my meals.  Today we were going to Santa Fe, New Mexico.  All the wonderful Southwestern flavors we love brought into my menu.  Here's it is.

Menu:
Grilled Santa Fe Burgers
Chili seasoned oven fries
Bush's Grillin Beans - Black Bean Fiesta


I found this great recipe for Grilled Santa Fe Burgers over at Sargento.com.  It sounded perfect, I had all the ingredients on hand....it's a winner!!!  I often use Sargento's cheese because I like the quality and flavor of their products.  They have a great variety to try in the stores!

UPDATE:  Oh, the local news station just said that while we continue to have a "cool down" we are going to have a "warm up" by the end of the week!  Geez! LOL!

So let's make burgers.

This is one of those burgers that has almost everything mixed into the meat.  The secret with doing this is to mix the meat gently and quickly to incorporate all the ingredients.  You don't want to handle the meat too much....you'll end up with tough hockey pucks!  And no one wants to eat a hockey puck!!

So in a medium bowl take your ground beef (I use ground sirloin for flavor, and lower fat content), add in Sargento's Fancy Shredded 4 Cheese Mexican, salsa (my sweet onion salsa works great here!), crushed tortilla chips, onion powder, cumin, garlic powder, plus salt & pepper.


Mix quickly but thoroughly.

Shape in to patties.  Cook them on an indoor or outdoor grill, preheated to medium high heat.  Cook for about 5 - 6 minutes on each side, or until done. 


Add some more Sargento cheese to the top to melt right before they are finished.  Toast your hamburger buns!  (I made homemade hamburger buns as well.  They were fabulous!  I'll give you the recipe tomorrow...promise).  Update:  Here's the link to the Homemade Hamburger Buns!

To serve you can top with some salsa.  MGG wanted cut tomatoes on his.  See how purty???


These were excellent!  Thanks Sargento for a great recipe!!

(Note: Sargento did not sponsor this...all opinions were my own.  I just loved the recipe and their products and wanted to share!)


Grilled Santa Fe Burgers
Adapted from Sargento.com
Serves: 4
Ingredients:
1 lb ground beef
1 cups shredded Sargento’s Fancy Shredded 4 Cheese Mexican
1/4 cup salsa  (I used my Sweet Onion Salsa)
1/4 cup crushed tortilla chips
1 ½ t onion powder
1 teaspoon cumin
1/2 teaspoon garlic powder
Salt & pepper
4 hamburger buns  ( I used my Homemade hamburger buns)
Toppings:
Lettuce (optional)
4 tomato slices (optional)
Sargento’s Fancy Shredded 4 Cheese Mexican shredded cheese (melted on top) (optional)
Salsa (optional)
Directions:
In a medium bowl, combine the beef, 1 cup of cheese, 1/4 cup salsa, tortilla chips, onion powder, cumin, garlic powder, salt and pepper (to taste). Lightly shape into 4 patties. Don’t overwork the meat or it will become tough.
 
Cook on the preheated grill over medium high heat for about 5-6 minutes per side.  If you are melting cheese on the burger, top with a good mound of cheese 1 minute before the end of the cooking time.  Close the lid on the grill to melt cheese.  Toast hamburger buns on the grill during the last 2 min of cooking.  To assemble burgers:  place hamburgers on the bottom bun.  Top with salsa, lettuce, and tomato if desired. 

Sunday, August 28, 2011

Strawberry Banana Muffins


Sometimes things are just better with a partner.

Take Laurel & Hardy....Lewis & Clark...Batman & Robin...Donny & Marie...Adam & Eve...Abercrombie & Fitch...Peanut Butter & Jelly

...or
Strawberries and Banana 

A match made in Heaven!

While looking at one of my favorite sites, JoyofBaking.com I found this combo in a muffin.  You know how I LOVE muffins! 

I was in luck, I had 1 banana and a handful of strawberries...just enough to make a small batch of muffins for Sunday breakfast!

So I adapted the JoyofBaking.com recipe to fit a smaller crowd.  Making 6 muffins instead of 12, and I substituted Splenda brown sugar for the real stuff to cut down on the carbs.  The result?  Fabulous!

Great flavor, moist, tender, and fruity!  Just like a smoothie in a muffin!  So for your next Sunday family breakfast, try a muffin...a Strawberry Banana muffin!  It's sure to be a hit with the whole family!!

So let's make muffins.

Take your butter and melt it in a saucepan on the stove or in a bowl in the microwave.  Let it cool.

In a medium bowl, mash your banana.


Add your egg and vanilla extract.  Mix well.


Add your melted butter (cooled so it won't curdle the egg!) and mix well.


In another large bowl, add your flour, brown sugar, baking powder, baking soda, cinnamon, and salt.  Mix to combine.


Chop your strawberries in to bite sized pieces.


Add your strawberries to the flour mixture.  Fold in to coat with flour.


Add your wet ingredients to the dry one.  Stir only enough to get everything moistened.


It should look like this.


Prepare a 6 cup muffin pan by spraying it with vegetable spray.

Fill muffin cups using an ice cream scoop, or 2 spoons.  I fill mine pretty full, cause I like em that way!


Bake in a preheated oven at 425 degrees for 20-25 minutes.  Mine were done at 22 minutes.

Voila!  Look at these babies!!!!


Want some???


Strawberry Banana Muffins

Adapted from JoyofBaking.com

1/4 cup (1/2 stick) unsalted butter, melted
1 large ripe banana, mashed (about 1/2 cup)
1 egg
½ t pure vanilla extract
1/2 c fresh strawberries, diced into bite sized pieces
1 1/8 c all-purpose flour
1/3 c light brown sugar or equivalent in Splenda Brown sugar
¾ t baking powder
1/8 t baking soda
½ t cinnamon
1/4 t salt

Preheat oven to 350 degrees F.  Lightly spray a 6 cup muffin pan with a vegetable spray.

In a small saucepan or microwave oven, melt the butter. Let cool to room temperature.
In a medium sized bowl mash the banana.  Add egg and vanilla extract and whisk together. Add the melted butter and stir to combine.   

In another large bowl combine the flour, sugar, baking powder, baking soda, cinnamon, and salt. Gently fold in the berries, making sure they are coated with flour. (This helps to prevent the berries from sinking during baking.) Add the wet ingredients to the dry ingredients and stir only until the ingredients are just combined. Do not over mix the batter or you will get tough muffins. 
Divide the batter evenly among the 6 muffin cups, using two spoons or an ice cream scoop. Place in the oven and bake until a tester inserted in the center of a muffin comes out clean, about 20 to 25 minutes. Transfer to a wire rack to cool. Muffins can be stored for a few days at room temperature.

Makes 6.   Preparation time: 20 minutes.

Friday, August 26, 2011

Product Review: Williams-Sonoma The Ultimate Burger Starter


Don't you just love trying new products in search of "GOLD"??

Found it!

With this product I hit the Motherload!

Seriously.

Back in June I was attending a technique class at the Williams-Sonoma store and spotted an item of interest way across the room.  I could hardly stand it not being able to pick it up and read the ingredients as the class was only half way through.  Classes are GREAT there, by the way.  I recommend taking one if have the ability to do so!

So when we finished I scurried right over and nabbed a jar of their "The Ultimate BURGER STARTER".


Click on this link to see the product on their site:  The ultimate burger starter
Here's what Williams - Sonoma says about it:

The world’s best burgers begin with our savory seasoning blend. Quick and easy to use, it’s the simple secret to juicy, succulent meat with incomparable flavor.

  • Classic American recipe pairs sweet caramelized onions with a signature medley of herbs and spices.
  • Dijon mustard, roasted garlic and aromatic Worcestershire sauce add depth and complexity.
  • Perfect for grilling or panfrying ground beef, turkey or pork.
  • Also great for meatballs.
  • Quick and easy – just combine 2 tsp. Burger Starter per 1/4 lb. of ground beef or turkey and cook as desired.
  • 10 oz.
  • A Williams-Sonoma exclusive.
Ingredients: Sweet onions, natural roasted onion flavor, kosher salt, dehydrated roasted garlic, dijon mustard (distilled vinegar, mustard seed, salt, water, white wine, citric acid, tartaric acid, spices), extra-virgin olive oil, black pepper, brown sugar, italian flat-leaf parsley, garlic powder, worcestershire concentrate (vinegar, molasses, corn syrup, water, salt, caramel color, garlic powder, sugar, spices, tamarind, natural flavor), dehydrated onions, mustard powder, citric acid


Review:  I don't usually like to add stuff to my burgers.  Boy was I wrong...  Now I'm converted.  This product is the BOMB!  It's depth of flavor from the onion and Worcestershire sauce give it a great beefy flavor.  It just adds a zest to the burger, like a gourmet restaurant style meal.  You only need to use a very small amount per burger, so this will last a long time!  Good cost savings there.  The item prices at $10.00 for 10 oz. 

You can add it to your grilled burgers, or the ones you pan fry on the stove.  It would be excellent in meatloaf, or meatballs!  Try it with Salisbury steak too!

You HAVE to try this....I kid you not.  I'm stocking up on this baby!  I even bought one for my sister, Sue, and my mom in Tennessee.  This product is on my A list of items I use often.

Here's a pic of our 4th of July burgers where I used this.  MGG says MMMMGood!


Wednesday, August 24, 2011

Sweet Onion Salsa


Salsa is fat-free, fresh-tasting, and so flavorful. 
 I'm addicted.

So when I ventured into making fresh homemade salsa I couldn't believe I hadn't made it before!  I have been making my Salsa Roja almost every week!!!  I told you I'm addicted.

So I thought I would change up the flavors a bit and bring out some onion flavor.  So I decided to make a sweet onion salsa.  This is a smaller batch than my other recipe, but you can adjust it to make more if you like.  This makes around 3 cups or so.  It packs a great onion punch, leaving out the garlic so it doesn't compete with the flavors.  I also added more jalapeno to this recipe to zip up the spice factor.  You can always adjust the chili to you level of heat you like.

Another thing about salsa is the versatility it lends to other dishes.  Here are a few ideas:

  • Add to scrambled eggs
  • Add to rice
  • Use as a burger topping
  • Top a baked potato
  • Use as a sauce for cooking salsa chicken
  • Add to ground beef and use for taco or nachos
  • Mix with ranch dressing to make a zesty salad dressing
  • Mix to sour cream and mayo for a great dip
  • Mix with guacamole to zip of the flavor.

So here's my recipe for Sweet Onion Salsa.  I hope you enjoy it!


For my Salsa Rosa recipe click here.


Sweet Onion Salsa


Ingredients:

1 14 oz can of whole or diced tomatoes

½ of a sweet onion such as Vidalia or Walla Walla
1 jalapeno, chopped (add less for a milder taste, remove membranes and seeds as well for less heat)
¼ of a bunch of cilantro – roughly 1 good sized handful
Juice from ½ a fresh lime
1/4 t kosher salt  
A pinch of sugar

1/3 t cumin

Directions:
 
Add all ingredients to a 10 cup capacity food processor.  Pulse until you get your desired consistency. Taste and adjust seasoning as desired. Place in a large container and chill to blend flavors.  Leftovers can be stored in the refrigerator up to three to four days. Makes about 3 cups.

Tuesday, August 23, 2011

Beef Enchiladas


I so enjoyed my time visiting with my mom in Tennessee.

One tradition she started is to have her "fabulous" Pot Roast ready and waiting for me when I arrive.  This visit was no exception.  Her pot roast is a family favorite and no one makes it as good as she can.  It's succulent and juicy, it just falls apart!

Click on the link to get the recipe for Mom's Famous Pot Roast .  It's well worth it!


So what to do with all that left over roast beef? 

Well, we could make beef hoagies or french dip sandwiches...but being from California we LOVE Mexican food.  Franklin, Tennessee has a couple of Mexican restaurants around town, but they are different from the Mexican food you get in LA.  And, mom misses her Mexican food!!!  So I decided to give her a mexi-fix.  We needed to make something quick and easy.  Beef Enchiladas!

So simple, lots a spicy flavor, and on the table in a flash!

Let's make Beef Enchiladas.

First, make the filling. 

Take your leftover pot roast and shred it up and place it in a medium sized bowl.  Add a good amount of Rotel Mexican using the juices as well!  This has great flavors with diced tomatoes, chilies, cilantro, and lime.  Add a good amount of shredded Monterey Jack cheese...and then add some more!  Mix well.

Pour some enchilada sauce in the bottom of a pan.  Pan size depends on how many you are making.  We used an 8x8 pan, making 4 enchiladas.  Take a 6 inch flour tortilla and place some of the beef filling down the middle of the tortilla.  Roll them up putting them in the pan seam side down.

Top with enchilada sauce and more shredded cheese.


Look how cute she is!!


Pop them in a preheated oven at 350 degrees for about 15-20 minutes until bubbly hot and cheese is melted.


That's it!  Simple as that...your done...now go eat!!

YUM!!!


Hope you try these with your leftovers, they are really easy and pack a flavor punch!


Beef Enchiladas

makes 4 enchiladas

Leftover pot roast, shredded
1/2 can Rotel Mexican with juices
1/2 c. Monterey Jack cheese, shredded  (pepper jack would be awesome as well!)
1 can Enchiladas Sauce (I used Ole' El Paso)
4 - 6" Flour Tortillas

Make the filling by placing shredded pot roast in a bowl.  Mix in a good amount of Rotel Mexican along with some juices.  Add shredded cheese and mix well.

In an 8x8 pan pour some Enchilada sauce in the bottom of the pan.  Take a flour tortilla and spoon some beef filling down the middle.  Roll up the tortilla and place in the pan, seam side down.

Pour rest of the enchiladas sauce over the top of the tortillas and top with more shredded cheese.

Place in a pre-heated oven at 350 degrees.  Bake for 15-20 min until hot and bubbly.


Monday, August 22, 2011

Fast & Fresh: Greek Pizza


Sometimes you just want an easy throw together meal.  

That was today for me...

So instead of calling out for a pizza I decided to make my own.  But hey, let's try a different style of pizza than my normal standby. 

Let's make a Greek Pizza!  Sounds good huh? 

Like a Gourmet pizza in a flash!

You'll love the tasty toppings on a ready-to-go dough or a pre-made crust.  Even make your own dough if you are so inclined.  But the ease of this is making it fast.  This uses the oven for only a short time, and having a tasty, satisfying meal ready when you are!

Many supermarket's sell ready to use pizza dough.  I got a whole wheat dough at "Henry's Market" (aka Sprouts) and I've seen them at Trader Joe's.  But a Boboli will do as well if you like.

So let's make a Greek Pizza!

First preheat your oven to whatever degree your dough package states.  Mine was 425 degrees.

Roll out your dough and shape it as desired.  Brush on some olive oil over the crust and bake it for 5 min.


Scatter thinly sliced, seeded Roma tomatoes all over the pizza.  Sprinkle with minced fresh Oregano, Mint leaves, and Garlic.  Make sure to leave about a 1/2' border around the pizza.


Add some Lemon zest, and crumbled Feta Cheese.  Drizzle with some more olive oil and bake until the crust is golden brown, about 10 min.


YUMMY!

Fast & Fresh!


Greek Pizza

Using a pre-made dough.  Preheat oven as directed on package.  Roll out dough.  Brush with Olive Oil.  Bake 5 min.  Leaving 1/2" border around the pizza, scatter thinly sliced, seeded Roma Tomatoes on pizza.  Sprinkle with minced, fresh Oregano, Mint leaves, and Garlic.  Add Lemon zest, and crumbled Feta Cheese.  Drizzle with more olive oil.  Bake until crust is golden brown, approx. 10 min.


Linked to:  Melt in Your Mouth Monday
Linked to:  Your recipe my kitchen
Linked to:  Tuesdays at the Table

Sunday, August 21, 2011

Fast & Fresh: Marinated Heirloom Tomato Salad


One of summer's the most versatile fresh vegetables is the TOMATO!

To this day my mom plants a tomato plant every year in anticipation of the luscious, juicy, ripe red tomatoes.  Oh, and my sister planted a Roma tomato plant this year.  I LOVE Roma's.  Unfortunately, so do her squirrels!  I haven't tried my hand at planting tomatoes yet but I sure love to eat them!

On a recent visit to my local farmer's market I spotted a bunch of HEIRLOOM TOMATOES.  All colors, shapes, and sizes.  I was in heaven.  Love those things!  Must be the color varieties.  They just lend such a pretty palate to your dishes.

So what to create?  I wanted a simple side dish that would highlight the pretty colors, and fresh flavors of the tomatoes.  So I found this recipe for Marinated Heirloom Tomatoes Salad from Sunset Magazine.  It was perfect!

The taste was light and refreshing.  The marinade has a ratio that is more vinegar to oil, so it is nice and tangy.  SO YUMMY!  This would be great as a side dish to a picnic, a potluck dish, or along side a grilled dish.  We served it along side my Grilled Chicken and Avocado Pitas.  Fabulous, if I may say so.

So what can be more Fast or Fresh than this???

Try it, you'll love it!


Marinated Heirloom Tomato Salad
Source: Sunset Magazine 

Ingredients
3 tablespoons red wine vinegar
2 tablespoons extra virgin olive oil
3 pounds mixed heirloom tomatoes
3 tablespoons chopped fresh mint leaves
3 tablespoons chopped fresh basil leaves
Salt and black pepper


Directions
In a small bowl, whisk together vinegar and oil. Rinse and core tomatoes and slice 1/3 to 1/2 inch thick. Arrange in layers in platter or serving dish.  Drizzle vinegar mixture and sprinkling mint, basil, salt, and pepper evenly.

Chill for 30 minutes or up to 4 hours. Bring to room temperature before serving.


Linked to:  fresh food friday

Thursday, August 18, 2011

Home Sweet Home

There's nothing like flying in to Los Angeles at night...

A gorgeous sunset to guide us...


The vastness of lights that seem to go on forever...


This was my view flying home last night...

Just came back from Nashville, TN.  I had such a good visit with my family, but they always seem to be too short!

Don't miss the humidity though....boy oh boy was it hot...and that humidity messes with my hair!

Great ride in the country...isn't this pretty?  Love the black fences!


Look at this park...I bet Rocky would love those steps!


Lots of food, lots of fun! I'll share some of the great things we cooked soon...but for now,
it's Home Sweet Home for me!


LinkWithin

Related Posts Plugin for WordPress, Blogger...