Sunday, May 29, 2016

Happy Memorial Day! A Cooking Class at Vom Foss

Image result for memorial day

It's Memorial Weekend and I hope that everyone is have a fun filled holiday!

We'll be spending time with friends, planning a big cookout with lots of food and fun around the pool! It's so nice to have an extra day or two off from work to relax and enjoy the start of summer.

I wanted to tell you about something special that I did last weekend.

On the spur of the moment I decided to attend a "No-Cook Sauces" class down in San Diego, taught by one of my favorite chefs, Phillis Carey.  The class was held at Vom Fass.  If you don't know about Vom Fass, please read on. They are a specialty store with roots in Germany that specialize in fruit vinegars, exquisite oils, selected wines, outstanding liqueurs and unique spirits. All from the very best producers from all over Europe. "Vom Fass' or "from the cask" carries the most unique items I've seen in a long time. I was like a kid in a candy store! Beautiful casks line the walls that hold specialty oils and vinegars that are there for your tasting. They offer you a selection of varied size bottles to chose from for your purchase and they are filled directly from the casks. This store is a dream!

Today Phillis was there to share with us some Cool No-Cook Sauces using the oils and vinegars from Vom Fass. So MGG and I drove down to the class and decided to make a quick overnight getaway for ourselves! Why not turn this in to a relaxing weekend. Since the class was only 1 hour, he dropped me off and he went exploring in Hillcrest and I went to class. 


First up, a Raspberry Balsamic Champagne Spritzer that was to die for! Then came the sauces which were an Argentine Chimichurri Sauce served over thinly sliced beef on a toasted crostini, and an Italian Salsa Verde severed over cooked shrimp. She also made a Papaya/Mango Poppy Seed Ginger Sauce served as dressing on a mango salad (HEAVEN!) and a Red Currant Raspberry Sauce served over fresh fruit. (I'll be serving this fruit salad at my Memorial Day cookout, so stayed turned for that recipe!)

Needless to say, the class was perfect, the food heavenly, and I spent A LOT of money in that store! A big shout out to Phillis Carey. She is such a wonderful chef.  I've been following her for years. She used to teach at a local Gelson's Cooking School, and then at the Westlake Culinary Institute, but sadly both locations have closed their doors. She's based out of Carlsbad and teaches all over the San Diego area, so I'm so glad I got to go down and take another class of hers. If you are in the San Diego area, look her up at http://phillis-
carey.blogspot.com and take a class. You won't believe how much you will learn from her!

Enjoy the holiday weekend!


Friday, May 20, 2016

Picnic in the Park: Banana Pudding Jars


Yum

I hope everyone is enjoying the May weather.  We sure are!

Spring has sprung and it's been hot one day and cool the next.  We've also got some Grey May going on here in the mornings.  Not to worry, it burns off by afternoon and then the sun is shining and everyone is outdoors enjoying the cool weather until our scorching summer comes along.

Today we are continuing with our Picnic in the Park theme.  I love picnics don't you?  It's such a great way to enjoy nature, family, and friends....oh and let's not forget the food.  The other day I showed you how to make a great Mediterranean Chicken wrap with some delicious grilled chicken.


Today we are talking desserts.  Oh yea!

Now I always find it hard to take along a good dessert to a picnic or concert in the park.  Since I gravitate toward ice cream, that would end up in a melted mess, so that's out.  So I develop my desserts around the container...mason jars! MASON JARS are the perfect solution for so many toteable things.  Things like salads both green and pasta salads are perfect in jars.  How about drinks? Another winner, and there's no spillage with the lid on!  So of course desserts are also perfect in jars.

Mason jars are hearty, and roomy.  I've even baked the dessert in them, like with my Peach Raspberry Crisps.  I've also used them for my Take Along Smore's.


Today I'm thinking "southern" dessert, and Banana Pudding in mason jars is calling me.  Listen carefully...hear that?  It's calling you too. Seriously, you need to make these sweet little desserts and take them somewhere!  now!  Kids love that wonderful flavor and the vanilla wafers that turn into cakey goodness...HEAVEN!  

This is something that the whole family will enjoy!


Banana Pudding Jars


Servings: 6


For the Pudding:
3/4 cup sugar
1/4 cup + 2 tablespoons cornstarch
Heaping 1/4 teaspoon salt
6 egg yolks
3-1/2 cups whole milk
2 tablespoons unsalted butter
1 tablespoon vanilla extract

For Assembling:
3 medium bananas, ripe, and sliced
1 box Vanilla Wafers
6 Pint size Mason Jars


In a medium saucepan, stir together the sugar, cornstarch, salt and yolks. Whisk in the milk and bring to simmer, stirring frequently, over medium heat 5-8 minutes. When the mixture starts to bubble, turn the heat down to low and continue cooking, whisking constantly, for 1-2 minutes until the mixture thickens. Remove the pan from the heat and immediately whisk in the butter and vanilla.

Transfer the mixture to a bowl and place a piece of plastic wrap or waxed paper directly on the pudding to prevent a film from forming. Chill in the refrigerator until cool about 2 hours.

To assemble, place one vanilla wafer in the bottom of each mason jar.  This will create a cake layer on the bottom. Spoon a large dollop of pudding on top. Add a layer of vanilla wafers standing up against the sides of the glasses around the circumference of the jar. Layer on some sliced bananas on top of the pudding. Add another layer of pudding and bananas.  Top with crushed vanilla wafers if desired.  Top jars with the lid to securely close.  Place in the refrigerator for another hour.  You may top them with whipped topping or whipped cream before eating if desired.  


Sunday, May 15, 2016

Picnic in the Park: Mediterranean Chicken Wraps


I so glad that spring has been really good to us lately.  I love being outdoors!

Most weekends you can find us hiking, swimming, hanging at the beach or eating alfresco.  While the weather has been a little up and down lately we've had a perfect day for a picnic in the park!  So I seized the moment and packed us a scrumptious lunch, packed the blanket and headed to Griffith Park for an afternoon of leisurely fun and food.


I just love, love, love...all of our wonderful parks.  Griffith Park is a landmark in Los Angeles.  It's a huge 4300 acre area that houses the LA Zoo, the LA Observatory, the Greek Theatre among all the natural reserves that house a multitude of wildlife.  There are many trails for hiking and designated picnic areas.  It's a great place to spend the afternoon.

So we drove to a perfect picnic spot and started unwrapping out food goodies.  First up are these tasty Mediterranean Chicken Wraps.  Oh boy are these good!  Last night we grilled a Greek Lemon Chicken and I made sure we had leftovers for another use.  Perfect, as these were cut up and used in these wraps.  The rest of the ingredients are fresh veggies rolled up in a tortilla with the chicken and a sprinkling of cheese.  There you have it!  The perfect, portable, sandwich.  


A big bonus is you can eat them with your hands...less silverware.  Yea! The kids, heck, the whole family will love them.  They really are the perfect picnic dish.  They would be great to take to a concert in the park...hmmm I'm thinking Hollywood Bowl!  They have all the great flavors of the Mediterranean.  Simple, smart, tasty, and filling.  What better than that?

Enjoy!


Mediterranean Chicken Wraps

serves 2

Ingredients:
2 8-inch tortillas or wraps
1 grilled chicken breast, cut in slices
1 cup of romaine, chopped
1 small red bell pepper, cut into strips
1 medium tomato, cubed
1/2 cucumber, seeded and julienned
2 oz feta cheese, crumbled

Directions:

Lay out two tortillas.  Divide the chicken, lettuce, bell pepper, cucumber and place them down the center.  Top with feta cheese.


Fold in two opposite sides of the tortilla toward the middle. Then roll the long side over, rolling tightly like a burrito to enclose all the ingredients.  Secure with a toothpick if needed.  To serve cut the wraps in half slicing on the diagonal.  

Serve and enjoy!

Note:  If you are taking these to another location, make sure to wrap them in parchment paper or aluminum foil to keep them fresh.


Tuesday, May 10, 2016

Springtime Brunch: Strawberry Sour Cream Muffins


I love springtime.  It makes me want to eat outside and have brunch!

I can't think of a better way to celebrate the nice weather of spring than having a brunch filled with foods that speak 'spring'.  Omelets with asparagus, mushrooms, and peas come to mind.  So do strawberries.  We see the first of our strawberries in the spring and they peak around May.


One perfect way to feature these luscious babies is to bake them into some muffins. Not just any muffins though.  This is a brunch...it deserves a little decadent muffin. One with sour cream in it to make it soft and tender.  Oh the joy of a strawberry muffin!

I've used a basic recipe and even provided you with lower carb options should you choose.  Either way you make them they will turn our fantastic!  Perfect for your spring brunch menu.


Remember, if you can't find some good juicy strawberries yet, then use frozen ones. They will work just as well, and you don't have to thaw them!

Enjoy the spring weather!


Strawberry Sour Cream Muffins


Makes 12


2 c flour
1 T baking powder
1/8 t salt
½ c sugar or ¼ c Splenda sugar blend
2 large eggs
1 c sour cream
6 T canola oil
1 t vanilla
1 c frozen or fresh strawberries, chopped

Preheat oven to 400 degrees. Spray a 12 cup muffin tin with non-stick cooking spray or line with paper liners.

In a large bowl add flour, baking powder, salt, and sugar. Stir to combine. In another small bowl lightly beat eggs. Add in sour cream, oil, and vanilla. Beat slightly to mix. Pour the wet ingredients into the dry ingredients. Stir until moistened. Do not over mix. Fold in strawberries.

Spoon batter into the prepared muffin tin. Bake for about 20 minutes or until golden brown. Allow to cool 5 minutes in the pan, then remove to a wire rack to cool completely.


Sunday, May 8, 2016

Fresh Strawberry Milkshake


Ice cream is a weakness of ours.

We just love the creamy goodness but sometimes we like to shake it up a bit from our usual scoop of ice cream.

This time we turned our favorite dessert into a creamy, dreamy, Fresh Strawberry Milkshake!  Oh man was it good! We had just come from the farmers market and had bought extra strawberries to make a shortcake with but I couldn't help myself, and decided to put them in a milkshake.


Now I typically gravitate toward a chocolate milkshake, but something about these strawberries were calling me.  Might have been the nice spring weather, or the bright red colors. Whatever it was I was disappointed because these berries were just delicious!

A milkshake is easy to make, you just through everything in the blender and turn it on.  Voila, a perfect milkshake is born.


So now we are sitting on our patio enjoying the beautiful cool weather and a delicious Fresh Strawberry Milkshake.  Life is good!

Enjoy!


Fresh Strawberry Milkshake

serves 4

8 ounces strawberries, cored and sliced
1/2 teaspoon pure vanilla extract
1 pint low-fat vanilla ice cream
1/4 cup 2% milk


Pour all ingredients into a blender and blend until smooth. Pour into glasses and serve immediately.


Wednesday, May 4, 2016

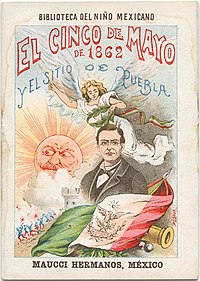
It's Cinco de Mayo Time!


It's Cinco de Mayo Time!

This holiday is really big in Los Angeles. A wonderful celebration of Mexican heritage and pride, marking the victory over the French in the Battle of Puebla. Just around the corner it land this year on Monday, May 5th. The poster above is from 1901 in honor of the victory.

So what better way to celebrate than with food? I can't think of anything. Of course in Los Angeles, we can go down to Olvera Street, which is located in the oldest part of Downtown, Los Angeles. This area was established by Spanish settlers back in 1781 and today the area is a modern Mexican-style marketplace with vendors and restaurants to enjoy the culture that abounds.

And the food is to die for...!

So today, I've gathered some of my favorite Mexican dishes that would be perfect for your Cinco de Mayo celebration!


Grab Some Tortilla Chips - 


Chunky Guacamole


Black Bean Salsa

Twisted Tacos 


Baked Tacos


Chicken Verde Tacos


Tex-Mex Soft Tacos


Main Dishes!


Black Bean Tostadas


Baked Chicken Taquitos


Black Bean Burritos


Beth's Favorite Chicken Enchiladas


Latin Empanadas


Cilantro Lime Flank Steak with Avocado Poblano Salsa


Let's not forget dessert!


Mexican Chocolate Pudding

Sunday, May 1, 2016

Slow Cooker Pepper Steak


I am obsessed with my slow cooker!

Here is another meal that I made using my new Breville Risotto Plus, which is a multi-tasker (steams, sauté's, slow cooker etc.) but any slow cooker will work just fine.

I had several bell peppers left over this week and I thought I better put them to good use.  Remembering my mom making Pepper Steak growing up I decided to re-create this for the slow cooker.  This technique allows you to use a tougher cut of meat that will be melt in your mouth tender once it's done!  I used a top round steak, which is perfect since it will hold it's shape in long strips and doesn't shred on you unless you cook it too long.


My version of Pepper Steak doesn't completely have an Asian flavor.  I don't recall my mom's being Asian in flavor, so I guess that why mine turned out a variation on the typical dish.  Mine included a little soy, but the big bang is the tomatoes and the seasoning sauce from Dales, or beef broth that you put in the dish.  Of course the end result is certainly about the peppers and the beef, and it's delicious!


Kitchen Note:  I don't really want soggy peppers in this dish so I put the peppers in the slow cooker about 2 hours prior to serving.  They were slightly tender, so if you want yours more on the crisp side put them in 1 hour before serving. 


**You can find Dale's (low sodium) Seasoning Sauce here.


Slow Cooker Pepper Steak


Serves:  4

Cooking time:  6 hours
Total time:  6.5 hours

1 lb top round steak, cut into strips
1/2 tsp garlic powder
1/2 red onion, diced
1/4 cup water
3 Tablespoons Dale's Low Sodium Seasoning Sauce (or use beef stock)
1 teaspoon cornstarch
1 14oz can of stewed tomatoes, with the juice
3 Tablespoons soy sauce
1 orange bell pepper, cut into strips
1 red bell pepper, cut into strips

In a skillet over high heat add steak and saute 2 minutes until browned on each side.  Add steak to the slow cooker.  Sprinkle garlic powder over the steak.  Add the diced onion.  In a small bowl add water and seasoning sauce plus the cornstarch and whisk to combine.  Add to the slow cooker.  Note:  you can use beef broth in place of the water and seasoning sauce, adding cornstarch to it.

Add the tomatoes and their juice, and the soy sauce to the slow cooker.  Cover and cook on low 6 hours.  2 hours prior to the end time add the bell pepper strips, recover and continue cooking.

Serve over rice, or even mashed potatoes.


LinkWithin

Related Posts Plugin for WordPress, Blogger...