Showing posts with label bbq. Show all posts

Tuesday, July 7, 2026

Grilled Flank Steak with Salsa Rossa Piccante & Crispy Roasted Potatoes


Fire up the grill for this Grilled Flank Steak with Salsa Rossa Piccante & Crispy Roasted Potatoes. Herb-marinated flank steak is grilled to perfection, served with a bold roasted red pepper and tomato sauce, and paired with crispy roasted potatoes for an easy steakhouse-inspired dinner at home.


Grilled Flank Steak with Salsa Rossa Piccante & Crispy Roasted Potatoes


Doesn't a perfectly grilled steak instantly make dinner feel like an occasion? Add a vibrant homemade sauce and a pan of crispy roasted potatoes, and suddenly an ordinary evening feels just a little more special—all without leaving home.

This Grilled Flank Steak with Salsa Rossa Piccante & Crispy Roasted Potatoes is one of those meals that looks like it came from your favorite neighborhood steakhouse, yet it's surprisingly approachable to make in your own kitchen. A simple herb marinade of fresh rosemary, thyme, smoked paprika, and garlic gives the flank steak incredible flavor, while the Salsa Rossa Piccante—a rich combination of roasted red peppers, San Marzano tomatoes, shallots, garlic, and a touch of red jalapeño—adds bold Italian-inspired character without overwhelming the steak.

The crispy roasted potatoes round out the meal with very little extra effort, making this a complete dinner that's equally suited for a relaxed weekend with the family, casual entertaining, or an at-home date night. It's the kind of recipe that feels impressive when you set it on the table, but it's built from simple ingredients and straightforward techniques that anyone can master.

One of my favorite things about this meal is how beautifully everything comes together on the plate. A generous swipe of the warm Salsa Rossa Piccante, perfectly sliced steak arranged on top, and crisp golden potatoes alongside create a restaurant-style presentation that's easy enough to recreate in your own kitchen. It's proof that sometimes the most memorable dinners don't have to be complicated—they just need good ingredients, a little care, and a recipe you'll want to make again and again.

Enjoy!


-- Ingredients


  • Flank Steak - An affordable cut that becomes wonderfully tender when marinated and sliced thinly across the grain.
  • Fresh Rosemary & Thyme - Fresh herbs infuse the marinade with savory flavor that complements the grilled steak beautifully.
  • Spices: Smoked Paprika, Cayenne, Garlic Powder, Dried Oregano
  • Red Wine Vinegar & Olive Oil
  • Jarred Roasted Red Peppers - The foundation of the Salsa Rossa Piccante, adding natural sweetness and beautiful color.
  • San Marzano Tomatoes - These tomatoes create a rich, smooth sauce with balanced acidity.
  • Shallots & Garlic - Build layers of flavor that make the sauce taste like it simmered for hours.
  • Red Jalapeno - for a little heat - omit if you don't want it spicy.
  • Baby Gold Potatoes - Roast beautifully with crisp edges and creamy centers, making them the perfect side for this steak dinner.
  • Italian Parsley - optional topping for the potatoes.


-- Equipment

  • Outdoor grill or grill pan
  • Large bowl or zip-top bag for marinating
  • Small saucepan
  • Sheet pan
  • Tongs
  • Instant-read thermometer
  • Sharp carving knife
  • Cutting board

My Go-To's


-- Let's Make It Together

Whisk together the herb marinade, coat the flank steak well, and let it marinate for at least an hour while the flavors develop.

As the steak comes to room temperature before grilling, prepare the Salsa Rossa Piccante by sautéing the shallots, garlic, and jalapeño before adding the tomatoes and roasted peppers. Let the sauce simmer gently until slightly thickened.

Roast the potatoes until deeply golden with crisp edges and fluffy centers.

Grill the steak until it reaches your preferred doneness, then let it rest before slicing thinly across the grain. Serve over a generous swipe of warm Salsa Rossa Piccante with the crispy potatoes alongside.


-- Perfecting the Cooking Process

The two biggest secrets to this recipe are patience and slicing. Giving the steak time to marinate builds flavor from the inside out, while allowing it to rest after grilling keeps the juices where they belong. When it's time to carve, always slice across the grain into thin slices. This shortens the muscle fibers, making flank steak remarkably tender with every bite.


-- Add Your Touch

This dinner is easy to customize with a few simple swaps.

  • Substitute tri-tip or skirt steak if preferred.
  • Add grilled asparagus or broccolini alongside the potatoes.
  • Finish the steak with shaved Parmesan for an Italian-inspired twist.
  • Stir fresh basil into the Salsa Rossa just before serving.
  • Serve with grilled rustic bread to soak up every bit of the sauce.


Set the Mood

Part of the joy of cooking is creating a little moment around the meal. Here are a few simple ways to set the mood when serving this dish.


Some dinners manage to feel both comforting and a little bit special, and this is one of them. The herb-marinated flank steak, vibrant Salsa Rossa Piccante, and crispy roasted potatoes come together to create a meal that looks impressive but is surprisingly easy to pull together. It's the kind of dinner that's just as fitting for a quiet weekend at home as it is for sharing with friends around the table.

If you enjoyed this recipe, you might also like my Italian Picnic Sandwich for a Crowd, Sicilian Lemon Butter Chicken with Garlic Thyme Rice, or Grilled London Broil with Grilled Nectarine, Corn, Tomato, & Burrata Salad for more fresh, flavorful meals that feel special without being complicated.

Happy cooking!

Beth ❤️


Before You Start


Why Marinate the Steak?
The herb marinade adds flavor while helping tenderize the flank steak. Even one hour makes a noticeable difference, but up to four hours develops even deeper flavor.

Why Let the Steak Rest?
Resting allows the juices to redistribute throughout the meat. Cutting into the steak too soon causes those flavorful juices to run onto the cutting board instead of staying in each slice.

Why Slice Against the Grain?
Flank steak has long muscle fibers. Slicing across them shortens the fibers, making each bite much more tender.

Can I Make the Sauce Ahead?
Yes! The Salsa Rossa Piccante can be made one or two days ahead and gently reheated before serving, making dinner even easier.

How Do I Know When the Potatoes Are Done?
Look for crisp, golden edges and tender centers. Turning them halfway through roasting helps them brown evenly on all sides.

Can I Cook This Indoors?
Absolutely. A grill pan or heavy cast-iron skillet works beautifully if outdoor grilling isn't an option.


Saturday, May 2, 2026

Mediterranean Quinoa Salad (Fresh & Flavorful)


This Mediterranean Quinoa Salad is fresh, colorful, and full of bright flavor. Made with crisp vegetables, chickpeas, quinoa, and a lemon herb dressing, it’s the perfect healthy summer salad for meal prep, cookouts, or easy lunches.


Mediterranean Quinoa Salad (Fresh & Flavorful)


This is the kind of salad that disappears fast at summer gatherings.

It’s bright, colorful, fresh, and somehow manages to feel both light and satisfying at the same time. The quinoa gives it heartiness, the vegetables keep it crisp and refreshing, and the lemon herb dressing pulls everything together with bold fresh flavor.

I especially love this recipe because it works for almost everything—meal prep lunches, backyard dinners, cookouts, or as an easy side dish alongside grilled chicken or kabobs. It’s one of those versatile recipes that tastes even better after it sits for a little while, making it perfect for warm weather entertaining.

Enjoy!


Ingredients

  • Quinoa — adds protein, texture, and makes the salad extra satisfying
  • Red bell pepper — brings sweetness and beautiful color
  • English cucumber — crisp, refreshing, and perfect for summer salads
  • Grape tomatoes — juicy bursts of freshness throughout the salad
  • Red onion — adds sharpness and balance
  • Chickpeas — hearty, filling, and packed with texture
  • Olive oil — forms the rich base of the dressing
  • Fresh lemon juice — keeps everything bright and fresh
  • Red wine vinegar — adds tang and depth
  • Fresh parsley — gives the salad a vibrant Mediterranean flavor
  • Garlic — adds bold savory flavor to the dressing
  • Salt — helps bring all the flavors together


Equipment

  • Medium saucepan
  • Fine mesh strainer
  • Large mixing bowl
  • Cutting board and knife
  • Small whisk or fork for dressing


My Go-To Tools


-- Let’s Make It Together

Rinse the quinoa well and cook according to package directions. Let cool slightly while preparing the vegetables.

Dice the bell pepper, cucumber, and red onion, then halve the tomatoes.

In a small bowl, whisk together the olive oil, lemon juice, red wine vinegar, parsley, garlic, and salt.

Add the quinoa, vegetables, and chickpeas to a large bowl. Pour over the dressing and toss until everything is evenly coated.

Serve immediately or chill for a bit to let the flavors blend together.


-- Perfecting the Cooking Process

The biggest key to great quinoa salad is texture. Rinsing the quinoa well removes bitterness, while allowing it to cool slightly before mixing helps keep the vegetables crisp and fresh instead of softening them.


-- Add Your Touch

This salad is incredibly flexible depending on the season or what you have in the fridge.

Add feta cheese for a creamy salty bite, avocado for richness, or grilled chicken for extra protein. Fresh herbs like basil or dill also work beautifully if you want to change the flavor profile slightly.


Set the Mood 

A good meal deserves a great setting. Here are a few easy ways to set the mood when serving this dish.


If you’re building an easy summer menu, these recipes pair perfectly with this Mediterranean quinoa salad:

Whether you’re meal prepping lunches for the week or planning a backyard dinner with friends, this salad is one of those fresh summer recipes you’ll come back to again and again.


Before You Start 

Do I need to rinse quinoa first?
Yes. Rinsing removes the natural coating that can taste bitter.

Can I make this ahead of time?
Absolutely. This salad tastes even better after chilling for a few hours.

How long does it keep?
Stored in an airtight container, it keeps well for 3–4 days in the refrigerator.

Can I add protein?
Yes. Grilled chicken, shrimp, or salmon work wonderfully.

Can I serve this warm?
You can, but it’s best slightly chilled or at room temperature for the freshest flavor.


Thursday, March 12, 2026

Crispy Smash Burgers with American Cheese (Easy Cast Iron Recipe)


Crispy smash burgers with melty American cheese made in a hot cast iron skillet. These juicy burgers with crispy edges are quick, easy, and better than a restaurant burger.


Crispy Smash Burgers with American Cheese (Easy Cast Iron Recipe)


Every once in a while I make a dish that instantly becomes the new favorite, and these crispy smash burgers are the latest. After one bite, my husband declared them “better than a restaurant burger,” which is about the highest praise a homemade burger can get around here.

What makes smash burgers so special is how you cook them. The beef hits a blazing hot cast iron skillet, gets pressed thin, and forms those irresistible crispy, caramelized edges while the center remains juicy and flavorful. Add a slice of melty American cheese and stack the patties on a soft bun with your favorite toppings, and you’ve got a burger that tastes like it came straight from a diner.

The best part? They come together in just minutes and use simple ingredients you probably already have on hand. Once you try them, there’s a good chance they’ll become your new favorite burger too.

Enjoy!


Ingredients

This recipe keeps things simple and classic so the flavor of the beef really shines.

Ground Beef – I like using 85/15 for the perfect balance of flavor and juiciness.

Kosher Salt & Freshly Ground Black Pepper – Simple seasoning that lets the beef develop that signature smash burger flavor.

American Cheese – The classic choice for smash burgers because it melts beautifully and creates that creamy, diner-style finish.

Hamburger Buns – Soft buns work best since the crispy patties are thin and stack nicely.

Optional Toppings – Mayonnaise, mustard, ketchup, lettuce, pickles, sliced tomatoes, and onions are all great choices depending on how you like your burger dressed.

  Equipment  

Cast Iron Skillet - crucial for obtaining those crispy edges that this burger is famous for.  This is one of my most cherished skillets.


-- Let’s Make It Together

Start by dividing the ground beef into eight small portions. Very loosely form each portion into a ball—don’t pack the meat tightly or the burgers will lose that tender texture.

Heat a cast iron skillet or griddle over high heat until it’s very hot. Place the beef balls onto the skillet and immediately use a sturdy spatula or bench scraper to smash them down as thin as possible.

Season the patties with salt and pepper and cook for about one minute, until the edges start to brown and crisp.

Flip the patties, season the second side, then place a slice of American cheese on top. Let the patties cook another 30–60 seconds, just until the cheese melts.

Stack two patties per bun, add your favorite toppings, and serve immediately.


-- Perfecting the Cooking Process

The secret to perfect smash burgers is high heat and pressing the patties immediately after they hit the skillet.  This creates maximum contact with the hot surface, which is what forms those irresistible crispy, caramelized edges while the inside stays juicy. Resist the urge to press the burgers again after flipping—doing so can squeeze out the flavorful juices. (Remember, a cast iron skillet creates the best crust!)


-- Add Your Touch

One of the best things about smash burgers is how easy they are to customize.

Try adding crispy bacon, sautéed onions, or sliced avocado for extra flavor. A swipe of burger sauce or garlic aioli can take things up a notch, while shredded lettuce and pickles add a nice crunch.

You can also toast the buns lightly in the skillet for a little extra texture. However you dress them up, these burgers are incredibly versatile and easy to make your own.


Set the Mood

If you'd like to create a whole atmosphere around eating your delicious Smash Burgers take a look at my tips below to "Set the Mood" for a fun dinner.


If you’re looking for a burger that’s simple, juicy, and packed with flavor, these crispy smash burgers are hard to beat. They cook in minutes, use everyday ingredients, and deliver that classic diner-style burger experience right at home.

If you enjoyed this recipe, you might also love some of these favorites from my kitchen:

• My Garlic Herb Air Fryer Pork Tenderloin for another easy weeknight dinner
• This Fresh Asparagus Salad with Oranges & Feta as a bright side dish
• Or my Almond Poppyseed Muffins with Cranberry Cherry Swirl for a delicious weekend breakfast


Before You Start

Do I need a cast iron skillet?
Cast iron works best because it holds high heat well, but a heavy stainless steel skillet or flat griddle will also work.

Why are smash burgers so thin?
Pressing the burgers thin increases surface contact with the hot pan, which creates the crispy edges that make smash burgers famous.

Can I make these ahead of time?
Smash burgers are best cooked and served immediately since they cook very quickly and taste best fresh off the skillet.

What’s the best beef for smash burgers?
Ground beef with a little fat—around 80/20 or 85/15—creates the juiciest burgers and helps develop that crispy crust.


Tuesday, July 1, 2025

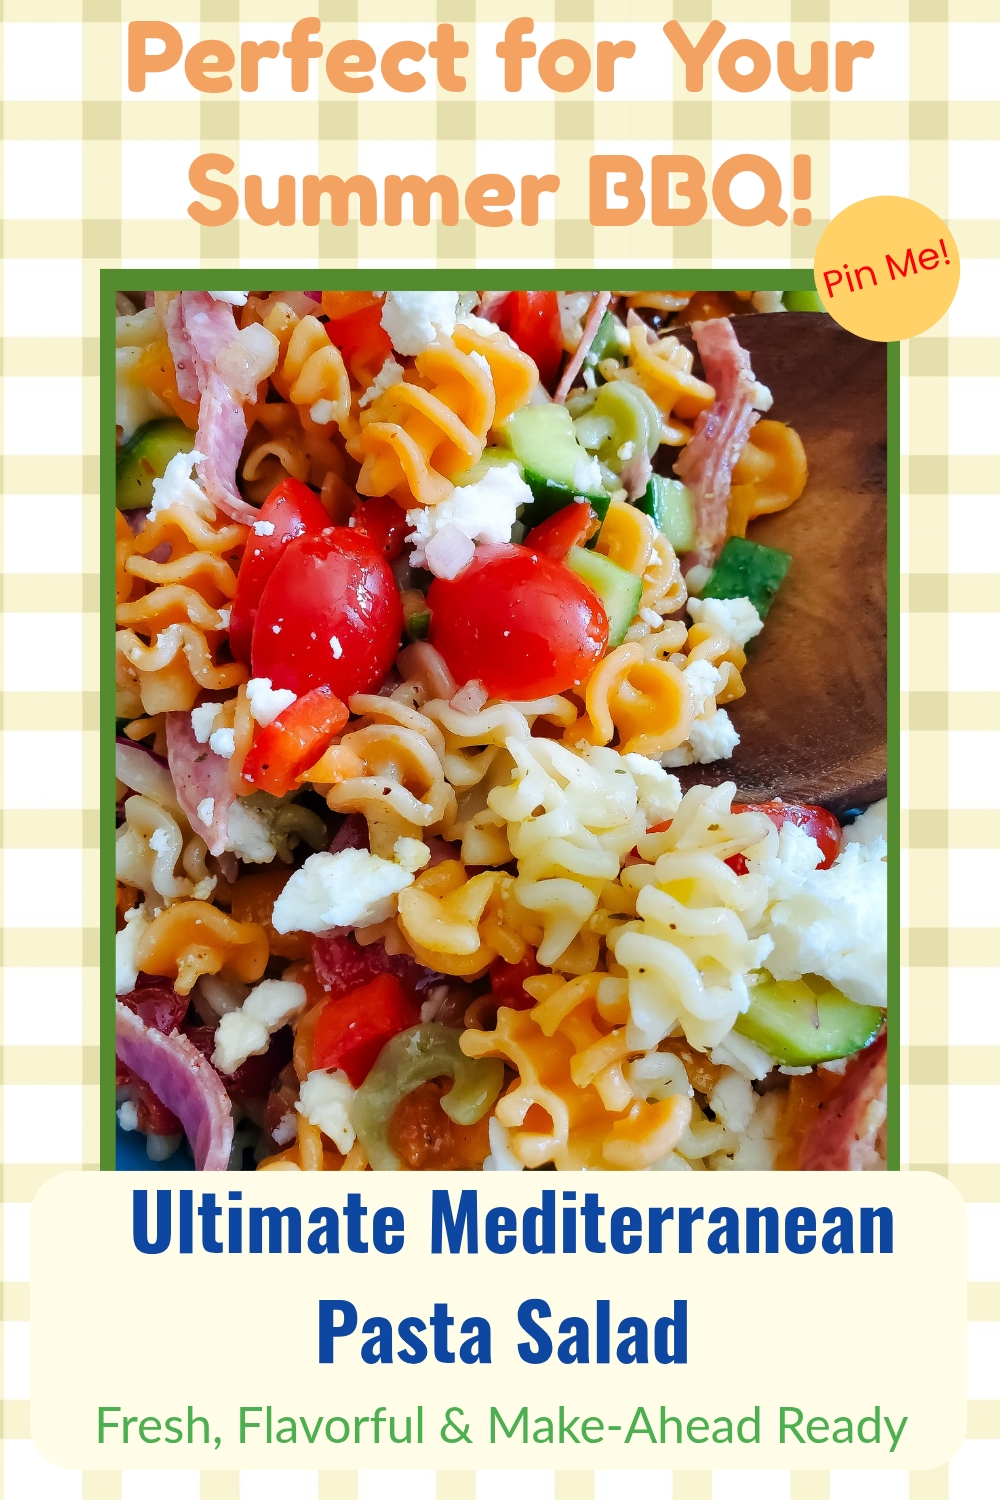
Ultimate Mediterranean Pasta Salad – Easy Side Dish for BBQs & 4th of July

This Ultimate Mediterranean Pasta Salad is the perfect easy make-ahead side dish for BBQs, potlucks, and 4th of July celebrations—fresh, zesty & crowd-pleasing!


Ultimate Mediterranean Pasta Salad – Easy Side Dish for BBQs & 4th of July


Every year, as the 4th of July rolls around, I find myself reaching for recipes that are bright, bold, and built for sharing. You know the ones—dishes that hold their own at the cookout table, that can chill in the fridge while you chase sparklers or man the grill, and still wow everyone when it’s time to eat. This Ultimate Mediterranean Pasta Salad is that dish.

It’s become my go-to for summer gatherings: a colorful, crave-worthy mix of tender rotini, juicy tomatoes, crunchy cucumbers, sweet peppers, and salty bites of feta and salami. But what really ties it together? A zesty lemon-herb dressing with a touch of honey, sumac, and paprika—it’s bold, tangy, and completely irresistible. Whether you're heading to a 4th of July potluck, planning a backyard BBQ, or just want a make-ahead meal that brings the sunshine, this pasta salad checks every box.

Enjoy!


What Ingredients do I need?


Pantry/Dry Goods

Deli/Cheese
  • Feta cheese (crumbled)
  • Beef Genoa salami (sliced or stick-style)

Produce
  • Cherry or grape tomatoes
  • Persian cucumbers
  • Orange bell pepper
  • Red bell pepper
  • Small red onion
  • Fresh basil
  • Lemons (for juice and zest)


Substitutions and Variations

Substitutions

  • Pasta:  Instead of rotini: Fusilli, penne, farfalle, or cavatappi
  • Cherry or Grape Tomatoes:  Chopped Roma or vine tomatoes (remove excess juice/seeds)
  • Persian Cucumbers:  English cucumber (peeled if preferred) or regular cucumber (remove seeds)
  • Orange & Red Bell Peppers:  Any bell pepper color or use roasted red peppers for a smoky flavor
  • Red Onion:  Shallots (milder) or sweet yellow onion (thinly sliced)


Variations

  • Vegetarian Delight:  Omit the salami and add chickpeas or white beans for protein.  Toss in kalamata or green olives for a salty punch.
  • Herb Garden Twist:  Swap basil with a mix of mint, parsley, and dill for a fresh, herby take.  Add a sprinkle of lemon zest just before serving for brightness.
  • Grain Swap:  Swap pasta with orzo, couscous, quinoa, or farro for a different texture or a gluten-free option.


Kitchen Tips and Notes

  • Cook pasta just to al dente: Slightly firm pasta holds up better once chilled and tossed in dressing—no mushy bites here!
  • Use the good olive oil: Since the dressing is raw and lemon-forward, a high-quality extra virgin olive oil makes a big difference in flavor.
  • Toss dressing just before serving (if prepping ahead): This keeps the salad vibrant and prevents sogginess. Or reserve a few spoonfuls to refresh the salad right before serving.
  • Double the dressing: It keeps well in the fridge for up to a week and tastes great drizzled on grilled chicken, veggies, or even grain bowls.

  • Store in an airtight container in the fridge for up to 3–4 days. The flavors will deepen as it rests!

  • Freshen it up before serving: Pasta can absorb dressing as it sits, so revive it with a splash of olive oil, lemon juice, or a spoonful of leftover dressing.


🔥BBQ Hosting Tips – Stress-Free, Crowd-Pleasing, and Fun

Throwing a backyard BBQ doesn’t have to mean sweating over the grill all day or scrambling at the last minute. With a little prep and a few smart hosting tricks, you can enjoy the party right along with your guests. Here are some of my go-to tips for effortless and memorable summer gatherings:

1. Prep Sides the Day Before:  Make-ahead dishes (like this Mediterranean pasta salad!) are lifesavers. Cold salads, dips, and marinated veggies can all be prepped a day in advance, saving you time and fridge space on party day.

2. Keep Drinks Cold & Easy to Grab:  Fill a cooler or drink tub with ice and stock it with sparkling water, lemonade, sodas, and maybe a signature mocktail or punch. Label it clearly and station it away from the cooking zone to avoid crowding the grill.

3. Plan a Simple, Grilled Main Dish:  You don’t need five kinds of meat. Choose 1–2 main proteins—like burgers and chicken—or go plant-based with grilled veggie skewers or portobello mushrooms. Simpler menus = happier hosts.

4. Create a Serve-Yourself Station:  Set up a buffet-style layout where guests can build their own plates. Include condiments, toppings, utensils, and napkins in one place so people don’t have to ask (or interrupt you) mid-flip.

5. Add Ambience with Music & Lighting:  A fun playlist and a few strings of patio lights or lanterns can instantly elevate the atmosphere. Bonus: citronella candles or herbs like rosemary and mint can help keep bugs at bay while setting the mood.

6. Prep for Clean-Up Ahead of Time:  Place labeled bins for recycling, and trash where guests can find them easily. Keep a stash of wet wipes and paper towels nearby—you’ll thank yourself later.

Bonus: Don’t Try to Do It All:  Let guests bring drinks, dessert, or chips. Most people want to help, and it makes the party feel more relaxed and communal.


HUNGRY FOR MORE? Subscribe to emails at the top of this page and follow along on Facebook,  and Pinterest for all of the latest updates.


LinkWithin

Related Posts Plugin for WordPress, Blogger...