Saturday, March 31, 2012

No Rise Pizza Dough


I'm back...It's spring...and look what I got!

I love spring flowers!!!
Don't you?

So bright and sunny looking.
They brighten my day!

Well I had the daddy of all computer router problems this week.  My power went out during our rain storm last Sunday and my surge protector didn't protect!  So I had no access all week.  Wow! It's amazing how life depends on being able to being on-line.  I was truely lost without it.  Even my smartphone just didn't cut it...it's not the same and not as user friendly as being on the old laptop!  All is well now...thank you!

I've been experimenting with different types of pizza dough lately.  I've even taken a class on how to make homemade pizza dough which made the best that I've had so far!  But that is not what we will be exploring today.  Today's recipe is for a pizza dough that is an everyday dough.  It's quick and doesn't need to rise.  Sounds strange huh?  That's what drew me to it as well!  Can you imagine coming home from work and making fresh pizza dough in a matter of minutes on a weeknight?  That's just what I did, and it worked!

I got this recipe from my sister's food processor reference guide.  So the dough is actually made in the food processor.  You could do this by hand as well, but it's much easier and quicker in a food processor.


This makes a really soft dough which is easy to roll out without much pull back.  Don't you hate it when you are rolling out dough and it keeps shrinking back!!  It's all in the formula, (flour type) which helps to make a pliable dough for rolling.


So you just mix it up, roll it out.  Let it rest a few minutes, then dress it up with your favorite toppings.  Simple as that!  I rolled mine thin cause I like it best that way.


Bake away and you have fresh homemade pizza on a weeknight!  The result?


It was good.  Not the best I've had, but not the worst either.  I would say this is a good basic recipe that will suffice in a pinch when you are in a hurry and don't have the time for allowing the dough to rise.  As I like my crust thin, I rolled this thin.  It still rose a little during the baking however, this a more dense crust.  Not crispy and airy like stone fired pizza crusts.  

Here's a better view of the crust...


I would make this again if I'm in a rush.  But if you have time maike the dough the regular way.  I've got my favorite pizza dough recipe coming up soon!

Oh, and as for the sauce...I have a killer recipe for pizza sauce that I'll share with you next!
Try this dough out for yourself and let me know what you opinion is.


No Rise Pizza Dough


Makes 1 pizza crust

1 pkg instant yeast
1 t sugar
2/3 c warm water
1 2/3 c flour
¾ t salt
2 t canola oil
1 ½ T cornmeal

Preheat oven to 425 degrees.

Mix yeast, sugar, and water in a small bowl and let stand for 10 minutes. 

Pour flour and salt in processor.  Turn on.  Pour yeast mixture through the feed tube.  Mix for 45 seconds until dough pulls away from the sides.  Add oil through the tube and mix another 60 seconds.  Dough should pull away from the side of bowl.  If it doesn’t pull away add another tablespoon of flour. 

Roll out dough to desired shape and thickness.  Sprinkle cornmeal on one side of the dough evenly and pat down so that it sticks to the dough.  This will be the bottom of your pizza.  Flip the dough over and place in pizza pan.  Top pizza with sauce and desired toppings.

Bake at 425 degrees for 15 minutes or until crust is golden brown and toppings are bubbly.


Thursday, March 22, 2012

Banana Chocolate Chip Bread


I love banana bread!

What better use of over-ripe bananas than to put them in a quick bread, muffins, or a smoothie!  So I happened to have a few extra bananas laying around and wanted to try something a little different than the average banana bread.  So I found this recipe in one of my favorite cookbooks, Healthy Calendar Cooking, which not only added some zip to the banana bread by adding mini chocolate chips, but they also made it low in fat!  How cool is that!  Yippee!

So this bread will provide 16 servings.  Each serving has 3g of fat...very good...and 24g of carbs.  Well if that's that not too bad if add some proteins with it for breakfast or eat it as a dessert.

So off I went to try this recipe.  Boy was I happy!  If came out really good.  The gooey chocolate compliments the banana so well, and when it's hot...or warmed up...HEAVEN!  Nothing better than warm chocolate in my book!

So if you enjoy a good banana bread, break out and try this spectacular banana bread.  I know you have bananas lying around too!

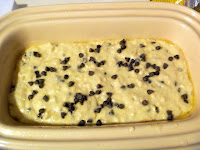
Here are some step by step pics to help you along.


Doesn't this look yummy?


Banana Chocolate Chip Bread

16 servings

1 ½ c ripe bananas, mashed
2 T canola oil
¼ c low fat buttermilk
4 egg whites
1 ½ c flour
½ c oats
½ c sugar
2 t baking powder
1 t baking soda
½ t salt
1/3 c mini semi-sweet chocolate chips (plus more for garnish)

Preheat oven to 350 degrees.  Spray and 8x4 inch loaf pan with cooking spray.

In a medium bowl combine bananas, oil, buttermilk, and egg whites.  Mix well.  In another large bowl combine flour, oats, sugar, baking powder, baking soda, and salt.

Make a well in the center of the dry ingredients and pour in the banana mixture.  Mix well.  Stir in the 1/3 cup mini chocolate chips.  Pour batter in the loaf pan.  Sprinkle a few extra mini chocolate chips on the top.

Bake 50-60 minutes or until a toothpick comes out clean from the center of the loaf.  Remove from oven and place on a cooling rack for 10 minutes.  Remove loaf from the pan and continue to cool on cooling rack 15 minutes.  Serves 16.  

source:  Healthy Calendar Cooking

Tuesday, March 20, 2012

Pecan Chicken Strips - Featured Post!!

My recent post for Pecan Chicken Strips was featured! 


I would like to thank Maine Food & Lifestyle.com for featuring my recipe.  "Thank You!" 


How exciting is that?!  So please take a peak at their post by using this link here:  mainefoodandlifestyle.com


If you would like to visit my post for the recipe click the link here:  Pecan Chicken Strips


Hope you all enjoy this recipe, it's a great meal to make during the week, and kids love it!


Monday, March 19, 2012

Vanilla Kiwi Smoothie


Do you love kiwis?


The fruit...not the hunky men from New Zealand!  LOL!  Well, if you do I have a great drink for you!  Here's another healthy smoothie using the abundance of kiwis that are in season right now.  I love this fruit!


What's better than blending some tart kiwis with some creamy vanilla yogurt?  Not much...
Kiwis are a little tart so to compensate for that pucker up quality you just add a little sweetener.  You can use sugar, honey (yum! and better for you!), Splenda, or agave syrup.  This smoothie does require a little sweetening otherwise your will definitely pucker up!  It's such a pretty green color too!


Enjoy a refreshing smoothie tomorrow!


Vanilla Kiwi Smoothie


serves 2


1 6 oz container of lite vanilla yogurt
1 small or 1/2 of a medium banana
1/3 c. 2% milk

1 T honey (substitute sugar, Splenda, or agave syrup)
3 kiwis, peeled and sliced
1 cup of ice cubes 


Place all ingredients in a blender.  Blend on high to mix ingredients and crush ice.  Serve.
Makes 2 1 cup servings.

Sunday, March 18, 2012

Herb Omelet


It's almost spring and it's time to break out the herbs!

This is a simple and flavorful "French" inspired Herb Omelet.  It's cooked ultra thin, almost like a crepe.  Using herbs you have on hand, fresh or dried lends a delicate flavor boost to an otherwise ordinary omelet.

If you recall, I'm not really and egg person!  But my experimentation continues and I must say, that are starting to grow on me...a little bit.    I think it's all the additions to the eggs that make it not so blah!  Who'd of thought?

This omelet is light, and although we had it for breakfast it could easily be served with a fresh mixed green salad and a glass of dry white wine and be perfect for a light spring lunch, Parisian style!


Herb Omelet

serves 4

8 eggs
1 T. milk
salt & pepper
1 T parsley, minced
1 t. thyme, minced
1/2 t. herbs de provence
2 T butter

In a medium bowl whisk together the eggs, milk, salt & pepper to taste.  Add the parsley, thyme, and herbs de provence and whisk until eggs are frothy.

Melt 1/2 tablespoon of butte in a small nonstick skillet over medium heat.  Pour in 1/4 of the egg mixture.  Cook until the eggs just begin to set, approx. 1 min.  Using a rubber spatula stir the eggs around the pan letting any uncooked egg run to the bottom of the skillet.  Stop stirring and allow eggs to cook until set, making sure that eggs are evenly distributed in the pan in one whole piece.  

Gently loosen the edges of the omelet with the spatula, then fold one side to the middle, then fold the opposite side to the middle into thirds.

Slide omelet onto the serving plate and serve.  Repeat with the remaining eggs and butter.


Saturday, March 17, 2012

Black Bean Burritos


Ole!


Got to put dinner on the table fast with little fuss??  Lean toward making burritos!  Not just any burrito.  How about a spicy black bean and meat burrito?  Sounds good huh!  These little babies whip up in about 20 minutes and provide you with a hearty meal with flavors that will have your mouth going MMMnnnn!  A healthy mix of black bean dip, along with ground sirloin is your base. Add in some salsa, spices, and cheesey goodness...oh boy, such a great combination.  You may remember the black bean dip from another of my recipes, Black Bean Tostadas.  Click on the link to visit that recipe as well.


Burritos are easy to make, kid friendly, and hubby's love them too!  The lend themselves to many variations, but I think these Black Bean Burritos have just a little bit more zip to them!  Serve them with a side of rice and a mixed green salad and you have a great meal!  Or....put the rice in the burritos!


Method Pics:


Try them soon, and don't forget to let me know what you think!


Black Bean Burritos


serves 4


1/2 lb ground sirloin
3 T. red onion, diced finely
1/4 - 1/3 c black bean dip
4 T. salsa
1 t chili powder
1/2 t cumin
1/4 t red pepper flakes
salt & pepper to taste
1 c shredded Monterrey jack cheese
4 burrito sized flour tortillas
sour cream, salsa, green onions, as toppings (optional)


Preheat oven to 300 degrees.


In a skillet over medium high heat, brown the ground sirloin and the red onion until cooked through.  Add the black bean dip, salsa, chili powder, cumin, and red pepper flakes.  Stir until all ingredients are combined and items are starting to bubble.  Turn down heat and add salt & pepper to taste.


Tear off 4 sheets of aluminum foil and set a tortilla on each sheet.  Using 1/4 cup of cheese for each burrito, spread half of each portion, or 1/8 cup on the tortilla.  Top with one quarter of the black bean mixture.  Top with another 1/8 cup of cheese.  


To roll burrito, fold side in toward the middle and roll up from the bottom.  Wrap in the aluminum foil.  Repeat creating the burritos with the remaining black bean mixture.  Folding each one and wrapping in foil.  Place all burritos in the oven for 5 min to melt the cheese.  Serve.  Variation:  Add Spanish rice to the burrito and reduce the amount of ground sirloin used.  


Thursday, March 15, 2012

Baked Ravioli


Sorry, I've been a little remiss in my postings this week.


I've been under the weather.  Every time I travel in an airplane I seem to catch some bug.   A nasty cold is not my idea of fun.  Maybe I should travel with a gas mask!


So this post is going to be short and sweet.  Like this dish.  Need dinner fast?  Want some comfort food?  This fits the bill and will tantalize your taste buds, and satisfy your tummy.  Kids love this one too!  To make this go quicker I suggest using fresh pasta you can buy in the refrigerator case at the grocery store.  Frozen will work to if you like.


Baked Ravioli lends a homely comfort feeling and is great with the addition of a side salad for a complete meal.  Add a little crusty bread and you are good to go.   Dinner is on.!


Baked Ravioli


serves 5 - 6


2 9 oz. pkg. fresh cheese ravioli
1 25 oz jar of marinara or tomato and basil sauce
2 garlic cloves, minced
1 t dried basil
1/2 c part-skim mozzarella cheese, shredded


Cook ravioli in a large pot of boiling water, as per package instructions.  
Preheat oven to 375 degrees.


Coat a medium casserole dish with cooking spray.  Line bottom of dish with the cooked ravioli.  


In a medium bowl combine the marinara sauce, garlic, and basil.  Pour over the ravioli and stir to coat.  
Place casserole dish in the oven and bake for 30 minutes, until bubbly.  Remove from oven.


Sprinkle cheese over the top and return to the oven to bake another 5-10 minutes until slightly golden.
Serve.


Tuesday, March 13, 2012

Pioneer Spotted Dog

Spotted Dog is a variation on an Irish Soda Bread.  It's slightly sweet and perfect for St. Patrick's Day - Slice of Southern


St. Patrick's Day is coming up!

It makes me think of my ancestry.  My Grandmother, Elizabeth was 1/2 American Indian, and 1/2 Irish and lived in Oklahoma.  What a great combination huh?  My Great Grandmother Addie McCleary was the Irish member of the family.  

Digging through my mom's recipes again, I came across an old hand written recipe for a version of Irish Soda Bread.  This is an Irish bread that typically had only a few ingredients, flour, soda, buttermilk, or sour milk.  That's it.  But being Irish-American, things changed along the way.  Food was adapted to what was on hand.  Farmers used what was available to them, or what could be bought.  This version is actually called Spotted Dog.  A little more sweet than the original and has the addition of fruit.  I used currants, although the recipe called for raisins.  I thought they look really cute in the bread, and lend a nice sweetness.  

So in ode to my Irish ancestry I bring to you this old recipe....Pioneer Spotted Dog.  (Oklahoma in origin)

We couldn't keep our hands off this bread!  It's that good.  Make a batch or two and see if your family can resist.

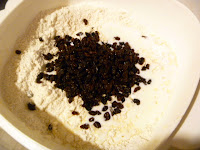
Some step by step pics...


Spotted Dog is a variation on an Irish Soda Bread.  It's slightly sweet and perfect for St. Patrick's Day - Slice of Southern
 Spotted Dog is a variation on an Irish Soda Bread.  It's slightly sweet and perfect for St. Patrick's Day - Slice of Southern

Spotted Dog is a variation on an Irish Soda Bread.  It's slightly sweet and perfect for St. Patrick's Day - Slice of Southern
 Spotted Dog is a variation on an Irish Soda Bread.  It's slightly sweet and perfect for St. Patrick's Day - Slice of Southern

Spotted Dog is a variation on an Irish Soda Bread.  It's slightly sweet and perfect for St. Patrick's Day - Slice of Southern


The end result....wow...look at this bread!


Spotted Dog is a variation on an Irish Soda Bread.  It's slightly sweet and perfect for St. Patrick's Day - Slice of Southern

Spotted Dog is a variation on an Irish Soda Bread.  It's slightly sweet and perfect for St. Patrick's Day - Slice of Southern


Enjoy and have a happy St. Patrick's Day!


Pioneer Spotted Dog

makes 1 loaf


3 1/4 cups flour
1/3 cup  sugar
1 tsp. baking soda
1 tsp. salt
½ cup cold butter
1 1/3 cups buttermilk or sour milk
3/4 cup currants

Preheat oven to 350 degrees.
Add flour, sugar, baking soda and salt to a large bowl. Cut in butter with pastry blender until it looks like little crumbles.  Add buttermilk and currants; stir just until moistened.
Knead dough on a board until dough forms.  Shape bread loaf.  Should be round and about  2 ½ inches thick. Place on a greased baking sheet (I used cooking spray).  Cut an X in the dough and sprinkle with a pinch of sugar if desired. 
Bake for 50-55 min.  Allow to cool and cut into wedges. Note:  Bread will lasts 2-3 days stored a room temperature.  

Sunday, March 11, 2012

Black Bean Salsa


Healthy Black Bean Salsa that is simple and quick to make.  Perfect for any entertaining idea! - Slice of Southern


Yum


Today is Spring Forward Day, and I've been "off" all day long!

I actually forgot about changing the clocks today, so when I woke up I thought it was early and I had plans.  So many plans... I'd get some things done before I had to leave for today's cooking class.  But then I remembered...bummer.  It wasn't early at all.  To top it off, I had to rush to get ready to leave.  So much for my early morning plans.

If that wasn't bad enough I got a large sugar rush from taste testing the cakes from today's class.  Not so much from the cake per say...but the frosting!  Yikes!! Even though I scraped off most of the frosting ( a sin, I know...) I had a sugar buzz for hours...


Totally off today.


Healthy Black Bean Salsa that is simple and quick to make.  Perfect for any entertaining idea! - Slice of Southern


So to redeem myself I whipped up this healthy Black Bean Salsa.  Simple, quick, and full of good stuff.  It's a tangy salsa that's great served with chips as an appetizer, or you can spoon it into a lettuce cup to eat as a salad.  Either way the flavors are fabulous!

Try this soon.  It would be great to serve during March Madness, or a spring party!


Healthy Black Bean Salsa that is simple and quick to make.  Perfect for any entertaining idea! - Slice of Southern


Black Bean Salsa

makes 3 cups

1 roma tomato, diced
1 avocado, diced
1/4 c red onion, diced
1 15oz. can of black beans, drained and rinsed
2 T cilantro, chopped
1 T. olive oil
2 T lime juice
pinch of red pepper flakes
pinch of salt

Combine tomato, avocado, red onion, black beans, and cilantro in a medium bowl. cilantro
In a small bowl whisk together olive oil, lime juice, red pepper flakes, and salt, until well combined.  Pour over the black bean mixture, tossing to coat.  Serve immediately, or chill in the refrigerator for 1 hour.  Serve with tortilla chips for a dip or over lettuce as a salad.


Linked to:
Add a Pinch - Mingle Monday

Friday, March 9, 2012

Product Review: Williams-Sonoma's Italian Braising Gravy

I haven't reviewed a product in a while so I thought I'd write one up on a item I recently used.  The item is Williams-Sonoma's Italian Braising Gravy.


Italian Braising Gravy


Here's Williams-Sonoma's description:


On Sundays, Italian American kitchens are filled with the rich, savory aroma of tomato sauce mixed with braised meat simmering on the stovetop. The sauce goes by lots of names, from “Sunday Gravy” to “Mamma’s Sauce.” It’s always made with love, and every family is convinced their recipe is the best. We make Sunday supper easy with our own version of this legendary all-purpose sauce.
  • A nostalgic Italian-American blend of Italian tomatoes, fresh garlic and basil, sautéed in extra-virgin olive oil with a splash of red wine, then slowly simmered for authentic homemade flavor.
  • Just braise with your family’s favorite meat and serve over pasta.
  • 32 oz., 2 lb.
  • Can be used in a slow cooker as well as the oven.
Ingredients:
Tomato puree (water, tomato paste), tomatoes, extra-virgin olive oil, concentrated beef stock, garlic, beef, pork, red wine, sea salt, basil, onion concentrate (onion juice, sunflower oil), pepper, sugar

Sells for $16.95.  Here is the link to the product:  Italian Braising Gravy

Well, the description is what got my attention on this one.  I wanted my house to smell of the savory aroma of Italian kitchens too!  So I bought some and couldn't wait to try it out.  I had just the dish for it too.

Braised Boneless Short Ribs served with Fettuccine. 

This was a great slow cooker meal.  One that didn't take a lot of prep, hence the braising sauce, and produced some tender meat that simmered in the sauce until it fell apart.  I served it on a bed of pasta, fettuccine to be exact.  Here is the end result.


The verdict:  While the dish was good, meat was tender, and it went well with the pasta, the sauce was just ok.  Nothing really to brag about.  I think that it really had a deep flavor, possibly from the beef stock and wine, but it lacked a little" tomatoey" taste that I like.  Being that this is expensive, I would probably just go buy a couple of jars of my favorite marinara sauce and use that instead.  Even better, make my own braising sauce with some crushed tomatoes, wine, garlic...some herbs.  Voila! A wonderful braising sauce.

So while I love Williams-Sonoma's products, this on didn't flip my skirt up.  Sorry guys!  Back to the drawing board for me on this sauce...but try the recipe, it is yummy, but make the substitutions to suit your taste if you like.

Braised Boneless Short Ribs served with Fettuccine 

serves 4

3 lb Boneless beef short ribs
1 jar of Williams-Sonoma's Italian Braising Gravy  or  2 large jars of marinara sauce
12 oz Fettuccine
1 oz Spinach
Grated Parmesan cheese for garnish

In a slow cooker place boneless beef short ribs.  Pour braising sauce over the top of the meat.  Cook in slow cooker on high for 4 hours or on low 6 hours.

Prior to serving bring a large pot of water to a boil.  Cook pasta according to manufacturer's instructions.  

Remove meat from the slow cooker and place in the center of a platter.  Add pasta to the remaining sauce in the crock pot and toss to coat.  Add spinach to pot and stir until slightly wilted.  Place pasta on the platter around the meat.  Garnish with cheese if desired.  Serve.

Tuesday, March 6, 2012

Winter Salad


I love this salad!


It's flavors are deeper, more rustic.  Like winter...
Salads are a great addition to your dinner, or as a main course for lunch.  This one doesn't hold back.  It uses ingredients that are winter fresh.  In-season ingredients that are easy to come by.


Spinach, bacon, pecans, dried cranberries, parmesan...all drizzled with a light lemon vinaigrette.  Yum!


Make one for your dinner tonight!


Winter Salad


serves 4


2 cups fresh Spinach
1/2 cup chopped pecans
4 bacon strips, cooked and crumbled
1/3 cup shredded Parmesan


Lemon Vinaigrette:
1 t Dijon mustard
1 t lemon zest
2 T fresh lemon juice
5 T olive oil
salt & pepper to taste


Place salad ingredients in a salad bowl.   Toss to combine.  In a small sealed jar, mix vinaigrette ingredients.  Shake well until totally incorporated.  Drizzle salad with dressing.  Toss to coat.  Serve.

Sunday, March 4, 2012

Quinoa Salad with Dried Cranberries and Pecans


My new love of late is Quinoa.

Don't you just love it?  Don't know what it is...or have never tried it?

Well let me tell you what you are missing.  It's a fiber rich whole grain that is classified as a superfood.  Who doesn't want that?  It a slightly nutty grain with a little bite to it like brown rice...or bigger couscous.  It's wonderful used in a salad such as this one, or as a side dish.  This salad is wonderful and light.  The flavors pop in your mouth, and it's very healthy for you.

Try something new this year, and be healthy with whole grains.  Try the quinoa, you'll love it.    


Quinoa Salad with Dried Cranberries and Pecans
Serves 4

1 cup quinoa
2 cups water
1 c fresh spinach, sliced
1⁄4 cup balsamic vinegar
2 Tbs. extra-virgin olive oil
1⁄4 cup dried cranberries
1⁄4 cup pecans, chopped
3 Tbs. chopped fresh flat-leaf parsley
1⁄4 tsp. sea salt
Freshly ground pepper, to taste

Place the quinoa in a fine mesh strainer and rinse well under cold water. In a saucepan over high heat, bring the 2 cups water to a boil. Add the quinoa and reduce the heat to low. Cover and simmer until the grains are tender and the water is absorbed, about 15 minutes. Remove the quinoa from the heat and let cool slightly. Transfer to a large bowl and fluff with a fork to separate the grains. Stir in the spinach, vinegar, olive oil, cranberries, pecans, and parsley.  Season with salt and pepper. Serve warm or at room temperature.


LinkWithin

Related Posts Plugin for WordPress, Blogger...