Showing posts with label pastry. Show all posts

Tuesday, October 6, 2026

Rustic Mushroom, Swiss Chard & Leek Galette with Goat Cheese


Rustic mushroom, Swiss chard and leek galette with goat cheese, mozzarella and fresh thyme wrapped in a flaky sour cream butter crust. A savory transition-to-fall dinner.


Rustic Mushroom, Swiss Chard & Leek Galette with Goat Cheese


We are slowly transitioning from summer to fall in Southern California.  The leaves on our trees are turning and falling, Some nights are cool and crisp, and some are overly hot as the weather changes and trys to settle into the new season.  And I’m ready for deeper flavors and a few heartier dishes, but when it’s still warm outside, I’m not quite ready for stews, roasts and heavy comfort food.

That’s when I turn to recipes like this Rustic Mushroom, Swiss Chard & Leek Galette.

It has all those flavors that start making me think about fall—earthy mushrooms, Swiss chard, sweet leeks, garlic and fresh thyme—but it still feels light enough for a warm October evening. The flaky sour cream butter crust makes it feel special, while the vegetables keep the whole thing grounded and fresh.

And then there’s the goat cheese.

Little dollops scattered over the top melt into creamy, tangy pockets with lightly toasted edges. Combined with the mozzarella tucked into the filling, it gives this rustic galette just enough richness without making it feel too heavy.

This is pretty much how we like to eat during this time of year: a little heartier, a little deeper in flavor, but still somewhere between summer and fall.

Enjoy!


Ingredients

For the Tart Pastry

  • All-purpose flour — The foundation for a tender, rustic crust.
  • Cold butter — Gives the pastry its flaky texture and rich flavor.
  • Sour cream — Adds tenderness and a little tang to the crust.
  • Lemon juice — Just enough to brighten the pastry and balance its richness.
  • Cold water — Helps bring the dough together without overworking it.
  • Salt — Essential for bringing out the flavor of the crust.

For the Filling

  • Baby bella mushrooms — Earthy and savory, they give the galette its deep fall flavor.
  • Swiss chard — Adds tender greens and a beautiful pop of color.
  • Leeks — Their mild, sweet onion flavor is perfect with mushrooms and thyme.
  • Garlic — Adds another layer of savory flavor.
  • Fresh thyme — One of my favorite herbs for this time of year.
  • Mozzarella — Melts into the vegetables for a creamy, cohesive filling.
  • Olive oil — For sautéing the vegetables.
  • Salt & black pepper — Just enough seasoning to let the vegetables shine.

For the Topping

  • Goat cheese — Small dollops melt and brown on top, adding tangy, creamy bites throughout the galette.


Equipment

  • Large skillet — My go-to heavy skillet works beautifully for sautéing the vegetables.
  • Rolling pin — For rolling the pastry into a rustic 12-inch circle.
  • Parchment paper — Makes transferring and baking the galette easy.
  • Baking sheet — A rimmed sheet is ideal for catching any melted cheese or juices.
  • Pastry cutter — Helpful for cutting the cold butter into the flour.

My Go-To's

  • Pastry cutter - a great way to easily cut in the butter into the flour.
  • Baking Sheet - having different sizes in your arsenal allow you to easily choose the correct size for what you are baking.  


Let's Make It Together

First, we'll make the pastry. Cut the cold butter into the flour and salt until you have coarse crumbs, then gently work in the sour cream, cold water and lemon juice. Once the dough comes together, wrap it up and let it chill while you make the filling.

The filling comes together quickly in one skillet. Brown the mushrooms first so they have a chance to develop some good color, then add the Swiss chard, leeks, garlic and thyme. Once the vegetables are tender, let them cool slightly before stirring in the mozzarella.

Roll the chilled dough into a rough circle—no need to make it perfect. Spoon the filling into the center, leaving a border around the edge, then fold the pastry up and over the filling, pleating it as you go.

Dot the top with goat cheese and into the oven it goes. About 30–40 minutes later, you'll have a golden, rustic galette with crisp pastry and a savory, cheesy vegetable filling.


Perfecting the Cooking Process

The key to a great galette is keeping the filling from becoming watery. Give the mushrooms time to brown and release their moisture before adding the greens and leeks. Let the cooked filling cool slightly before adding the mozzarella and placing it on the pastry. This keeps the crust flaky and helps the galette bake up beautifully golden instead of soggy.


Add Your Touch

  • Try another mushroom: Cremini, white mushrooms or a wild mushroom blend would all work beautifully.
  • Change the cheese: Gruyère or fontina would be delicious in place of the mozzarella.
  • Add a little heat: A pinch of red pepper flakes would bring a subtle warmth.
  • Make it more herb-forward: Add a little fresh rosemary along with the thyme.
  • Finish with freshness: A little lemon zest scattered over the finished galette would be lovely.


Set the Mood

A good meal deserves a great setting.  Here are a few ways to set the mood when serving this dish.


This Rustic Mushroom, Swiss Chard & Leek Galette is exactly the kind of recipe I want to make when summer is slowly giving way to fall.

It's savory, earthy and comforting, but it doesn't feel heavy. The flaky lemon-scented crust, tender vegetables, melted mozzarella and little pockets of goat cheese make it feel like something special without requiring a complicated dinner.

It's a good reminder that you don't have to jump straight into full-on fall cooking. Sometimes the best recipes are the ones that live right in between the seasons.

If you're enjoying this kind of hearty-but-not-heavy cooking, take a look at my Mediterranean White Bean Skillet next. It's another cozy, vegetable-forward dish that's satisfying enough for cooler days while still feeling fresh and bright.

You may also like:


Before You Start

Can I make the pastry ahead of time?
Absolutely. The pastry can be made earlier in the day and kept refrigerated until you're ready to assemble the galette.

Can I use spinach instead of Swiss chard?
Yes. Spinach will work, although it cooks more quickly and has a softer texture than Swiss chard.

Can I use a different cheese?
Definitely. Gruyère, fontina or another good melting cheese would work well in the filling.

Can I make the galette ahead of time?
It's best served warm from the oven, but you can assemble it ahead and refrigerate it until you're ready to bake. Allow a little extra baking time if the galette is going directly from the refrigerator to the oven.

Why do I need to cook the mushrooms first?
Mushrooms release quite a bit of moisture as they cook. Browning them first helps concentrate their flavor and keeps excess moisture from making the galette soggy.

Can I freeze the galette?
For the best pastry texture, I'd recommend baking it fresh rather than freezing the assembled galette. Leftovers can be refrigerated and gently reheated.


Saturday, March 6, 2021

Hot Ham and Swiss Pockets

Ham and Swiss cheese just go together, but put it in a flaky puff pastry pocket and you have one hot delectable lunch!


Hot Ham and Swiss Pockets


I have another wonderful lunch idea for you that easy to put together.  I love my lunchtime sandwiches and even better is when it is a hot sandwich.  This one is the ultimate flavor combination of scrumptious ham and Swiss cheese, hot and melty, and baked inside a delicate puff pastry pocket.  Yum!  A take on a classic hot Ham and Swiss sandwich, but soooo much better!

This sandwich is very easy to put together with the help of store bought puff pastry, deli ham and sliced Swiss cheese.  You really just need to cut out some squares for the crusts and assemble.  Throw them in the oven to bake and your sandwich will puff into heavenly goodness!  We served these for lunch but they would make a great dinner item, or make them tiny into bite size appetizers.  They are fabulous any way  you serve them.


How do you serve them?

  • For lunch with a side salad and fruit
  • As a light dinner with a bowl of soup and a side salad
  • As an appetizer, just make the pockets into smaller sizes

What Ingredients do I need?

  • Puff pastry (I use a 5x5" pastry squares that I found at a Middle Eastern Market - see picture.) Pepperidge Farms are readily available.

  • Spicy Brown Mustard
  • Deli Ham slices
  • Swiss Cheese slices
  • Egg


Substitutions and Variations

  • Use Honey Ham or Black Forest Ham
  • Use Turkey instead of Ham
  • Use Pastrami instead of Ham
  • Use Gruyere Cheese
  • Use Dijon Mustard
  • Use Mayonnaise instead of Mustard
  • Mix Spicy Mustard and Mayo together
  • Add in some spinach
  • Add in tomato slices
  • Make a turkey, mushroom, Swiss pocket

Kitchen Tips and Notes

  • NOTE: The recipe doesn't have amounts for the ham and Swiss cheese.  I bought 1/2 lb of ham and a package of sliced Swiss.  I used 2-3 slices of ham and 1-2 slices of cheese per sandwich.  Estimate what you would like, but keep in mind if you stuff them too much you will have more difficulty sealing them and the possibility of the filling oozing out!
  • Use a pizza wheel to easily cut the pastry dough
  • I used 5x5" squares, you can use any size you want.  
  • You can also take on pastry square and place the filling on half and fold it over for triangle pockets
  • Make small triangle appetizers
  • Another method would be to leave a large puff pastry sheet whole, layer on the ingredients, place the top sheet over and bake.  Once baked then you can cut squares or slices to your liking.
  • Watch the puff pastry when it's baking so that it doesn't get too brown or burn on top.
  • To make an egg wash just add a little water to an egg and beat together.


HUNGRY FOR MORE? Subscribe to emails at the top of this page and follow along on Facebook,  and Pinterest for all of the latest updates.


Hot Ham and Swiss Pockets


1 package frozen puff pastry, defrosted 
Spicy Brown mustard
deli ham, sliced
Swiss cheese, sliced
1 egg, beaten with 1 tablespoon water, for egg wash

Preheat the oven to 450 degrees F. 

Place a piece of parchment paper on a sheet pan.

Lay 1 sheet of puff pastry on a lightly floured board.  Cut in to squares about 5x5".  Cut 2 squares per sandwich and make as many as you like.  Place the bottoms on the sheet pan and brush the center with the mustard, leaving a 1-inch border around the edge. Place several slices of ham and then 1-2 slices of cheese, also leaving a 1-inch border. 

Brush the border with the egg wash using a pastry or silicone brush.  Place the second sheet of puff pastry square on top, lining up the edges.   Crimp the edges together using the fork tongs.  Brush the top with egg wash and cut two small slits in the top of the pastry to allow the steam to escape.  

Bake for 18-20, or until puffed and golden brown. Allow to cool for a few minutes, slice on the diagonal and serve.


Wednesday, September 16, 2020

Late Summer Tomatoes: Paprika Potato and Tomato Tarts

Puff pastry slathered with an herby cheese, topped with potatoes, tomatoes, and shallots, spiced just right and baked until golden and flaky. Yum!


We've have wonderful summer tomatoes this year and I've been using them in so many dishes this summer such as Tomato Avocado & Grilled Corn Salad, Simple Mediterranean Salad, or even my Green Bean, Chicken & Tomato Stir Fry.  Tomato Pie is a long standing southern dish that is completely scrumptious with fresh summer tomatoes, and today's recipe is a variation of that.  Here's a way to use some of those sweet dainty grape tomatoes while creating a light vegetarian dish that can be a main entree or served as a side dish.


PAPRIKA POTATO AND TOMATO TARTS

I served this as a light dinner along with a squash salad (recipe coming soon) since we've been having so much heat.  While this does require the oven, the amount of time to cook is relatively short which helped to keep the heat in the kitchen down.  


Light puff pastry is slathered with an herby delicate cheese and topped with thinly sliced potatoes, tomatoes, and shallots, spiced just right and baked until golden and flaky.  


Look how elegant these look!  They are really easy to put together and turn out wonderfully delicious.  They have such an outstanding presence they will make a splash when serving to family or guests.  Cut these into even smaller squares and enjoy as an appetizer at a cocktail party.  They are certainly versitile.

I hope you will enjoy these, they are quite a treat!


Enjoy!


KITCHEN TIP:  Use a mandoline to get wonderful thin sliced potatoes.  Be sure to use a guard or a cut resistant glove to keep your finders safe!  I use this one.  


Paprika Potato and Tomato Tarts


Makes 6 servings

1/2 pkg. frozen puff pastry, thawed
1/3 c. Boursin garlic and fine herbs cheese
1/4 lb small gold potatoes, but into very thin round slices
1 1/2 tsp thyme
2 tsp olive oil
1/2 tsp salt
1/4 tsp paprika
6-8 grape tomatoes
1/2 shallot, thinly slice lengthwise
1 egg, lightly beaten

Preheat the oven to 400 degrees.

Dust a service area lightly with flour and unfold the puff pastry.  Cut the pastry into 6 equal rectangles by cutting one horizontally down the middle, and then vertically cutting 1/3 of the way and then 2/3 of the length.  Score each of the rectangles along the edge to make a 1/2" border.  Do not cut completely through the dough.  Transfer the squares to a sheetpan.  Using an offset spatula divide the cheese among the rectangles, spreading with the scored border. 

In a medium bowl toss the potatoes, thyme, oil salt, and paprika together to coat.  Place potatoes over the cheese on the pastry.  Using a serrated knife cut the grape tomatoes into thirds lengthwise.  Arrange over the tomatoes.  Top with shallots.  Use a pastry brush to brush the borders with the egg wash.

Bake until pasty is golden brown and potatoes are tender, 15 - 20 minutes.  Serve immediately.


Saturday, April 27, 2019

Quick and Easy Chocolate Chip Cinnamon Rolls


Quick and Easy Chocolate Chip Cinnamon Rolls: Heavenly chocolately breakfast pastries! - Slice of Southern

Weekends are for breakfast and sometimes you need some homey, comforting baked goods.

I grew up with mom making quick cinnamon rolls from biscuit dough.  While they weren't the big and fluffy rolls we are used to these days from a yeast dough they sure where mighty tasty!

But what do you do when you don't have a lot of time to make something from scratch?

Turn to my...


QUICK AND EASY CHOCOLATE CHIP CINNAMON ROLLS


Quick and Easy Chocolate Chip Cinnamon Rolls: Heavenly chocolately breakfast pastries! - Slice of Southern


These are the perfect dish to make for a quick sweet breakfast treat.  A little help from refrigerated cinnamon rolls along with a addition of chocolate chips turn these rolls into a heavenly chocolatey breakfast pastry that everyone is going to love!


Quick and Easy Chocolate Chip Cinnamon Rolls: Heavenly chocolately breakfast pastries! - Slice of Southern


Quick and Easy Chocolate Chip Cinnamon Rolls: Heavenly chocolately breakfast pastries! - Slice of Southern


Items you will need:
9" round baking pan
semi-sweet chocolate chips
or sugar-free chocolate chips
refrigerated cinnamon rolls

Quick and Easy Chocolate Chip Cinnamon Rolls: Heavenly chocolately breakfast pastries! - Slice of Southern


These are quick and can be on the table in under 30 minutes.  They are a decadent treat for breakfast, with coffee, or for a snack.  Try these today!

Enjoy!


Quick and Easy Chocolate Chip Cinnamon Rolls

1 can refrigerated cinnamon rolls (I used lowfat)
1/3 cup semi-sweet chocolate chips (regular or sugar free)


Preheat your oven to 400 degrees.

Open cinnamon rolls and remove from package.  Carefully unroll each cinnamon roll and flatten just a bit with your fingers.  Place about 1 Tablespoon of chocolate chips along the length of the dough, depressing them into the dough.   Re-roll the cinnamon rolls and place them into a 9" round baking pan.  Bake for 13-15 minutes until cooked through and golden brown on the top.

Remove cinnamon rolls from the oven.  Heat the icing package for 10 seconds in the microwave.  Drizzle glaze over the warm cinnamon rolls.  Serve immediately.

Quick and Easy Chocolate Chip Cinnamon Rolls: Heavenly chocolately breakfast pastries! - Slice of Southern

Quick and Easy Chocolate Chip Cinnamon Rolls: Heavenly chocolately breakfast pastries! - Slice of Southern

Sunday, February 10, 2019

Valentine's Day Dessert: Chocolat en Croute (Product Review)


Trader Joe's Chcolat en Croute: What's better than a hot gooey chocolate filled pastry straight from the oven? - Slice of Southern

Today I wanted to share with you a product that I found that would make the most perfect dessert for Valentine's Day!

Trader Joe's  has a wonderful product that I found in the freezer section.  It's a Chocolat en Croute dessert that you can take home and bake in your own oven.   It's filled with the most decadent almond crème and chocolate and is enveloped in a heavenly braid and topped with slice almonds.  A quick bake in the oven produces a decadent dessert.

Trader Joe's Chcolat en Croute: What's better than a hot gooey chocolate filled pastry straight from the oven? - Slice of Southern

Trader Joe's Chcolat en Croute: What's better than a hot gooey chocolate filled pastry straight from the oven? - Slice of Southern

Oh man!  What's better than a hot gooey chocolate filled pastry straight from the oven?  Nothing!  And for Valentine's Day, chocolate is our go to treat and this dessert totally takes this special occasion over the top.  Everyone will be amazed with this dessert, and it is so easy to make!  

Trader Joe's Chcolat en Croute: What's better than a hot gooey chocolate filled pastry straight from the oven? - Slice of Southern

Trader Joe's Chcolat en Croute: What's better than a hot gooey chocolate filled pastry straight from the oven? - Slice of Southern

This is one great product find, and it's at Trader Joes.  The perfect way to impress your loved ones with a hot and fresh from the oven dessert!  Run to Trader Joe's today and get yourself a treat!  It's so worth it.

Enjoy!


Trader Joe's Chcolat en Croute: What's better than a hot gooey chocolate filled pastry straight from the oven? - Slice of Southern


Wednesday, December 14, 2016

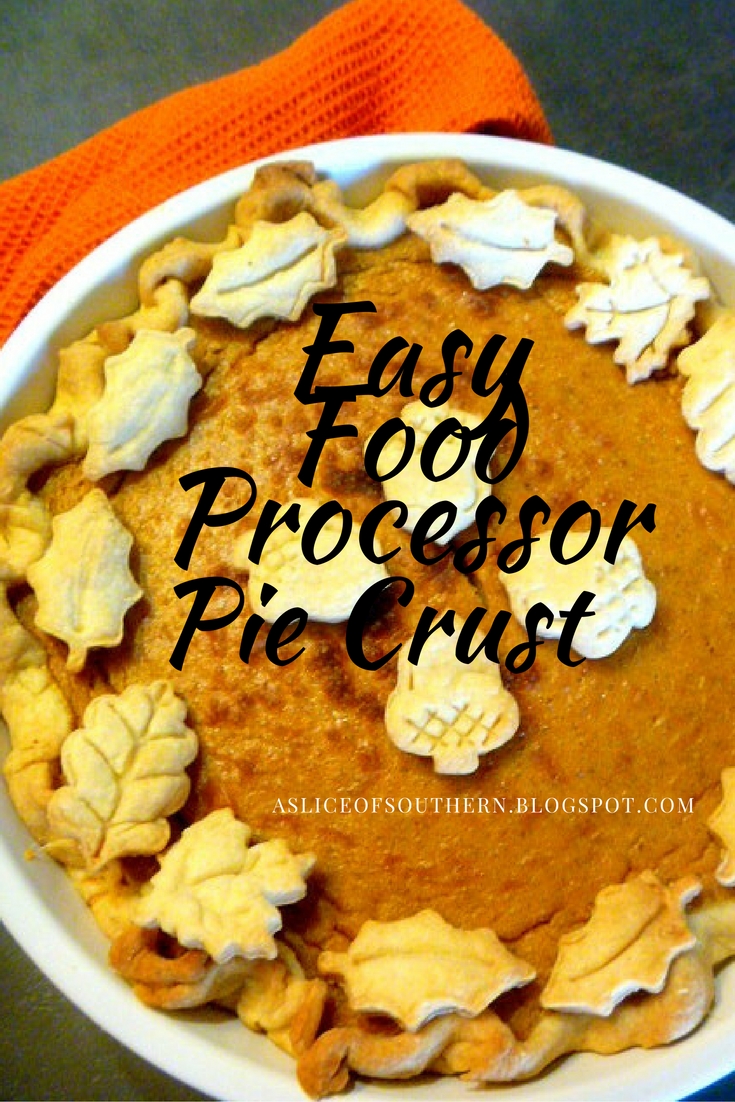
Easy Food Processor Pie Crust


Yum

My mom has been making pies all her life.  Every kind of cream pie you can imagine along with some excellent fruit pies thrown in the mix!

She's old school though.  She learned from her mom and went by feel when making the pie dough using a base recipe passed down from my Grandma.


Fast forward many years as an adult and I'm making the pies, and my mom is teaching me how to make the dough from scratch.  I know a lot of you are mystified by making homemade pie crust but trust me when I say, it is REALLY EASY.

Now I usually use my Grandma's recipe but this year I switched it up a bit.  I wanted something that had both butter (for flavor) and shortening (for flakiness) and is made using a food processor.  Off I go searching through my multitude of cookbooks where I found the perfect recipe that met all my wishes.  The King Arthur 200th Anniversary Cookbook is full of wonderful recipes.  I recommend you picking up a copy.  This cookbook is so fabulous and it has so many recipes in it that will fulfill ALL your baking needs.  They had a multitude of recipes for pie crust including the one I am showing you today. 


So I got out my handy dandy food processor (I use this one) and the ingredients, and made this in about 5 minutes.  No kidding.  It's so EASY in a food processor.  Dump and pulse, pulse, pulse.  Then in the frig goes the dough for 45 min to an hour and then you are ready to make pie!


Go for it!  Make your pie crust from scratch, and try this recipe.  The dough was so easy to work with, it rolled out like a dream, and held together really well when forming the edges.  The taste?  Heavenly!  The butter flavor stood out and the crust was flaky to boot!  You are sure to love this crust.


The pie you see here is my favorite Pumpkin Pie with Orange Marmalade.  I've been making this for years and the light citrusy flavor brings an extra special something to your dessert! 

Enjoy!


Easy Food Processor Pie Crust

source:  The King Arthur 200th Anniversary Cookbook

1 3/4 c All Purpose Flour
1/2 tsp salt
1 T sugar (optional)
1/2 c (1 stick) unsalted butter, cold or frozen, cut into 4 pieces
2 T solid shortening
about 6 Tablespoons ice water

Using the steel blade of the food processor, quickly blend flour, salt, sugar, butter and shortening.

Slowly pour in the ice water through the feed tube while pulsing the machine.  Process only until a mass of dough has formed on the side of the bowl.  Don't overdo it.  Wrap the dough in plastic and chill for at least an hour. (You can also freeze the dough at this point.)

Roll out and place inside pie dish.  Makes enough pastry for a 8 inch, double-crust pie or a single crust for a 9 - 11 inch pie.  This crust can be filled and baked at this point, or baked blind.


Saturday, October 17, 2015

Breakfast Baking with King Arthur Flour: Sausage, Apple, and Cheddar Pocket Pies


The other day I told you that I recently took a class at our new Sur La Table.  They partnered with King Arthur Flour to present a fun, hands-on class featuring Breakfast Baking.

King Arthur Flour is America’s oldest flour company, founded in Boston in 1790 bringing top-quality flours to bakers in the United States. Today they reside in Vermont and produce some of the best flours I've ever used.

I was so excited to have the chance to attend a backing class in conjunction with King Arthur Flour.  It was fabulous.  We made 3 different baked items in about 2 1/2 hours. Today I'm bringing you the second item we made, Sausage, apple, and Cheddar Pocket Pies.  

When I saw this on the menu I was thinking "Seriously? what a strange combination of items.  Apples and Sausage?  I don't think I'm going to like this....."  But we made them and I was the first to try them.  I think others in the class were thinking the same thing a me as they all watched me take a bite.  O M G...you would not believe the flavor profile.  Totally savory, with a smoky, onion flavor.  Subtle cheese for some gooey texture and then barely a hint of sweetness from the apple.  Excellent!


These are perfect for lunch, snacks on the go, or even a light dinner with a salad. You can make them as suggested in a 6" circle, or make them with a 3" circle for appetizers or snacks.  Whatever you like, it's very versatile, but make them you must!

Enjoy!


My previous item from this Breakfast Baking with King Arthur Flour is here. (Pumpkin Streusel Coffee Cake)


Sausage, Apple, and Cheddar Pocket Pies

source: adapted from King Arthur Flour

PREP     30 mins. to 40 mins.

BAKE     30 mins. to 35 mins.
TOTAL   1 hrs 30 mins. to 1 hrs 45 mins.
YIELD    8 pocket pies


Pastry
2 1/2 cups King Arthur Perfect Pastry Blend
1/2 teaspoon salt
1 cup (16 tablespoons) cold unsalted butter
1/4 to 1/2 cup ice water

Filling
10 ounces sausage meat, uncooked
1 cup peeled and diced Granny Smith apple
1 cup diced onion
1/2 cup (2 ounces) grated cheddar cheese
1/4 teaspoon ground black pepper

Directions
1) To make the pastry: Combine the flour, cheese powder, and salt.

2) Work in the butter until larger, pea-sized clumps form.

3) Drizzle in the ice water and toss, adding more water if necessary to make the dough cohesive.

4) Divide the dough in half, and shape each half into a disk. Wrap and refrigerate for at least 30 minutes.

5) To make the filling: Stir together all the ingredients.

6) Preheat the oven to 400°F.

7) Roll out each disk on a floured surface. Using a mini pie mold, 6" cutter, or circle template, cut out 16 circles, re-rolling the dough as necessary.

8) Place a heaping 1/4 cup filling in the center of eight pastry circles.

9) Dampen the dough around the filling with water, and top with an unfilled circle.

10) Seal with the help of a pie mold, or by pinching the edges with your fingers or a fork.

11) Place the pocket pies on a baking sheet, and bake for 15 minutes. Lower the temperature to 350°F and bake for an additional 15 to 20 minutes, until golden brown.

12) Remove the pies from the oven, and serve warm. Refrigerate any leftovers.


Monday, July 29, 2013

Easy Blueberry Skillet Cake


My love of breakfast goodies also runs over into brunch items too.

Having brunch with close friends is always fun.  Taking the time to eat outdoors is always a treat during the summer in Los Angeles.  The weather is generally cooler in the morning and it's a great time to sit and relax, laugh with friends and enjoy the day before the heat blasts us back inside for cover and cool air-conditioning.  

I came across a wonderful dish from Paula Deen that is perfect for a summer brunch. It's semi-homemade using canned biscuits as the base for the cake.  Add some fresh berries and some flavor powerhouses like brown sugar and cinnamon, and you have a winning combination!


Not only was this easy to put together, it feeds a crowd, and you serve it in the dish you cook it in!  How easy is that?  I love using my cast iron skillets to bake in and serve with.  Double duty all the way!  So off to the brunch this went and the most important part?  The taste!  I love anything with cinnamon and brown sugar.  So this was an instant winner for me.  However, the addition of the blueberries put this over the top.  

Let's just say there won't be any leftovers!


Easy Blueberry Skillet Cake
Adapted From Paula's Best Dishes Episode: Breakin' For Breakfast
Servings: 4 to 6
Prep Time: 10 min
Cook Time: 35 min
Difficulty: Easy

Ingredients

Streusel Topping:
1/4 cup slivered almonds
1/4 cup granulated sugar
2 tablespoons (1/4 stick) unsalted butter
2 1/2 tablespoons all-purpose flour
1 teaspoon ground cinnamon


Coffee Cake:
2 tablespoons (1/4 stick) unsalted butter
1 tablespoon light brown sugar
1 (12-ounce) tube buttermilk biscuits
1 cup blueberries, fresh or frozen and thawed

Directions

For the streusel topping: Combine the almonds, sugar, butter, flour, and cinnamon in a food processor and pulse until large crumbs form.

For the coffee cake: Preheat the oven to 375 degrees F.

In a 9-inch cast-iron or other ovenproof skillet, cook the butter and brown sugar over medium heat until melted. Arrange the biscuits in a single layer in the skillet. Scatter the blueberries over the biscuits, and then distribute the streusel topping over the berries. Bake until the biscuits are golden and a tester inserted in the center of a biscuit comes out clean, about 20 minutes. Allow to cool slightly and serve from the skillet. 


LinkWithin

Related Posts Plugin for WordPress, Blogger...