Showing posts with label food boards. Show all posts

Tuesday, October 20, 2026

Portable Autumn Picnic Board


This Portable Autumn Picnic Board is filled with meats, cheeses, fruit, and savory bites for an easy, no-cook lunch at the park or outdoor gatherings.


Portable Autumn Picnic Board


Weekends around our house often include some version of a Mediterranean lunch plate. Either a board filled with a little cheese, some savory meats, olives, fresh fruit, and something crunchy to nibble on, or a hot skillet dish that perfect for scooping onto crusty bread. It's one of our favorite ways to enjoy a relaxed lunch without spending much time in the kitchen.

When early fall rolls around, though, we love taking that same idea outdoors. There's something wonderful about packing up a picnic, heading to the park with our dog Bogie, and enjoying a beautiful autumn afternoon. I love spreading a plaid table scarf over a picnic table, setting out some delicious food and refreshing drinks, and settling in to enjoy the fresh air and a little time away from home.

That's how this Portable Autumn Picnic Board came together. I took some of our favorite snacks and gave them a seasonal twist with an assortment of cheeses, savory meats, sweet dates, juicy grapes, fig jam, crackers, and other little bites. Everything is arranged in a handled ceramic serving dish, then wrapped snugly for the trip so it's ready to enjoy when we arrive.

It's colorful, delicious, and wonderfully uncomplicated. There's no cooking, no elaborate preparation, and no fussing with the food once you get there. Just unwrap, set it on the table, pour something refreshing to drink, and enjoy a leisurely fall picnic. And the best part? This little portable spread works just as beautifully for a beach afternoon, an outdoor concert, or a casual gathering with friends.

Enjoy!


Ingredients

Building Your Autumn Picnic Board

The beauty of a picnic board is that there really aren't any rules. Start with a few favorite cheeses and meats, add something fresh and something crunchy, and finish with a little sweetness. Here's what went into my autumn picnic board.

What I Used on My Board

Cheeses

  • Havarti Dill Cheese: Creamy, mild, and wonderfully flavorful with its little flecks of dill.

  • Cheddar Cheese: A familiar favorite that adds a slightly sharper contrast to the Havarti.

Meats

  • Salami: Savory and full of flavor, perfect for pairing with cheese and crackers.

  • Sliced Turkey: A lighter, mild option that balances the richer salami.

Bread & Crackers

  • Sliced Baguette: A rustic addition that's perfect with cheese or a little fig jelly.

  • Parmesan Rosemary Crackers: Crisp and savory with delicious herbal notes.

  • Town House Crackers: Buttery, flaky crackers that everyone loves.

Fruit & Nuts

  • Medjool Dates: Naturally sweet and wonderfully chewy, bringing a little autumn richness.

  • Fresh Grapes: Juicy and refreshing between bites of cheese and meat.

  • Almonds: A satisfying crunch that fills in those little spaces on the board.

Savory Extras & Finishing Touches

  • Fig Jelly: A lovely sweet addition that pairs beautifully with cheese and crackers.

  • Kalamata Olives: Briny and bold, adding a Mediterranean touch.

  • Fresh Basil Sprigs: A little greenery for color, freshness, and a beautiful finishing touch.


Make It Your Own: A Mix-and-Match Picnic Board Guide


Equipment: My Picnic Essentials

You don't need special equipment to create a beautiful portable board. A few practical pieces make arranging, packing, and serving much easier.

  • A handled ceramic serving dish or shallow tray: I love using a dish with handles because it's easy to carry and makes a pretty presentation right on the picnic table.

  • Small bowls or ramekins: Perfect for olives, fig jelly, or anything that might spill or spread onto the other ingredients.

  • Plastic wrap or a fitted lid: Keeps the arrangement together during transport.

  • A small cheese knife or spreader: Handy for serving soft cheeses and fig jelly.

  • An insulated picnic bag or cooler with ice packs: Essential for keeping the meats and cheeses properly chilled.

  • A plaid table scarf or picnic blanket: Not essential to the food, of course, but it makes the setting feel wonderfully autumnal!


Let's Make It Together

This is one of those projects that's just as enjoyable to put together as it is to eat. I start by placing the small dish of fig jelly on my serving tray. This helps provide structure to your platter and gives me a place to build around.

Next, I tuck in the salami and folded turkey slices along the side of the jelly bowl in a river-like flow.  This will help the meat stand up in a pretty design.  Then comes the cheese placed in 3 different sections, followed by the baguette and crackers tucking them along the rims of the dish. Then comes the fun part—filling all those little spaces with grapes, dates, and almonds. A few fresh basil sprigs add a pretty finishing touch.

Once everything looks inviting, I wrap the dish snugly, pack it into a cooler, and we're ready to head out. When it's time for lunch, all that's left to do is uncover the board and enjoy!


The Secret to a Perfect Portable Picnic Board

The trick to a picnic board that travels well is to arrange everything snugly without overcrowding it. Start with the larger items, tuck smaller ingredients into the spaces, and keep anything wet or sticky in its own little container. A shallow serving dish that is covered tightly with plastic wrap or a container with a secure cover helps keep the arrangement intact.  Keep the board chilled until you're ready to serve, and you'll have a beautiful spread that looks almost as good at the park as it did in your kitchen.


Add Your Touch

One of my favorite things about a picnic board is how easily it changes with the occasion.

Think Outside the Charcuterie Board!  To make your plate easily portable you'll want a vessel with a little bit of a lip on the sides so items stay contained within when transporting.  Flat boards may not hold up as well to traveling as items may shift or fall off the edges.  Think baking dishes, serving trays that have handles, or smaller aluminum baking trays.  Here are some examples.  


For an Autumn Afternoon: Add crisp apple slices, fresh pears, fig jam, toasted pecans, and aged cheddar for those cozy harvest flavors.

For a Mediterranean-Inspired Lunch: Include feta, hummus, pita wedges, Kalamata olives, marinated artichokes, cucumbers, and roasted peppers.

For a Beach Day: Keep things light and refreshing with turkey, mild cheeses, grapes, berries, crackers, and fresh vegetables. Pack everything well chilled and protected from the sand.

For an Outdoor Concert: Choose easy finger foods such as cubed cheeses, rolled meats, sturdy crackers, grapes, and nuts. Keep the spread simple so everyone can nibble without much fuss.

For a Casual Gathering: Make a larger board with extra cheeses, meats, seasonal fruits, and a few different spreads. It's an easy centerpiece that encourages everyone to gather around and graze.


Set the Mood

Meals taste even better when the table feels inviting.  Here are a few simple ways to set the mood for this recipe.


There's something so enjoyable about taking an ordinary weekend lunch and turning it into a little outdoor occasion. A pretty table covering, a delicious assortment of favorite foods, and a beautiful fall afternoon are really all you need.

I hope this Portable Autumn Picnic Board inspires you to pack up a few favorites, head outdoors, and enjoy a leisurely lunch of your own. Whether it's a quiet afternoon at the park, a beach picnic, or a casual gathering with friends, sometimes the simplest meals create the nicest memories.

If you love relaxed Mediterranean-inspired flavors, you might also enjoy my Mediterranean Quinoa Salad or Farmstand Corn & Orzo Salad with Arugula for another fresh and flavorful lunch idea.


Before You Start

How far ahead can I assemble the picnic board?
You can prepare many of the ingredients the day before. Slice the cheeses, portion the meats, wash and thoroughly dry the grapes, and gather the crackers and nuts. For the freshest appearance and texture, arrange the board shortly before heading out. If assembling in advance, refrigerate it covered and add the crackers just before serving.

How do I keep a picnic board cold while traveling?
Pack your covered board in an insulated cooler with plenty of frozen ice packs. Keep perishable ingredients at 40°F or below until serving. Once the board is out, don't leave perishable foods unrefrigerated for more than two hours, or one hour when temperatures are above 90°F.

What's the best way to transport a charcuterie-style picnic board?
A shallow, sturdy serving dish with handles works beautifully for short trips, provided it fits securely inside your cooler. Wrap it snugly with plastic wrap or use a fitted lid. Place small containers around ingredients that could shift, and keep the dish level during transport.

What foods should I pack separately?
Crackers, bread, and delicate crispy items are best packed separately if the board will travel a long distance. Be mindful of juicy fruits, olives, or any item that can give off moisture and cause other items to become soggy.  

Can I make a vegetarian picnic board?
Absolutely! Skip the meats and add extra cheeses, hummus, roasted vegetables, marinated artichokes, nuts, fresh fruit, and a selection of breads or crackers. Choose vegetarian cheeses if needed.

How much food should I plan per person?
For a picnic board served as lunch, plan approximately 3–4 ounces of cheese and 2–3 ounces of meat per person, along with bread, crackers, fruit, nuts, and other accompaniments. For an appetizer board, you can use smaller portions.


Saturday, November 22, 2025

Easy Make-Ahead Applesauce Oatmeal Bread (Perfect for a Thanksgiving Breakfast Board)


Bake this Easy Make-Ahead Applesauce Oatmeal Bread ahead of Thanksgiving and wake up to a cozy, stress-free breakfast board.


Easy Make-Ahead Applesauce Oatmeal Bread (Perfect for a Thanksgiving Breakfast Board)


Thanksgiving morning should feel cozy, calm, and full of anticipation—not rushed or stressful. Between the oven timers, last-minute side dishes, and the smell of pumpkin pie in the air, it’s easy for breakfast to get lost in the shuffle. That’s why I love this Easy Make-Ahead Applesauce Oatmeal Bread.

Baked ahead and stored in the freezer, this warm, spiced loaf can be sliced and ready to enjoy with minimal effort. Simply place it on the counter to thaw the night before Thanksgiving.  In the morning, you can slice it, warm it up, and place it on a board with butter, jams, fresh fruit, and nuts, and you’ve got a beautiful, stress-free breakfast spread that will delight everyone without adding to the day’s chaos.

It’s the perfect combination of comfort, convenience, and cozy fall flavors, making it a small but meaningful way to start the holiday right—relaxed, happy, and full of anticipation for the feast to come.


Why This Bread Works

There are a few reasons this Applesauce Oatmeal Bread has become my go-to for Thanksgiving morning:

  1. Easy to Prep
    The ingredients are simple and pantry-friendly—flour, oats, applesauce, warm spices, and a handful of walnuts. Mixing the wet and dry ingredients takes just a few minutes, so even a busy weeknight or weekend morning is no problem.

  2. Make-Ahead & Freezer Friendly
    One of the biggest advantages is that you can bake this loaf ahead of time. Once it’s cooled, it freezes beautifully, wrapped tightly to lock in freshness. The night before Thanksgiving remove from the freezer and thaw overnight on the counter, and you’re ready to slice and serve—no extra kitchen stress required.

  3. Warm, Cozy Flavors
    Cinnamon, allspice, nutmeg, and oats give this loaf that quintessential fall flavor, while applesauce keeps it moist without being heavy. Each bite feels comforting and homey, making it perfect for a holiday morning.

  4. Slices Beautifully for Serving
    Unlike some quick breads that crumble or fall apart, this loaf holds together well. That makes it ideal for a Thanksgiving breakfast board, where slices can be arranged alongside butter, jam, fresh fruit, and nuts for a simple but elegant presentation.

  5. Versatile for Any Morning
    While it shines on Thanksgiving, this bread is just as wonderful for weekend breakfasts, brunches, or even as an afternoon snack. Once you know the convenience of a make-ahead loaf, it’s hard to go back to scrambling on busy mornings.


Make-Ahead + Freezer Instructions

One of the best things about this Applesauce Oatmeal Bread is how perfectly it lends itself to make-ahead planning—which is a lifesaver on Thanksgiving morning. Here’s how to prep it in advance:

Baking Ahead  (I often make this the weekend before Thanksgiving)

  • Prepare the loaf according to the recipe instructions and let it cool completely. (recipe below)
  • Once cooled, wrap the loaf tightly in plastic wrap, then cover with aluminum foil for extra protection.

Freezing

  • The loaf can be frozen for up to 3 months.
  • If you like, slice the bread before freezing—this makes it easy to grab exactly how many slices you need without thawing the whole loaf. I often leave the loaf whole and thaw the entire loaf so we can eat it throughout the Thanksgiving weekend. (if there is any left!)

Thawing

  • The night before Thanksgiving, remove the wrapped loaf from the freezer and place it on the counter to thaw overnight.
  • If you prefer warm slices, place individual slices or the whole loaf in a 300°F oven for 5–10 minutes until heated through.


Breakfast Board Ideas

This Applesauce Oatmeal Bread is not just delicious—it’s beautifully versatile and makes a stunning centerpiece for a simple Thanksgiving morning breakfast board. Here are some ideas to turn your loaf into a festive, stress-free spread:

1. Sliced Bread as the Anchor

  • Slice the loaf evenly and arrange the pieces on a board or platter.
  • Sprinkle a few extra oats or chopped nuts on top for a rustic, cozy look.

2. Add Spreads and Toppings

  • Butter & Softened Cream Cheese – classic and comforting.
  • Jams or Fruit Preserves – try apple, pear, or spiced cranberry for a seasonal touch.
  • Nut Butters – almond or walnut butter pairs beautifully with the flavors in the bread.

3. Fresh Fruit

  • Seasonal fruits like apple slices, grapes, pears, or berries add color, freshness, and a natural sweetness.

4. Crunchy Accents

  • A bowl of nuts like walnuts, pecans, or almonds add texture.
  • Mini granola clusters or lightly spiced roasted nuts also work well.

5. Extras for Variety

  • Mini muffins, yogurt cups, or small pastries can complement the loaf.
  • Warm drinks such as coffee, tea, hot chocolate, or spiced cider round out the board and make the table feel festive.
Pro Tip: Gather your other board items the night before if possible—you can place them in containers or ziploc bags and refrigerate those that require it. That way, Thanksgiving morning is as effortless as it is beautiful.

With these simple touches, your breakfast board will feel elegant, inviting, and stress-free, while letting your make-ahead Applesauce Oatmeal Bread shine as the star of the morning.


What Ingredients Do I Need

This Easy Make-Ahead Applesauce Oatmeal Bread uses simple pantry staples and a few cozy, fall-inspired ingredients. Here’s what you’ll need:

Wet Ingredients

  • Granulated sugar – adds sweetness without overpowering the warm spices
  • Eggs – bind the loaf and give structure
  • Vegetable oil – keeps the bread moist (I used canola oil)
  • Vanilla extract or boiled cider – adds warmth and seasonal aroma (I used boiled cider - it adds a punch of apple flavor)
  • Applesauce (unsweetened) – naturally sweet, adds moisture, and keeps the bread tender

Dry Ingredients

  • Golden wheat flour – for a subtle, nutty flavor (this is white wheat flour)
  • Unbleached all-purpose flour – adds structure
  • Baking powder & baking soda – help the loaf rise perfectly
  • Cinnamon, allspice, and nutmeg – warm fall spices that make this bread smell like the holidays
  • Salt – balances sweetness and enhances flavor
  • Quick-cooking oats – add texture and heartiness

Optional Add-Ins

  • Chopped walnuts – for crunch and extra flavor
  • Extra oats or nuts for topping – make the loaf look rustic and festive

Note: Most of these ingredients are likely already in your pantry. The applesauce, spices, and nuts give this loaf its cozy, Thanksgiving feel without any complicated steps.


Kitchen Tips & Variations

Kitchen Tips

  • Use unsweetened applesauce for the best texture and balanced sweetness — sweetened versions can make the loaf overly soft.
  • Don’t skip the oats on top. They add a rustic, cozy finish that looks great for breakfast boards.
  • Check for doneness early. Every oven is different — start testing at the 50-minute mark.
  • Let it cool fully before slicing. This helps the crumb set and prevents crumbling, especially if you plan to freeze it.

Variations

  • Cranberry Twist: Fold in ½ cup dried cranberries for a festive pop of color and tang.
  • Maple Glaze: Drizzle a light maple icing over the cooled loaf for extra holiday sweetness.
  • Nut-Free Version: Swap walnuts for pepitas or omit them altogether for nut free serving.
  • Apple Chunk Upgrade: Add ½ cup small diced apples for more texture and extra juicy apple flavor.


Thanksgiving morning doesn’t have to feel rushed — especially when you’ve already baked something cozy, wholesome, and ready to slice. This Applesauce Oatmeal Bread is your little gift to yourself and your family: thaw it overnight, brew the coffee, and ease into the holiday with something homemade and stress-free.

If you build a breakfast board this year, I’d love to hear how you styled it! Share your ideas, your spreads, or photos of your board in the comments — especially if this bread becomes the anchor. Happy Thanksgiving, and enjoy every slow, delicious moment of the morning.


HUNGRY FOR MORE? Subscribe to emails at the top of this page and follow along on Facebook,  and Pinterest for all of the latest updates.


    RECIPE IS DOWN BELOW👇     


Thursday, August 7, 2025

Creamy Summer Labneh with Peaches, Pistachios & Prosciutto – A Modern Mediterranean Mezze

This Creamy Summer Labneh with Peaches, Pistachios, & Prosciutto is a vibrant blend of sweet and savory. Topped with fresh fruit, herby oils, and warm pita, it's the perfect modern Mediterranean mezze for effortless summer entertaining.


Creamy Summer Labneh with Peaches, Pistachios & Prosciutto – A Modern Mediterranean Mezze


Warm summer evenings and a night out to celebrate—what more could you ask for?  My husband and I recently visited a new Mediterranean restaurant for a special night out, and while the entire meal was outstanding, it was the appetizer that I couldn't get out of my head.  It was a whipped burrata dish topped with juicy stone fruit, paper-thin prosciutto, and fresh arugula—a beautiful balance of creamy, sweet, savory, and peppery that we devoured without hesitation.

For days I couldn’t stop thinking about it and just new I had to re-create this dish. I loved the combination of flavors, but I wanted to make it my own—with a little twist. Instead of burrata, I reached for labneh, a rich and tangy strained yogurt that brings that same creamy texture but with a bit more substance and a fresh Mediterranean feel. Paired with diced peaches and nectarines, chopped pistachios, torn prosciutto, and a drizzle of basil and pistachio oils, it turned into a mezze-style platter that felt just as indulgent, but even easier to pull together.

This dish is as fresh and vibrant as summer itself, and honestly—it couldn’t be simpler. Just spread, sprinkle, drizzle, and serve. The result is a beautiful, flavor-packed appetizer that looks impressive on the table but takes only minutes to assemble. Whether you’re hosting friends or just adding something special to a quiet night in, this modern Mediterranean mezze is bound to become a seasonal favorite.

Enjoy!


What Ingredients Do I Need?

Here’s everything you’ll need to bring this creamy, summery mezze to life:

  • Labneh – Tangy, rich, and creamy. This is the base of your dish and adds that perfect savory note.

  • Peach & Nectarine – Juicy and sweet, diced for a burst of summer flavor in every bite.

  • Prosciutto – Thinly sliced and torn into ribbons. Adds a salty contrast to the sweetness of the fruit.

  • Arugula – Peppery and fresh, it balances the creaminess and adds a pop of green.

  • Pistachios – Chopped for crunch and nutty richness.

  • Basil oil – Herby and aromatic, perfect for drizzling.

  • Pistachio oil – Adds depth and a luxe finish.

  • Pita wedges – Warmed just before serving for the perfect dipper.


Substitutions and Variations

Substitutions

Don’t have everything on hand? Here are a few easy swaps using pantry or grocery staples:

  • Labneh → Use full-fat Greek yogurt (strained overnight with cheesecloth) or whipped cream cheese for a similar texture.

  • Prosciutto → Try crisped-up pancetta, thin slices of salami, or even omit for a vegetarian version.

  • Pistachios → Swap with chopped almonds, walnuts, or sunflower seeds.

  • Basil oil / Pistachio oil → Drizzle with good-quality olive oil and a sprinkle of fresh herbs like basil or mint.


Variations

Want to change it up a little? Try one of these flavorful twists:

  • Make it Vegetarian: Skip the prosciutto and add crumbled feta or marinated olives for a salty bite.

  • Add a Sweet Drizzle: A touch of honey or pomegranate molasses can elevate the fruit and bring a sweet-savory balance.

  • Swap the Fruit: Use plums, cherries, or figs in place of peaches and nectarines depending on what’s ripe and in season.


Kitchen Tips & Notes

  • Make Ahead Friendly: You can prep the labneh base and toppings ahead of time, then assemble just before serving.

  • Warm the Pita: Lightly toast or warm pita wedges right before serving for the best texture and flavor.

  • Use a Shallow Platter: This makes it easier to spread the labneh and build those beautiful layers on top.

  • Don’t Skip the Drizzle: Even just a swirl of olive oil and a few fresh herbs brings the whole dish together.


     "Set the Mood"     


This mezze-style appetizer was practically made for lingering summer evenings. Whether you’re dining al fresco under string lights or setting out a spread for weekend brunch, this dish brings that effortless wow-factor that turns any table into a celebration.

Serve it on a beautiful shallow platter with warmed pita wedges tucked alongside and a chilled glass of rosé or sparkling water with citrus slices. It’s just as perfect for a low-key poolside snack as it is for a backyard gathering or bridal brunch. Want to make it feel even more Mediterranean? Add a few small plates of olives, marinated feta, or stuffed grape leaves for an easy mezze board moment.

From garden parties to casual cocktail nights, this creamy summer labneh fits right in—and makes your guests feel like they’re somewhere just a little bit special.


.


.HUNGRY FOR MORE? Subscribe to emails at the top of this page and follow along on Facebook,  and Pinterest for all of the latest updates.


Wednesday, December 16, 2020

Holiday Best Snacking Board

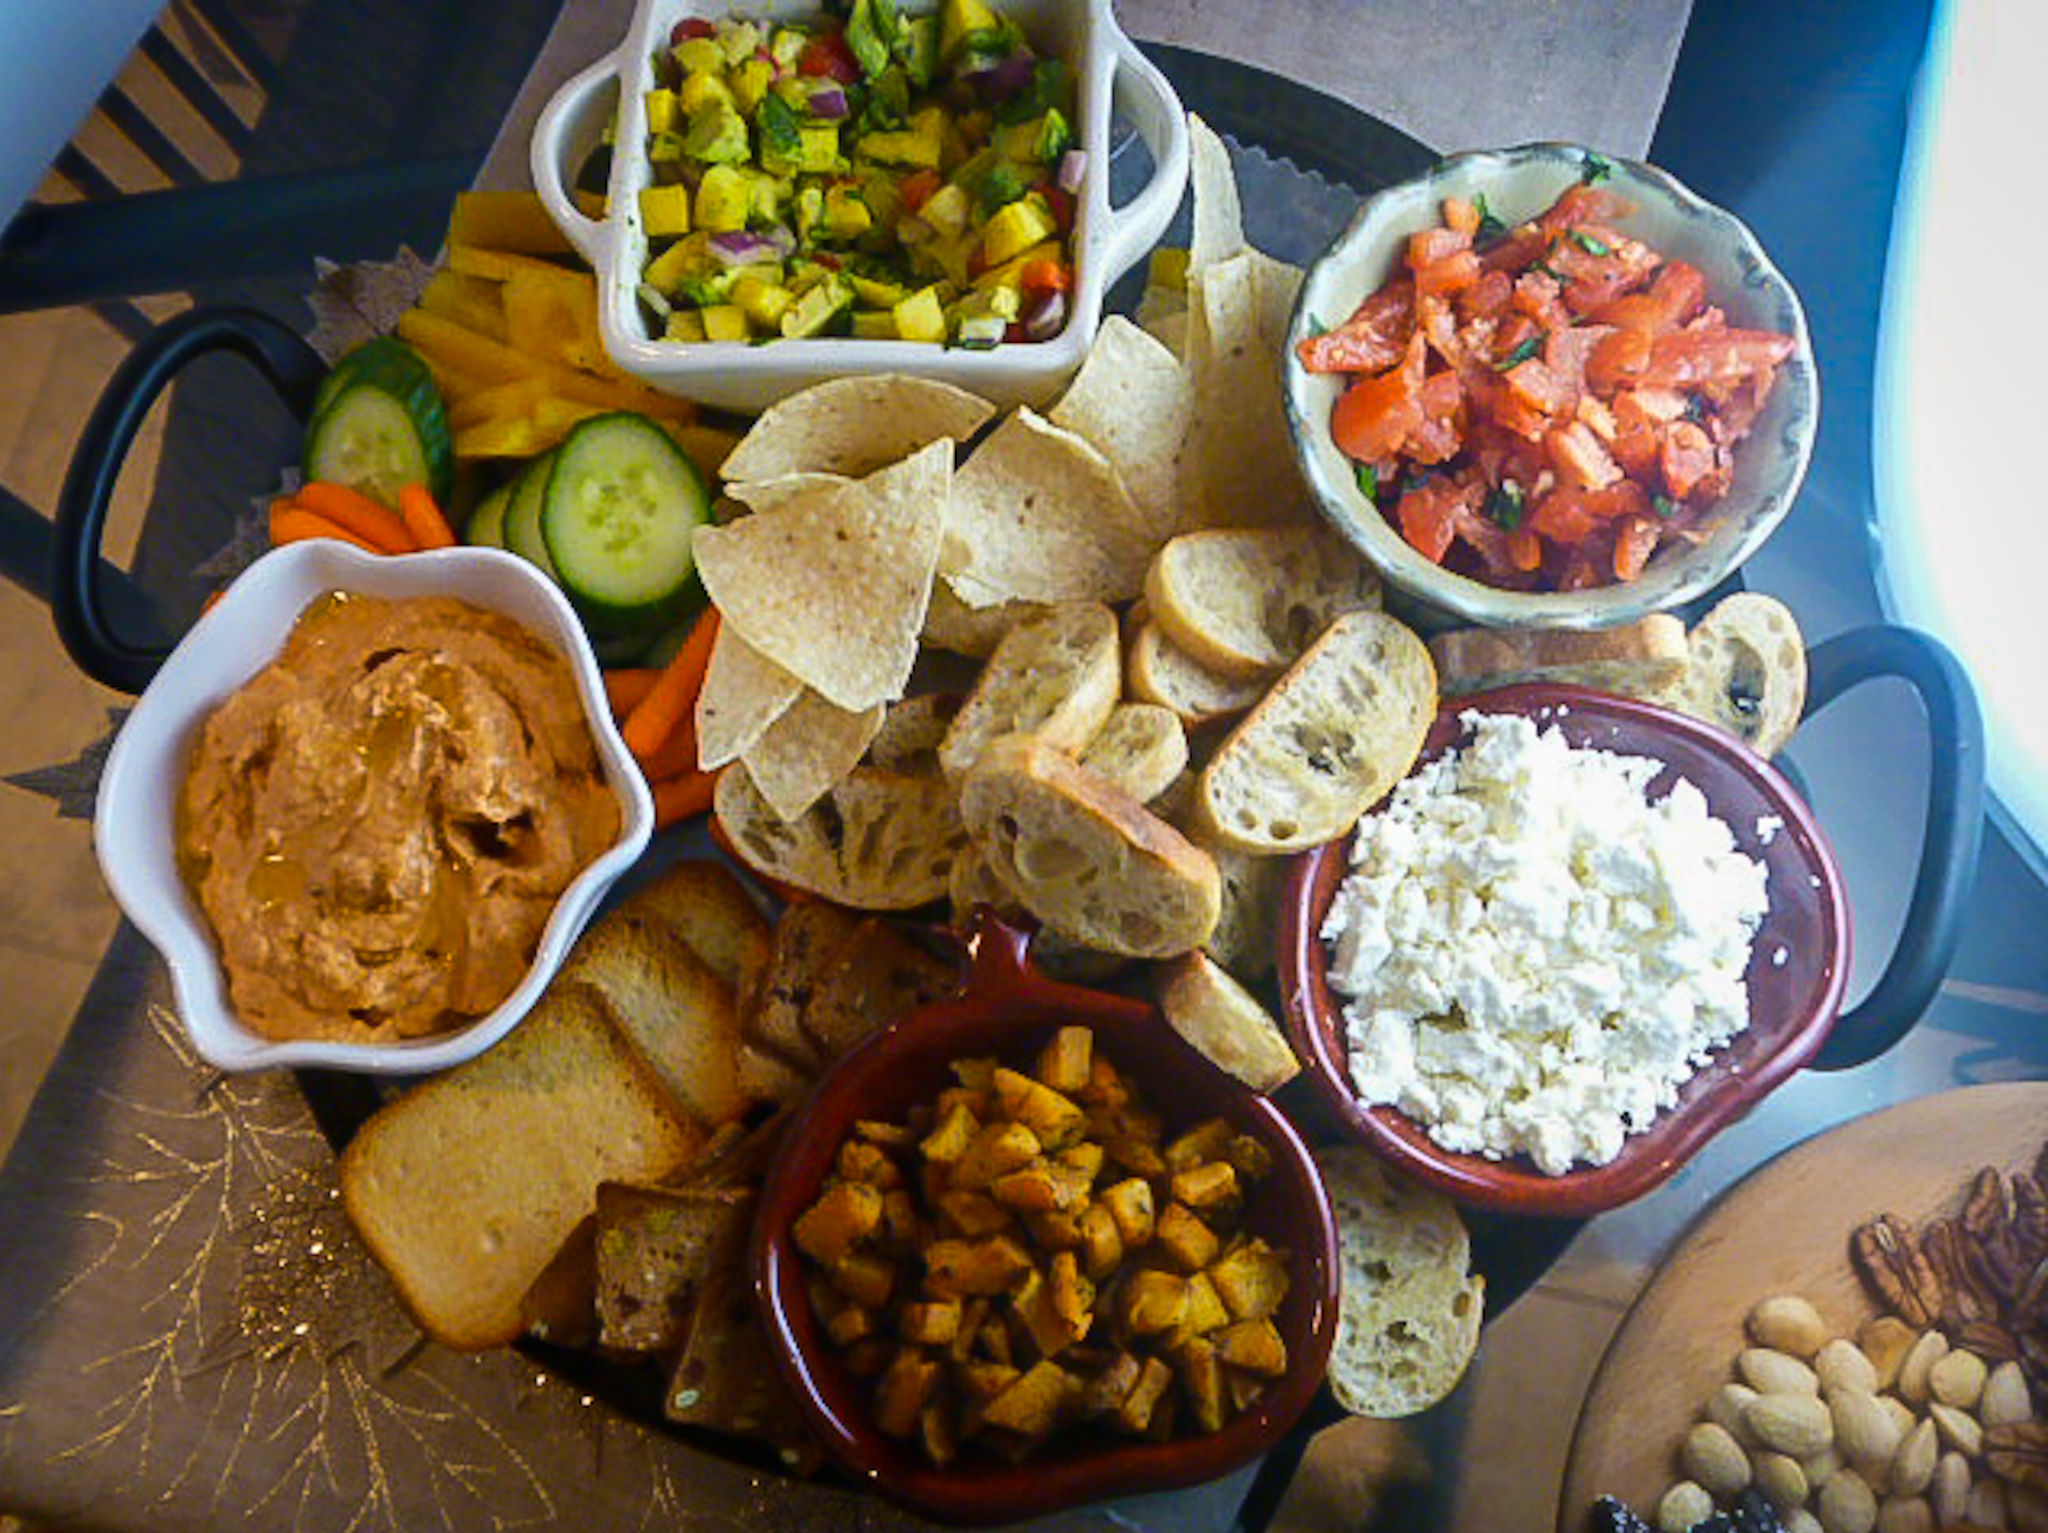
For a weekend or a pre-holiday meal, enjoy my Holiday Best Snacking Board with savory dips, a variety of dippers, along with some nuts, fruits, and sweets.  


Holiday Best Snacking Board

What better way to get people to join you at the table than with a wonderful snacking board that holds a plethora of delectable goodies.  A snacking board is the ultimate and easy way to gather.  They are great for parties when we can all have them, but for now they are the perfect way to bring the family together.

With some help from Trader Joe's I was able to pull together two outstanding snacking boards.  You don't have to make things homemade all the time, so take some help from some special gourmet items and put together a spread that's healthy, appetizing, and filling.  


The first board is full of toppings and dipping vessels.  From hummus, to a goat cheese log, to crostini that you put together your way with a variety of toppings.  The second board is full of finger snacks.  From dried fruits, to various nuts, and some sweets thrown in the mix.  This is definitely a sweet & salty board.  

All together we have one decadent meal ahead of us!


When would you use a snacking board?

  • Family get-togethers
  • Game night
  • Girls night
  • Pre-holiday meals
  • Holiday snacks
  • New Year's eve
  • An appetizer party
  • Movie night
  • Weekend Brunches
  • Snacking Lunches
  • Cocktail parties
  • Pool party


What ingredients do I need?

For the:  Finger Food and Dipping Board

  • Mango Salsa
  • Crumbled Feta Cheese
  • Trader Joe's Spicy Hummus Dip
  • Homemade Bruschetta (recipe below)
  • Homemade Butternut Squash Crostini (recipe below)
  • Homemade Crostini (recipe below)
  • Tortilla Chips
  • Trader Joe's Pistachio Pomegranate Crisps
  • Trader Joe's Brioche Toasts
  • Carrots
  • Cucumber slices
  • Bell pepper slices
  • Trader Joe's Cranberry Chèvre Fresh Goat Cheese


For the:  Fruit, Nuts, and Sweets Board

  • Trader Joe's Dark Chocolate Stars Shortbread Cookies
  • Trader Joe's Candied Pecans
  • Dried Apricots
  • Marcona Almonds
  • Walnuts Halves
  • Pecan Halves


Substitutions and Variations
  • For the dips try pico de gallo, tzatziki, white bean dip, other flavored hummus, spinach & artichoke, jams, fruit salsa
  • For the dippers try pita bread, pretzel chips, bagel chips, or pita chips, 
  • For the vegetables try celery, broccoli, endive, and snap peas
  • Don't like nuts, do an olive tray, or a sweets only tray
  • Add more fresh fruits such as strawberries, grapes, and sliced apples
  • Add other dried fruit such as apples, pineapples, figs, and dates


Kitchen Notes and Tips
  • Use a large wooden tray or platter as your board
  • Make sure your tray is food safe, otherwise line with a piece of parchment paper
  • Arrange big items first on your board and fill in with the smaller items
  • Use most of the space on your board for an abundant look
  • Dips and spreads should be placed in small bowls and spread out in different areas on the board 
  • Fill in the spaces under the dips and spreads with the dippers. 
  • Fan pieces for a nice look
  • Groups similar items together for impact


Butternut Squash Crostini


cubed butternut squash (store-bought)
olive oil
salt & pepper
garlic powder
ground sage

Preheat oven to 400 degrees.

Cut the cubed butternut squash into small bite sized pieces.  Place on a large rimmed sheet pan, and drizzle with olive oil.  Season well with salt, pepper and garlic powder plus a small sprinkle of ground sage.
Toss to evenly coat and roast about 25-30 minutes or until the squash is fork tender but not too soft.  To serve use place feta cheese and some squash on a crostini.


Bruschetta


    2-3 ripe Roma tomatoes seeds removed, finely diced, and gently patted dry 
    3-4 fresh basil leaves sliced into thin ribbons
    2 cloves garlic finely minced
    1 1/2 - 2 Tablespoons olive oil

Combine diced tomatoes, basil, and minced garlic in a bowl.  Drizzle olive oil enough to coat.  Stir to combine and allow to rest for flavors to develop 30 minutes.   Place in a small bowl to serve.


Crostini

1 baguette, cut into 1/2" slices
2 Tablespoons extra-virgin olive oil
flaky kosher salt

Preheat oven to 400 degrees.

Lightly coat both sides of bread with olive oil and arrange in single layer on a baking sheet.
Bake on the center rack for 10 minutes, flipping them halfway through, until golden and slightly crisp. Sprinkle with salt and serve.


LinkWithin

Related Posts Plugin for WordPress, Blogger...