Monday, October 26, 2020

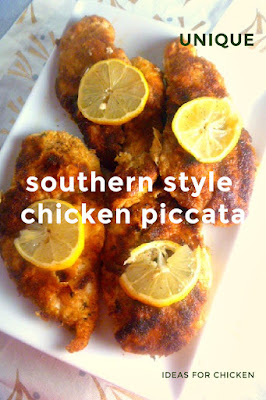
Southern Style Chicken Piccata

Thin chicken breasts dredged in breadcrumbs and sautéed until golden and crispy, then smothered in an addictive lemon-wine pan sauce.  Fabulous!


I can't believe that I've never posted a recipe for Chicken Piccata!  As much as I love everything lemon and as easy of a weeknight dinner as this dish is, I sure am slow to provide you with my version of Chicken Piccata.  Well today's the day.


My version is more of a Southern Style way to bread and cook the chicken.  The south loves everything breaded and Chicken Piccata is no exception.  Typically you would just dredge pounded thin chicken breasts in flour and then sauté them in a skillet.  We are taking it one step further and creating 3 dredging stations:  flour, eggs, and Italian breadcrumbs.  This creates a coating similar to fried chicken and results in a wonderfully crispy crusted chicken.  


For the sauce I used a combination of broth and wine, along with the lemon to make a tangy and fabulous sauce to pour over the chicken.  Again the original dish calls for capers in the sauce but I left those out.  You could certainly add those back in if you prefer.


I dare say my Southern Style version of Chicken Piccata is really outstanding.  The chicken turns out crispy and the sauce is to die for.  This comes together in under 30 minutes and if perfect for a weeknight meal, Sunday supper, or for when company comes.  This version of an essential Italian dish should be one kept on hand in your recipe arsenal.

Enjoy!


Southern Style Chicken Piccata

serves 4

4 thin cut boneless skinless chicken breasts
Salt and pepper to taste
1 cup all-purpose flour
2 large eggs 
1 cup Italian seasoned dry breadcrumbs
1/2 teaspoon paprika
2 Tablespoons olive oil + 1 Tablespoon butter 
1/4 cup white wine 
1/4 cup low sodium chicken broth 
1/3 cup fresh lemon juice
2 tablespoons  butter
Salt and pepper to taste
Lemon slices for serving

Preheat your oven to 375 degrees.

Season chicken breasts with salt and pepper.  Create you dredging stations.  To one shallow bowl add the flour.  To another, add the eggs and beat until combined.  To a third bowl add the breadcrumbs and the paprika.  Mix together to combine.

Dredge chicken in the flour, shake off excess and dip in the eggs.  Allow excess egg to drip off and then place in the breadcrumbs and coat both sides.  Place these on a baking sheet and continue the process for the other chicken breasts.

Heat olive oil  and butter in a large skillet over medium high heat.  Add the chicken breasts and cook until done and golden brown, about 4-5 minutes per side.  Remove chicken from the skillet to a plate.

Add the wine, chicken broth, and lemon juice to the pan and scrape up any brown bits in the bottom.  Bring the sauce to a boil and allow to reduce by 1/2.  This should take several minutes.  Season with salt & pepper to taste.  Turn off the heat and add the butter, and stir until melted.  Add chicken back to the skillet and coat both sides.

Serve chicken on a platter adding remaining sauce of the top.  Add a slice of lemon for garnish and serve.  


adapted from: Grandbaby Cakes


Saturday, October 24, 2020

Essential Pumpkin Bread

A classic Pumpkin Bread that's tender and moist, with the perfect amount of warm spices.  No one can resist this bread!


Everyone needs and essential recipe for Pumpkin Bread in their recipe box and this one is just the BEST.  It's the perfect recipe to use as is, or as a base recipe for mix-ins.  


When fall rolls around I can't wait to start baking with all the warm spicy flavors.  But I'm always torn on what to make first.  Something with apples, pumpkin, or maybe maple?  This year pumpkin won the race.  In looking at what bakery item to make I noticed that while I have many pumpkin recipes such as Pumpkin Waffles with Maple Cream Syrup , Blueberry Pumpkin Muffins with Almond Oat Streusel, Farmstyle Pumpkin French Toast, and Pumpkin Pie Bars, but I haven't posted a basic Pumpkin Bread recipe.  How can that be?


Well I'm here to provide you with a great recipe today.  One that you will make year after year.  Quick breads are easy to make and this recipe proves that.  You can literally mix this in one bowl and no mixer is required!  Quick breads are really the best.  Here are a few of my other recipes you may like:  Brown Sugar Sour Cream Banana Bread, Mom's Old Fashioned Country Zucchini Bread, and  Blueberry Coconut Banana Bread.


Now I used a new pan this time around instead of the standard loaf pans.  You can purchase my pan here.  I like making small loaves to give as presents to friends and neighbors during the holidays, which also helps us from eating all this decadent goodness!  This recipe will make 1 standard loaf or 6-7 small loaves.


This pumpkin bread is full of warm spices and would be perfect for breakfast, a snack with coffee or tea, or dessert with some cinnamon whipped cream on top. Yum!  Once you've made the tried and true recipe you may want to branch out.  Why not add in some chocolate chips, dried cranberries, or nuts next time.  The variations are endless.  Fall is here and I say "Bring on the comfort food!"

Enjoy!


Essential Pumpkin Bread

1 loaf - 6-7 mini loaves

1/2 cup vegetable oil
1 1/3 cups sugar
2 large eggs
1/2 - 15-ounce can pumpkin (not pumpkin pie filling)
1/3 cup water
1 3/4  cups flour
1/4 teaspoon baking powder
1/2 teaspoon baking soda
3/4 teaspoons salt
1/2 teaspoon nutmeg
1/2 teaspoon vanilla extract

Preheat the over to 350 degrees.

Spray a 8 1/2" x 4 1/2" loaf pan with cooking spray.  In a large bowl add the oil, sugar, eggs, pumpkin, and water.  Mix well.  Add in the flour, baking powder, baking soda, salt, nutmeg and vanilla.  Stir until just combined.  Don't over mix.

Pour the batter into the loaf pan.  Bake for 60-75 minutes until a toothpick stuck in the center of the loaf comes out clean.  Remove from the oven and cool on a wire rack for 10 minutes.  Remove from the pan and continue to cool.  Slice and serve.

Note:  If making mini loaves you will want to reduce the baking time to 20-30 minutes.


Tuesday, October 20, 2020

5 Ingredient Creamy Mushroom Tortellini

Tortellini is combined with sautéed mushrooms and spinach and covered with a wonderful cream sauce.  Easy and fast!


I can only think of one thing better than a quick weeknight dish and that's one with only 5 INGREDIENTS!  Yes, that is what we are making for dinner tonight.  A Creamy Mushroom Tortellini dish that requires 5 ingredients to make.  And it's GOOD!


Tortellini should be a pantry staple in your house if you are wanting to make deliscious but quick meals.  It's budget friendly, everyone love it, and it cooks in a matter of minutes.  Today we aren't just going to through some marinara sauce on it, no...we are going to jazz these babies up!


I chose chicken tortellini for a little protein but you can use cheese if you like.  Add in some mushrooms, a little garlic, and some spinach doused with a cream sauce...heaven!


You can't beat these easy quick weeknight meals that come together in under 30 minutes.  Give this a try and let me know what you think.

Enjoy!


5 Ingredient Creamy Mushroom Tortellini


serves 4


2 (9-ounce) packages chicken tortellini (or cheese)
2 tablespoons olive oil
8 ounces sliced cremini mushrooms
2 minced garlic cloves
1/2 cup half & half or heavy cream
2 packed cups baby spinach

Bring a large pot of salted water to a boil. Add cheese tortellini; cook according to package instructions until al dente. Drain well.

Heat olive oil in a large skillet over medium heat until shimmering. Add mushrooms, season with salt and pepper, and sauté until browned and tender, 5 minutes. Add garlic and sauté until fragrant, 1 minute. Add half & half and simmer until slightly thickened, 5 minutes. Add cooked tortellini and toss to coat. Add baby spinach, toss until wilted. Serve.


Sunday, October 18, 2020

Taco Tuesday Side Dish: Skillet Lime Corn Saute

One bite of these charred bits of roasted corn laced with jalapeno and green onions, doused in lime juice and a sprinkle of queso fresco will having you saying Ole!


I've got the perfect side dish to go along with your next Taco Tuesday meal.  It's my Skillet Lime Corn Sauté.  It's bursting with flavor and takes no time at all to make.


SKILLET LIME CORN SAUTE

All you need is some corn, frozen or fresh work equally well, a little jalapeno and green onion for zestiness, some lime juice and a bit of queso fresco.  5 Ingredients to the tastiest side dish around!  They are perfect with your weekly tacos and will bring a new fresh flavor to the menu.

Don't stop at tacos though.  This side dish is wonderful next to grilled chicken, steak, or fish.  Why not pack this up and take it on a picnic, or even better to a potluck.  This is an easy quick side dish that is so versatile that it goes with just about everything. 


When it's summertime and the corn is fresh make use of that and cut the corn off the cob.  When it's any other season a bag of frozen crisp corn will transform into the most wonderful dish.  And by sautéing the corn you will get little bits of charred corn that brings on the flavor. YUM! 

I recommend using a cast iron skillet for this but it isn't absolutely necessary.  Other skillets may not allow you to get that great charred bits of corn that you are after, but it will taste amazing.


Try this with my Chicken & Bell Pepper Tacos for a great menu idea.  We thought it was the perfect combination and you will to!

Enjoy!


Skillet Lime Corn Sauté


serves 4


2 Tablespoon canola oil
2 cups corn (frozen or from 2 fresh corn cobs, cut off)
1 jalapeno, seeded and diced
1/3 c green onions, whites and greens, sliced
2 limes, juiced
queso fresco, crumbled

In a large cast iron skillet, heat oil over medium high heat.  Once hot add in the corn and cook for 3 minutes without stirring.  Add in green onions and jalapeno, stir and cook for 3 more minutes.

Turn off the heat and add the lime juice.  Stir to combine.  Sprinkle with queso fresco.  Serve hot or at room temperature.


Thursday, October 15, 2020

Taco Tuesday: Chicken & Bell Pepper Tacos

Chicken tacos get a new lease on life with a bright and tangy sauce all tucked into warm corn tortillas and topped with queso fresco.  Ole!


Do you love Taco Tuesdays but are tired of the same of taco filling week after week?  Well give this tasty recipe a try!  20 minutes and a handful of ingredients is all you need to have a new fast and fresh take on tacos on the table!


CHICKEN & BELL PEPPER TACOS

These Chicken & Bell Pepper Tacos are made with shredded leftover chicken, or you can use a rotisserie chicken for convenience.  Add in some bell pepper, bold tomatillos, onion and a poblano pepper to make a zesty sauce.  Put them all together by tucking the mixture in warm corn tortillas and top them with some queso fresco and you have one heck of a delicious taco!


We make these whenever we have some leftover shredded chicken and a craving for Mexican food.  The saucy veggie mixture takes this ordinary chicken taco over the top, so don't skip this part.  If you've never cooked with tomatillos you are in for a treat.  This if a fruit that is bright green and covered with a paper husk.  Make sure to look for tomatillos with a firm texture.  If they are soft they are already overripe.  Oh, and be sure to remove the paper husk prior to cooking!  You don't want those in there.  Once they heat up during the cooking process the tomatillos break down much like a tomato.  I know you are gonna love these!


Be sure to serve this with some fresh salad, Mexican corn (coming soon) or rice and beans for a complete meal.  

Enjoy your Taco Tuesday, or any other day for that matter!


Chicken & Bell Pepper Tacos


serves 4


2 Tablespoons canola oil
1/2 cup yellow onion, diced
5 fresh tomatillos, (husks removed) washed and diced
1 poblano pepper, seeded and chopped
2 garlic cloves, minced
2 cups shredded chicken (leftover or from a rotisserie)
1 cup red bell pepper, diced (1-2 bell peppers)
1 tsp salt
1 tsp ground cumin
1/2 tsp ancho chili powder
1 lime
8 6" corn tortillas, lightly charred
crumbled queso fresco


Heat oil in a large skillet over medium-high. Add onion, tomatillos, poblano pepper, and garlic. Cook , stirring often, until soft and saucy, about 5 minutes.   

Add in chicken, bell pepper, salt, cumin, and chile powder. Stir to combine. Cook about 5-8 minutes until bell pepper has softened and the chicken is warmed through.  Zest 1/2 of the lime and add it to the pan. Cut lime in half and squeeze the juice from the zested half into the chicken mixture. Stir to combine. 

Serve in warmed and charred tortillas and top with crumbled queso fresco. Cut the remaining 1/2 lime into wedges and serve with the tacos.


Wednesday, October 7, 2020

Brown Sugar Butterscotch Banana Muffins - Small Batch

Hot from the oven, incredibly moist & fluffy 
with golden domed tops.  
You'll fall in love after the first bite!


While everyone else is posting pumpkin everything, I'm easing in to the fall flavors this year.  Starting off light since we are still in the "heat" of things in Los Angeles.  

I was thinking about what flavors remind me of fall and then Halloween came to mind, and then of course candy flavors started popping in my head.  Do you remember eating Butterscotch candies when you were young?  Mom used to by these hard candies that were round and butterscotch flavored.  Boy did I love those candies.  

Butterscotch definitely comes to mind when I think of fall.  I don't have any of those little hard candies anymore but I know I have a bag of butterscotch chip in my freezer!  So today's recipe is for the all those butterscotch lovers out there.


BROWN SUGAR BUTTERSCOTCH BANANA MUFFINS

This muffin turned out so delectable!  I took my base recipe for banana muffins, added some brown sugar for a warm flavor and added some sweet caramelly butterscotch chips for those wonderful fall feels.  


There's no such thing as a dry crumbly muffin in my house!  Mine are always outrageously soft and moist.

This batch makes about 8 muffins, standard size, or can be used to make mini muffins which are great after school snacks or take-alongs.  Note: Make sure to decrease the bake time when making mini muffins.


Hot from the oven, incredibly moist and fluffy with golden domed tops, you’ll fall in love with one bite!

Enjoy!  


Brown Sugar Butterscotch Banana Muffins


Yield:  6 large muffins, plus some batter leftover to fill 1-2 more, or 5 minis

1 large ripe banana, mashed
1 large egg
1/2 c 2% milk
1/4 c canola oil
1 tsp vanilla
1 1/2 c flour
1/2 c brown sugar
2 tsp baking powder
1/2 tsp salt
1/2 tsp cinnamon
1/3 c butterscotch chips


Preheat oven to 400 degrees.  Spray a muffin tin with non-stick cooking spray and set aside.

In a large bowl mash the banana.  Add the egg, milk, and oil and vanilla.  Mix together using a spatula to completely incorporate.

Add the flour, sugar, baking powder, salt, and cinnamon.  Stir just until combined.  Do not over mix.  Fold in the butterscotch chips, leaving a few back to place on the tops of the muffins.

Using a cookie scoop, add batter to the individual muffin tins.  Add the remaining chips on the tops of each muffin.  Bake 18-20 minutes.  Remove from the oven and allow to cool 5-10 minutes in the tin.  Serve warm or at room temperature.


Sunday, October 4, 2020

Light and Healthy Mediterranean Style Potato Salad

 A lighter and healthier potato salad filled with red onion and fresh herbs doused in a mustard vinaigrette.  Delish!!!


Who doesn't love a good potato salad?  We all do, but sometime we need that wonderful side dish to be a little healthier.  Am I right?

Growing up, Mom use to make the typical Mustard Potato Salad that loaded with mayo, eggs and all the good stuff.  But let me tell you it's also loaded with calories.  Plus, if you want to take it to a potluck or a picnic then you had better eat it quick.  I don't want to see what happens to mayo when it's been in the hot sun for hours on end!


So Suzy over at the Mediterranean Dish has solved that problem for us.  A lighter and healthier potato salad filled with red onion and fresh herbs all doused with a mustard vinaigrette.  Totally delish!!!

Perfect with any main dish and also a great travel companion to those potlucks, picnics, and at any BBQ.  It withstands the heat, not to mention that is tastes fabulous as well.  


Here's some tips on making the perfect potato salad:

  • The potato - small baby gold potatoes, red potatoes, or small white potatoes are best.  You want something with a thin skin that you don't have to peel.  Russet potatoes are too starchy and don't hold their shape very well so I would not suggest this type.
  • Cut before you cook - It's easier to cut the potatoes first and then cook them.  If you cut them after you run the risk of them falling apart.  Another plus is that cut potatoes will cook faster that whole ones.  Makes sure to salt your water as well to give the potatoes some flavor.
  • Dress the potatoes while they are hot - This will help the potatoes absorb all the flavors from the dressing.
  • Serve the salad at room temperature - After you bring this dish all together all the salad to sit for a bit while  you finish up your other dishes to allow the flavors to blend.  Serve it a room temperature for the best flavors. 


Make sure to make this one soon.  It's comes together in under 30 minutes.


Enjoy!


Light and Healthy Mediterranean Style Potato Salad


serves 4-6

1 1/2 lb small potatoes such as new potatoes, Yukon gold potatoes, or red potatoes
Water
salt
1/4 cup chopped red onions
1/4 cup fresh chopped parsley
1/4 cup chopped dill

Dijon Vinaigrette
1/3 cup extra virgin olive oil
2 tbsp white wine vinegar
2 tsp Dijon mustard
1/2 tsp ground sumac
1/2 tsp black pepper
1/4 tsp ground coriander


Wash and dry the potatoes. Slice potatoes thinly with a knife or mandoline. 

Place potatoes in a pot and add water to cover by 1 inch. Bring to a boil. Add salt. Turn the heat down to low and allow the potatoes to simmer for about 6 minutes or so until they're tender when poked with a fork.

Add vinaigrette ingredients to a small bowl and whisk until well-combined. 

Drain the potatoes in a colander and then place them in a bowl.  Add the mustard vinaigrette and gently toss to coat.

Add onions and fresh herbs. Toss gently to combine.

Transfer the potatoes to a serving platter. Allow the salad to rest for 20 minutes.  Serve at room temperature.

adapted from:  Mediterranean Dish


Saturday, October 3, 2020

Pineapple Lemonade Spritzer

A light and crisp lemonade that's refreshingly tart and sweet, topped with a bit of fizz and a kick of rum!


It's been quite a week.  We have Covid 19 and Quarantine, storms, high heat warnings, fires, a debate from Hell.  Needless to say I think everyone could use a refreshing drink.  One that you can make with or without alcohol.

We've been making this spiked lemonade most of the summer, and it's so tasty and thirst quenching that we're not even done with this drink yet.  


This is the perfect drink when you need a pick me up, are hot and bothered, or just want to chill.  It's all covered here in one drink, and I think we all deserve one right about now!

It's super easy to make using pre-made lemonade, a little pineapple, some sparkling water or a splash of 7-up and some nice white rum (or not, for a non-alcoholic version).

A light and crisp lemonade that refreshingly tart and sweet, topped with a bit of fizz and a kick of rum!


So, if you find yourself in need of something to ease all that's going on turn to this drink.  Guaranteed to put a smile on your face.

Enjoy and stay safe!


Pineapple Lemonade Spritzer

1 serving

2/3 glass of lemonade
1/3 glass of pineapple juice
splash of sparkling water or 7 up
1 shot of white rum (optional)

Fill a glass with ice.  Add your ingredients, stir and serve.  This is a ratio based recipe so you can fit it to any size glass.  Add more rum the taller the glass.


LinkWithin

Related Posts Plugin for WordPress, Blogger...