Pages

Tuesday, December 29, 2020

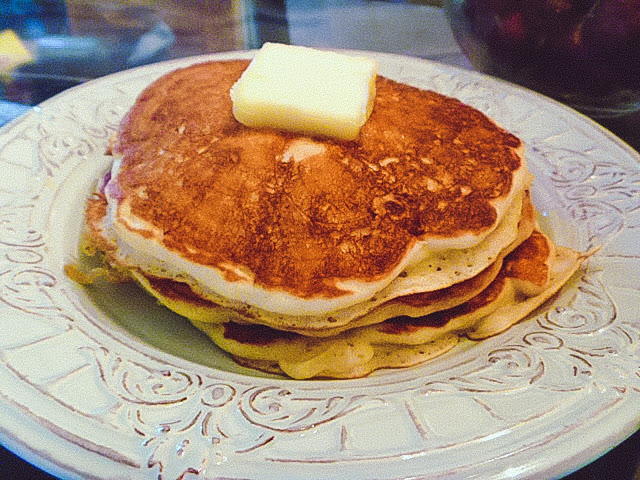
New Year's Brunch: Eggnog Pancakes with Cinnamon Syrup

Soft and fluffy pancakes laced with the flavors of eggnog and nutmeg are doused with the most sinful cinnamon syrup.  The perfect way to start off a New Year!


Eggnog Pancakes with Cinnamon Syrup


Truth be told every Sunday is brunch day around our house.  MGG and I love to have a leisurely brunch with eggs, bacon, toast, fruit, and yogurt most weekends but we also love to throw in a wonderful treat of pancakes or waffles every now and then.  Pancakes are a favorite of ours and these eggnog pancakes are something special.  The eggnog and a hint of nutmeg give these pancakes such a delightful flavor.  Top them with a cinnamon syrup and you have one comforting dish!

The perfect way to ring in the New Year by serving these during a holiday brunch!  They would be equally special during the winter months while eggnog is still available.  

Soft and fluffy Eggnog Pancakes – worth waking up for!


What goes in eggnog pancakes?

  • flour
  • baking powder
  • baking soda
  • salt
  • store bought eggnog
  • vegetable oil
  • egg
  • freshly grated nutmeg
  • sugar


Pancake Toppings, Substitutions and Variations

  • Butter and maple syrup – the classic!
  • Drizzled with honey
  • Dusting of cinnamon and sugar
  • Fresh fruit –  piled over pancakes with whipped cream!
  • Rich sauces – like caramel sauce, chocolate sauce, butterscotch sauce...


Kitchen Tips and Notes

  • Stir the batter until just combined.  The batter will be lumpy, so don't over mix!
  • Whisk your dry ingredients together to distribute them evenly before adding the wet ingredients.
  • Use a 1/4 measuring cup to scoop batter out of the bowl and onto the skillet or griddle.  Makes for even pancakes, and is handy too!
  • Watch for the bubbles!  That's the sign of when to flip.
  • Keep you heat on medium - medium-low to ensure they don't brown too quickly.
  • To avoid keeping them warm in the oven, get two skillets going!
  • If you are making a lot, keep the finished ones warm in a low oven.  Place them on a sheet pan, don't stack them or they will become soggy, until you are ready to serve.


EGGNOG RECIPES

In case you bought several cartons of eggnog because they were on sale and you couldn’t resist… (oh wait, that’s me!)


pancakes, pancakes, pancakes


HUNGRY FOR MORE? Subscribe to emails at the top of this page and follow along on Facebook,  and Pinterest for all of the latest updates.


Eggnog Pancakes with Cinnamon Syrup


Pancakes:
1 cup flour
2 Tablespoon sugar
1 teaspoon baking powder
1/2 teaspoon baking soda
1/2 teaspoon salt
1 cup eggnog
2 Tablespoon vegetable oil
1 egg
1/4 teaspoon freshly grated nutmeg

Syrup:
1/2 cup pure maple syrup
1/4 teaspoon cinnamon

In a medium bowl, add flour, sugar, baking powder, baking soda, salt, and the nutmeg. Stir to combine. Make a well in the middle and add the oil.

In another bowl whisk together eggnog and egg. 

Add to dry ingredients and mix together until just moistened. Batter will be lumpy.

On a preheated skillet, ladle batter onto skillet for each pancake. Cook until golden brown and holes begin to appear on top. Turn on the second side and cook until golden brown
.

Meanwhile pour the syrup into a microwave proof bowl and add the cinnamon.  Stir until combined.  Microwave in 30 second increments until warm.

Serve pancakes with butter and drizzled with warm syrup.


Sunday, December 27, 2020

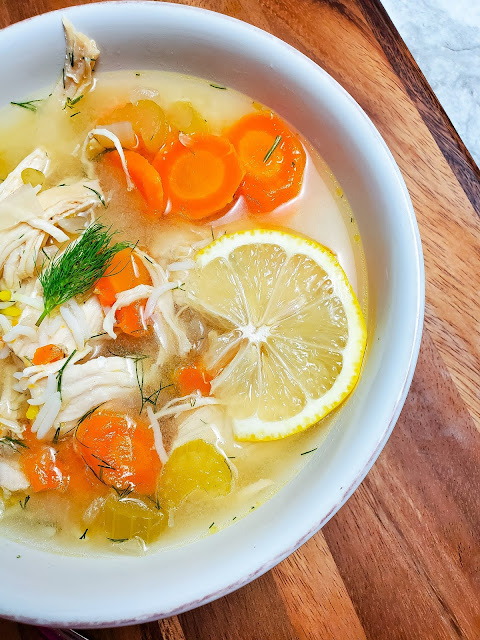
Instant Pot Meal: Lemon Chicken & Rice Soup

A Lemony Chicken & Rice Soup to soothe your soul.  The perfect winter meal made in the Instant Pot, even on a weeknight!


Lemon Chicken & Rice Soup 


Here's another great soup recipe that will warm you right up this winter.  It's filled with chicken, veggies, rice and a savory broth that brightened with dill and lemon juice.  This one is made in the Instant Pot but can be converted to make on the stove top or even the slow cooker.

Take advantage of cooking the chicken right in the broth which results in a beautiful savory flavor infused broth right in the Instant Pot.  Skip the rotisserie chicken – this is better!  Soup is the perfect family meal.  This once cooks in no time so it's perfect for a weeknight, but honestly, any night is soup night in our house!  


What Ingredients do I need?

  • Chicken breasts
  • onion
  • carrots
  • celery
  • low-sodium chicken broth
  • garlic
  • dill
  • lemons for juicing
  • cooked basmati rice
  • bay leaves
  • Parmesan cheese


Substitutions and Variations

  • Most types of rice is great for soup. White, brown, wild rice, basmati and jasmine rice are all great.
  • More veggies (chopped zucchini, stir in chopped kale or spinach, bell peppers)
  • Add 1/2 tsp dried thyme or 2 sprigs, or a touch of other dried herb
  • Try adding a can or two of diced tomato for a light tomato based soup (I would remove the dill and the lemon juice from this version)
  • Add crushed red pepper flakes for a little spicy heat.  
  • Chicken thighs instead of chicken breasts


Kitchen Tips and Notes
  • Be sure to remove the bay leaves before serving 
  • Dill is a great fresh herb in this soup.  It really compliments the lemon and the chicken and brings a bright flavor to the soup. 
  • Parmesan Cheese added to the soup at the end add great flavor, a little saltiness, and makes the soup a little creamier.
  • Rice - I do not like my pastas and rices soaking up all of my luscious broth!  To get around this I cook the rice separately or use leftover rice and add it to the individual bowls as I'm serving it.  The soup warms the rice and it saves my broth!

How to store Leftover Chicken and Rice Soup

  • For storing - I would store the rice and soup separately to avoid the rice from soaking up all the broth. The soup will last for several days in the refrigerator or may be frozen for 3 months.  Leave a little headspace at the top of your container if freezing.  Soups tend to expand when frozen.


ADD A SOUP DUNKER!


HUNGRY FOR MORE? Subscribe to emails at the top of this page and follow along on Facebook,  and Pinterest for all of the latest updates.


Lemon Chicken & Rice Soup 


serves:  8

2 tablespoons olive oil
3 large carrots, peeled and diced
2 stalks celery, diced
1 large onion, finely diced
6 cloves garlic, minced
1 teaspoon salt
1/2 teaspoon black pepper
8 cups  low-sodium chicken broth 
1 - 1 1/2 lbs skinless, boneless chicken breasts
1 teaspoon kosher salt
1 teaspoon ground black pepper
2 bay leaves
1/3 cup fresh lemon juice
1/4 cup to 1/2 cup fresh dill, chopped
1/3 cup finely grated Parmesan cheese
2 1/2 cups basmati rice, cooked

Turn you Instant Pot on saute.  Add the olive oil.  Saute you carrots, celery, and onion for about 5 minutes to get come color on them, and until they slightly soften.  Add in the garlic and stir for 30 seconds.  Hit the cancel button to turn off the saute feature.  Add in the chicken broth, chicken breasts, salt and pepper, and bay leaves.  Place the lid on and turn the steam knob to "sealing". 

Push the Pressure Cook or Manual button and set for 14 minutes.  Once the time is up release the pressure by turning the knob to release.  Open the lid and remove the chicken breasts.  Shred the chicken and return it along with any accumulated juices to the pot.  Stir in the lemon juice and fresh dill and stir to combine.  Add the Parmesan cheese and stir.  Hit cancel to turn off Instant Pot.

To serve, place a 1/3 cup of rice in a bowl and ladle in the chicken soup.  Serve immediately.


Tuesday, December 22, 2020

Meyer Lemon & Rosemary Chicken Salad

 A wonderfully fresh and easy to pull together winter salad that makes a great weeknight dinner.  It's bursting with the flavors of lemon and rosemary which make for one heck of a flavor combination! 


Yum

Meyer Lemon & Rosemary Chicken Salad


If you're in a pinch and need a quick meal I've got one for you.  This wonderful salad is bursting with bold flavors.  Meyer lemons and rosemary are the stars here but they also have some help from earthy radishes, slightly bitter escarole, and delicate shallots.  Meyer lemons can be found during the winter months, are less acidic and a little sweeter than regular lemons.  They are wonderful in this salad.

This is the perfect salad for lunch or a light dinner.  Serve it alongside some crusty bread, pita, cornbread, and even a bowl of soup if you would like.  This salad can be made from winter through summer using regular lemons.  It's full of protein, very satisfying and can be done in under 30 minutes.  We simply loved it!  


What is the best time for this salad?

  • Meyer Lemons are available beginning in November and run through March.  This is a great winter salad
  • Perfect for lunch or a light dinner
  • Serve for a Garden Party
  • A bridal shower
  • A Ladies Tea
  • Girls Night In
  • Hectic family nights
  • Weeknight meals
  • Whenever you are short on time

What do I serve with this salad?


What Ingredients do I need?

  • Meyer Lemons (found in the Winter months)
  • Shallot
  • Escarole
  • Chicken Breasts
  • Fresh Rosemary
  • Radishes

Substitutions and Variations

  • Substitute regular lemons for the Meyer lemons
  • Try navel or Cara Cara oranges for a different take
  • Use chicken thighs instead of breasts
  • Use Italian kale or spinach instead of escarole
  • Use Easter radishes
  • Use jicima or parsnips for the radishes
  • Try to stick with fresh rosemary as it will provide you with the most pungent flavor, however you can use dried rosemary if necessary


Kitchen Tips and Notes

  • Chop your ingredients before you start, to cut down on overall time
  • Slice chicken breasts horizontally to make thin cutlets
  • You can buy thin cutlets if you prefer
  • The recipe can be enlarged or decreased as needed easily
  • Oil the chicken breasts so the herbs adhere and stick to the meat while cooking
  • Meyer lemons are found during the winter months - substitute regular lemons if unavailable
Enjoy!


Meyer Lemon & Rosemary Chicken Salad


servings: 4


2 Meyer lemons
1 small shallot, finely chopped
3 tablespoons olive oil
Coarse salt and freshly ground black pepper
2 8 ounces chicken breasts, halved horizontally
1 tablespoon finely chopped fresh rosemary
1 head escarole, trimmed and chopped - about 4 cups
4 – 5 radishes, thinly sliced
olive oil for cooking

Prepare the dressing:  Juice 1 lemon into a small bowl.  Stir in the shallot, and add a pinch of salt and pepper.  Add the olive oil and which until emulsified.  

Preheat a grill pan over medium-high heat. Season chicken with salt and pepper. Sprinkle with rosemary. Lightly douse the chicken with olive oil. Grill 5 minutes or until golden brown on one side. Turn; cook 5 to 6 minutes more or until they reach an internal temperature of 165°F.

Meanwhile, cut thin slices from the remaining lemon.  Cut those slices in to quarters.  Transfer to a large bowl.  Add the chopped escarole and radishes. Toss with enough dressing to coat.  You may have extra.  Place dressed greens on a platter and arrange chicken on top.  Drizzle with a little more dressing. 


adapted from bhg.com


Sunday, December 20, 2020

Classic Sugar Cookie Recipe

Sweet and tender Sugar Cookies are the base for every holiday occasion with good reason.  They can be rolled out and cut into whatever shape you desire and decorated to your heart's content!


Classic Sugar Cookie Recipe

Everyone needs a Classic Sugar Cookie Recipe and this one, from my mom's recipe collection, is one we've made for years.  While the recipe has stayed the same I have adjusted the method over the years to yield the best results.  I dare say this is one of my favorite cookies of all time.

Just in time for Christmas, this cookie is easy to make and creates a tender sweet cookie that holds it's shape.  Perfect for cutting out cute Christmas shapes as I have done here and leaving on a plate for Santa this Christmas eve.


What can you use sugar cookies for?

  • Perfect with dessert served with milk
  • Eat them plain or decorated
  • Use them for ice cream sandwiches
  • Dunk them in milk
  • Perfect for any holiday celebration, Christmas, Hanukkah, Easter, Valentine's Day, Birthdays, Halloween, Graduation
  • Serve them at a Tea Party
  • Serve them along with an ice cream parfait, or pudding


What ingredients do I need?

  • all purpose flour
  • baking powder
  • salt
  • sugar
  • butter
  • egg
  • vanilla


Substitutions and Variations

  • Substitute almond extract for the vanilla
  • mix-in can be added such as sprinkles, flavored chips (chocolate, white chocolate, cinnamon etc), or chopped candy bars
  • Make drop cookies or form cookies by hand
  • Decorate with Royal Icing, sprinkles, sanding sugar, frosting, pretzels, chopped nuts, oreo crumbs, chopped dried fruit


Kitchen Notes and Tips

  • Bake on parchment paper so they don't over brown
  • Remove from the oven just when the edges start to brown
  • Roll out the dough evenly so the cookie all cook at the same rate.
  • Splurge on a good pure vanilla extract
  • Chill the dough in the refrigerator for at least 1 hour to prevent spreading.
  • Keep you working surface lightly floured - too much flour will create a dry cookie.
  • Measure flour the "right way" loosen the flour by giving it a good stir with a spoon or whisk. Next, spoon the flour into a measuring cup until heaping (piled beyond the rim of the measuring cup) and then level with the flat side of a knife. 


Enjoy!


Classic Sugar Cookie Recipe


makes: 2 dozen 4" cookies

4 cups all-purpose flour
1 teaspoon baking powder
1/2 teaspoon salt
2 sticks (1 cup) butter, softened
2 cups sugar
2 large eggs
2 teaspoons vanilla extract

To a large bowl add flour, baking powder, and salt into a bowl. In a separate bowl, beat butter and sugar with a mixer on medium speed until pale and fluffy, about 3 minutes. Beat in eggs and vanilla. Reduce speed to low and add in the flour mixture a little at a time.  Remove dough to a board and divide in half. Flatten each half into a disk, and wrap in plastic. Refrigerate until firm, at least 1 hour.

Preheat oven to 325 degrees. Let one disk of dough stand at room temperature for 10 minutes, until soft enough to roll. Roll out dough on a lightly floured work surface to 1/4-inch thick, adding more flour as needed to keep dough from sticking. 

Cut out cookies using desired cutters or templates. Transfer to parchment-lined baking sheets. Roll out scraps, and repeat. Repeat with remaining disk of dough. Chill cookies until very firm, about 15 minutes,

Bake cookies until edges just start to turn golden, 15 to 18 minutes. Let cool on sheets for 5 minutes then remove to cool on wire racks. 


Wednesday, December 16, 2020

Holiday Best Snacking Board

For a weekend or a pre-holiday meal, enjoy my Holiday Best Snacking Board with savory dips, a variety of dippers, along with some nuts, fruits, and sweets.  


Holiday Best Snacking Board

What better way to get people to join you at the table than with a wonderful snacking board that holds a plethora of delectable goodies.  A snacking board is the ultimate and easy way to gather.  They are great for parties when we can all have them, but for now they are the perfect way to bring the family together.

With some help from Trader Joe's I was able to pull together two outstanding snacking boards.  You don't have to make things homemade all the time, so take some help from some special gourmet items and put together a spread that's healthy, appetizing, and filling.  


The first board is full of toppings and dipping vessels.  From hummus, to a goat cheese log, to crostini that you put together your way with a variety of toppings.  The second board is full of finger snacks.  From dried fruits, to various nuts, and some sweets thrown in the mix.  This is definitely a sweet & salty board.  

All together we have one decadent meal ahead of us!


When would you use a snacking board?

  • Family get-togethers
  • Game night
  • Girls night
  • Pre-holiday meals
  • Holiday snacks
  • New Year's eve
  • An appetizer party
  • Movie night
  • Weekend Brunches
  • Snacking Lunches
  • Cocktail parties
  • Pool party


What ingredients do I need?

For the:  Finger Food and Dipping Board

  • Mango Salsa
  • Crumbled Feta Cheese
  • Trader Joe's Spicy Hummus Dip
  • Homemade Bruschetta (recipe below)
  • Homemade Butternut Squash Crostini (recipe below)
  • Homemade Crostini (recipe below)
  • Tortilla Chips
  • Trader Joe's Pistachio Pomegranate Crisps
  • Trader Joe's Brioche Toasts
  • Carrots
  • Cucumber slices
  • Bell pepper slices
  • Trader Joe's Cranberry Chèvre Fresh Goat Cheese


For the:  Fruit, Nuts, and Sweets Board

  • Trader Joe's Dark Chocolate Stars Shortbread Cookies
  • Trader Joe's Candied Pecans
  • Dried Apricots
  • Marcona Almonds
  • Walnuts Halves
  • Pecan Halves


Substitutions and Variations
  • For the dips try pico de gallo, tzatziki, white bean dip, other flavored hummus, spinach & artichoke, jams, fruit salsa
  • For the dippers try pita bread, pretzel chips, bagel chips, or pita chips, 
  • For the vegetables try celery, broccoli, endive, and snap peas
  • Don't like nuts, do an olive tray, or a sweets only tray
  • Add more fresh fruits such as strawberries, grapes, and sliced apples
  • Add other dried fruit such as apples, pineapples, figs, and dates


Kitchen Notes and Tips
  • Use a large wooden tray or platter as your board
  • Make sure your tray is food safe, otherwise line with a piece of parchment paper
  • Arrange big items first on your board and fill in with the smaller items
  • Use most of the space on your board for an abundant look
  • Dips and spreads should be placed in small bowls and spread out in different areas on the board 
  • Fill in the spaces under the dips and spreads with the dippers. 
  • Fan pieces for a nice look
  • Groups similar items together for impact


Butternut Squash Crostini


cubed butternut squash (store-bought)
olive oil
salt & pepper
garlic powder
ground sage

Preheat oven to 400 degrees.

Cut the cubed butternut squash into small bite sized pieces.  Place on a large rimmed sheet pan, and drizzle with olive oil.  Season well with salt, pepper and garlic powder plus a small sprinkle of ground sage.
Toss to evenly coat and roast about 25-30 minutes or until the squash is fork tender but not too soft.  To serve use place feta cheese and some squash on a crostini.


Bruschetta


    2-3 ripe Roma tomatoes seeds removed, finely diced, and gently patted dry 
    3-4 fresh basil leaves sliced into thin ribbons
    2 cloves garlic finely minced
    1 1/2 - 2 Tablespoons olive oil

Combine diced tomatoes, basil, and minced garlic in a bowl.  Drizzle olive oil enough to coat.  Stir to combine and allow to rest for flavors to develop 30 minutes.   Place in a small bowl to serve.


Crostini

1 baguette, cut into 1/2" slices
2 Tablespoons extra-virgin olive oil
flaky kosher salt

Preheat oven to 400 degrees.

Lightly coat both sides of bread with olive oil and arrange in single layer on a baking sheet.
Bake on the center rack for 10 minutes, flipping them halfway through, until golden and slightly crisp. Sprinkle with salt and serve.


Sunday, December 13, 2020

Cozy Family Faves: Tex-Mex Chicken Soup

Hot soup full of chicken, carrots, celery, onion, pasilla peppers, and Latin spices will warm you up on a cold winter's night. 


With the holidays in full swing I wanted to post some family favorites that are easy one-pot meals with some kicked-up flavor.  This one is perfect for busy days and cold nights.


Tex-Mex Chicken Soup

Stove Top, Instant Pot, and Slow Cooker versions

Winter is the best time for hot soups and this one is a wonderful variation of your standard chicken soup.  This soup has a tex-mex flair which comes from the pasilla peppers.  They pack great flavor and a little spice.  Hot soup full of chicken, carrots, celery, onion, pasilla pepper, beans, and Latin spices will warm you up on a cold winter's night.  The best thing is it is made in one pot and is done in a flash!


What to eat with the soup?


What ingredients do I need?

  • Chicken Breasts
  • Onion
  • Carrots
  • Celery
  • Pasilla Peppers
  • Chicken Broth
  • Cannellini Beans
  • Cumin
  • Coriander
  • Garlic Cloves
  • toppings


Substitutions and Variations

  • Chicken Thighs instead of chicken breasts
  • Poblano peppers instead of Pasilla peppers
  • Diced Green Chilis instead of peppers
  • Any white bean for the Cannellini beans
  • Pinto beans 

Kitchen Notes and Tips

  • To make this go quicker use store bought shredded chicken and put in the soup at the end of the cooking to warm through
  • Use a rotisserie chicken for a quicker mealtime
  • Pasilla peppers are a little spicy, use an anaheim for less spice
  • Add some jalepeno hot sauce to amp up the spice
  • Freeze left over soup in portions for quick lunches 


Enjoy!


Tex-Mex Chicken Soup

serves:  6

1 medium yellow onion, diced
3 celery stalks, sliced
4 carrots, peeled and sliced
2 pasilla peppers, seeded and chopped
3 garlic cloves, minced
1 tablespoon cumin
1 tablespoon coriander
1 1/2 lbs boneless, skinless chicken breasts
4 cups low sodium Chicken Broth
2 14oz cans cannellini beans, drained and rinsed
salt & pepper
Garnish:  shredded Monterey jack cheese, lime juice, tortilla chips (optional)

Stove Top:
In a dutch oven heat 2 tablespoons of canola oil over medium heat.  Add onion, carrots, celery, and peppers.  Cook, stirring occasionally, until starting to get tender, about 4-5 minutes.  Add in the garlic, cumin, coriander, chicken broth, chicken breasts, and beans.  Season with salt & pepper.  Bring to a bowl then reduce heat to a simmer (medium-low or low) and cook for 30-35 minutes.  Remove chicken from the pot and shred.  Return shredded chicken back to the pot and stir to combine.  Check seasoning and add additional salt & pepper if needed.  Served topped with garnishes if desired.


Instant Pot:
Turn your instant pot on using the Saute feature.  Add 2 tablespoons of canola oil and heat.  Add the onion, carrots, celery, and peppers.  Cook, stirring occasionally, until starting to get tender, about 4-5 minutes.  Turn off the saute function by hitting cancel.  Add the remainder of the ingredient.  Season with salt & pepper.  Place the lid on the Instant Pot and turn the vent knob to "sealing".  Hit the Manual Pressure button and adjust the time to cook for 13 minutes.  Once it has finished cooking turn the vent knob to venting for a quick release.  Once it completes releasing the steam open the lid and set aside.  Remove the chicken breasts and shred.  Return chicken back to the pot and stir to combine.  Serve topped with garnishes if desired.


Slow Cooker:
To the slow cooker bowl add all the ingredients except garnishes.  Make sure to salt & pepper to taste.  Cook on low for 4-5 hours and high for 2-3 hours.  Remove chicken and shred it then return it back to the slow cooker.  Serve in bowls topped with garnishes if you would like.