It’s carrot season!
Although carrots grow all year round they are their sweetest during the springtime. I love a good carrot. I tend to look for larger carrots that may have a woody core, but the flavor is so much sweeter.
I usually snack on raw carrots (daily) which is my first choice and favorite way to eat them. Besides using them in stews, pot roasts, soups, and such, I also love to roast carrots.
Roasted carrots are easy and they are the perfect complement to a springtime meal. They go with most meat dishes and bring a little freshness to your plate.
Today I wanted to share with you my recipe for Ginger Glazed Roasted Carrots and Green Beans. I served this alongside a wonderful pork tenderloin to a light spring dinner we had recently. Both the carrots and green beans came out perfectly as the roasting brought out the sweetness and the glaze just boosted the flavor. I use a wonderful ginger from Gourmet Garden that is paste that comes in a tube. Super handy! I got mine from my local grocery store and I’m sure you will find it as well. But if not, substitute ground ginger and use just a little less.
Try some wonderful spring vegetables this weekend. Carrots are a great one to start with and they pair so well with the green beans. This recipe is easy to put together and you will love the results.
Enjoy!
Ginger Glazed Roasted Carrots & Green Beans
serves 4
1/2 lb carrots, trimmed, peeled and sliced lengthwise
1/4 lb green beans, trimmed
1 tbsp olive oil
¼ c honey
1 tbsp butter
1 tsp ginger (Gourmet Garden)
¼ salt
¼ pepper
Preheat over to 400 degrees. Place carrots and green beans on a baking sheet and drizzle with olive oil. Toss to coat. Place in the oven and cook for 20 minutes, stirring once half way through the cooking time.
Meanwhile combine honey, butter, and ginger in a small saucepan over medium heat. Heat until it starts to bubble and then reduce and simmer for 1-2 minutes.
Remove vegetables from the oven and sprinkle with salt and pepper. Drizzle glaze over the carrots and green beans and toss to coat. Serve immediately.
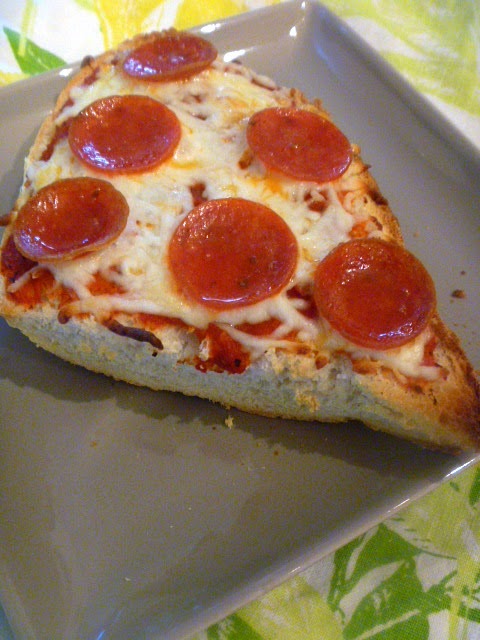
It’s French Bread Pizza time!
We did a lot of running around last weekend doing so many fun things. I just love when we have a 3 day weekend and are able to make the weekend fun and relaxing. It just makes the weekend more special when we don’t do the usual…you know chores, errands, laundry and such!
So in between running around I found myself hungry…go figure. With not that much time on my hands to cook I had to make and eat something fast so I could get on with the partying!
Looking around the kitchen I spotted a loaf of fresh French Bread and that sparked an idea. I’ll make French Bread Pizza. I don’t usually eat pizza this way but I remember that I used to love it when I was younger…huhhmmm…and French Bread Pizza was in style; the big thing at that time!
I pretty much always have the makings of pizza on hand. So out came some pizza sauce, some pepperoni that I keep in the freezer, (Turkey pepperoni is really, really good.) and some shredded mozzarella cheese. Honestly, any cheese is the bomb on a pizza. Hello, melted cheese? Yes please!
This is so easy to make. Just cut the French bread in half and you have your crust or base to put on the toppings. Heat up your oven and pop it in to bake for about 10 mins until everything is hot and melty and the bread starts browning. That’s it! Lunch is served!
Kitchen Tip: Enjoy some extra zing by sprinkling on some Pizza Seasonings on top of the sauce. You can pick up some here.
Enjoy a quick meal of old school French Bread Pizza when you can.
French Bread Pizza
Serves 2
½ loaf of French bread – sliced in half lengthwise
Pizza sauce
Pizza Seasoning – a sprinkle
Shredded mozzarella
Pepperoni – turkey or the real stuff
Optional: any topping that you like
Heat oven to 375 degrees. Place bread sliced side up and spread on pizza sauce. Sprinkle pizza seasoning over the sauce. Top with shredded mozzarella cheese. Top with pepperoni or your favorite toppings.
Place on a cookie sheet and place in the oven. Cook for about 10 minutes or until the cheese is melted and bubbly and the bread has slightly browned on the edges. Serve immediately.
This weekend I had the pleasure of hosting a ladies luncheon.
What great fun to get a few girlfriends together to celebrate our friendship! We've been friends a long time and sometimes it's hard to get everyone in the same place at the same time. We certainly try, but with the busy schedule of life getting in the way we end of pairing off and seeing each other in smaller groups. So it was time to have an outdoor luncheon for all the girls and relax and enjoy just being girls!
We had an array of food items that we all made together. We kept it simple and light. Sangria was on the list, as well as a beautiful fruit salad along with a crostini with a wonderful white bean dip. Most of the dishes were finger food friendly. It's easier to have small bites to choose from which allow you to interact and move around enjoying the spring weather, rather than having a sit down meal. More like tapa style.
I wanted to share with you one of the dishes that we made. A quick but hearty Chicken Quesadilla was perfect for us to share. We made several of them to serve 6 hungry girls. We filled them with chicken, (I usually have roasted chicken shredded on hand!) cheeses, chilis, and tomatoes. This dish was tasty and quick. Served along a side of sour cream for dipping this was a yummy treat!
So, if you need a quick lunch, or want to serve appetizers to your friends or family, this is a versatile dish that is easy to make. You can vary the ingredients to suit your mood as well. Be creative and let your taste buds lead the way!
Chicken Quesadillas
Makes 2 8" quesadillas
4 8” flour tortillas
1 cup shredded Colby jack
1/3 cup finely chopped green chilis
1 medium tomato, diced
1 cup cooked chicken, shredded
sour cream, guacamole (optional)
Brush one side of each tortilla with butter. Place two tortillas, on a griddle or do one at a time in a large skillet. Sprinkle with cheese, chilis, tomato and chicken. Top with remaining tortillas. Cook over medium heat for 3-4 minutes on each side or until lightly browned. Cut into wedges. Serve with sour cream or guacamole if desired.