Pages

Tuesday, September 27, 2016

Spicy Thai Chicken Satay with Grilled Pineapple


Break out the grill!  This Spicy Thai Chicken Satay with Grilled Pineapple cooks quickly on a grill and has a sweet and spicy beautiful glaze.  Slice of Southern


Yum

Still feeling the summer heat?  We are. 

Even though the season has officially changed to Fall we are still getting 100+ heat in Los Angeles.  Typical for this time of year, we don't really get the fall weather until late October.  So it's still grilling season!  We love that we can actually grill all year round.  Grilled meat is the best, isn't it?

Break out the grill!  This Spicy Thai Chicken Satay with Grilled Pineapple cooks quickly on a grill and has a sweet and spicy beautiful glaze.  Slice of Southern

This weekend I was looking through another of my cooking magazines by BHG and came across a recipe for Thai Chicken Satay with Grilled Pineapple.  YUM!  You had me at satay!  So I decided to make this yummy dish with a few slight modifications for our dinner.  Modifications?  Oh yea, let's spice this baby up a bit.  Then Spicy Thai Chicken Satay with Grilled Pineapple happened.

Break out the grill!  This Spicy Thai Chicken Satay with Grilled Pineapple cooks quickly on a grill and has a sweet and spicy beautiful glaze.  Slice of Southern


Serving this with a Simple Asian Salad, this dish was fabulous!  The chicken satay cooks quickly on a grill and has a sweet and spicy beautiful glaze.  Grill up some pineapple spears or rings to go along side and serve this over rice.  The perfect dinner, or make this as game day appetizers for a group of people.  Either way this chicken really rocks!  The glaze is perfect with the Sriracha sauce added for a little heat.  You can either adjust the temperature to your liking or omit it all together.  This glaze is what makes this dish special so don't skip it.

Break out the grill!  This Spicy Thai Chicken Satay with Grilled Pineapple cooks quickly on a grill and has a sweet and spicy beautiful glaze.  Slice of Southern


So break out your grill and keep the summer feeling going by making this Spicy Thai Chicken Satay with Grilled Pineapple.  Your sure to love it!

Enjoy!


Spicy Thai Chicken Satay with Grilled Pineapple


Ingredients:

2/3 cup sweet-and-sour sauce
2 tablespoons fresh basil, chopped
1 tablespoon butter, melted
1 teaspoon Thai seasoning
1 clove garlic, minced
4 tablespoons Sriracha Sauce
6 pineapple rings
Nonstick cooking spray
1 pound skinless, boneless chicken breast halves, cut into 1/2 inch thick strips
2 cups hot cooked rice (optional)
Fresh basil, shredded (optional)


Directions:

    If using wooden skewers, soak them for 30 minutes in water to prevent burning. 

    For Thai sauce, in a small bowl combine sweet-and-sour sauce, snipped basil, butter, Thai seasoning, garlic, and Sriracha Sauce.  Set aside.  

    Preheat charcoal or gas grill to medium heat. 

    Brush both side of the pineapple rings with canola oil.  Place on a tray.  Thread the chicken strips onto 12-15 wood skewers accordion style.  Place on the tray.

    Place chicken skewers and cook (uncovered for charcoal, covered for gas) 10 to 12 minutes or until chicken is no longer pink, turning occasionally and brushing with sauce during the first half of grilling. Discard any remaining reserved sauce. Grill pineapple slices for 6 to 8 minutes or until warm and grill marks appear, turning once halfway through grilling.

    Serve chicken and pineapple with hot cooked rice, if desired. Garnish with basil shreds.


    Saturday, September 24, 2016

    Blackberry Almond Muffins - Small Batch


    Yum

    I don't usually cook to much with anything almond.  If I do I tend to make savory dishes like this Chicken Amandine, or salads like this wonderful Pear Salad, instead of baking with them.


    Don't get me wrong I love almonds.  They are a staple in our house, but somehow they weren't in my repertoire.  So I decided to change that right now.  I really love a big warm bear claw in the morning, don't you?  And, I've actually made those in one of the many cooking classes I've taken at Sur La Table, but...that's way to involved for me today.  I need something I can whip up quick and savor my breakfast treat pronto! 


    BLACKBERRY ALMOND MUFFINS TO THE RESCUE

    If you've followed me for any length of time you will know that I am unashamedly called the 'muffin man'.  I love them, and make them often.  So today's small batch treat will give you a burst of berries, along with the earthy nutty flavor of almonds that remind me of fall. 


    I've made a smaller batch for you.  Sometimes you just don't need 12 muffins, when only 6 will do.  However, feel free to double the recipe and freeze any leftovers to have on the run when you want them.  Now go make muffins!  It's the weekend and you deserve them...I know I do!  You'll have 6 scrumptious muffins in no time. 


    Blackberry Almond Muffins - Small Batch


    Serves 6
    Cook time 20-25 min


    Ingredients:
    1 egg
    1/2 cup 2% milk
    1/4 cup Canola Oil
    1 tsp almond extract
    1 1/2 cups all purpose flour
    1/2 cup sugar
    2 t. baking powder
    1/2 t. salt
    1 cup of fresh blackberries, chopped
    Directions:

    Place egg, milk, oil, and almond extract in a large mixing bowl and whisk together until light.  Add flour, sugar, baking powder, and salt.
    Stir until moist.  Don’t overmix…batter should be lumpy and a little thick.  Add blackberries, and gently fold them in to the batter.

    Spray a non-stick muffin pan with cooking spray.  Divide batter among 6 muffin cups,  filling most of the way full.

    Bake at 425 degrees for 20-25 min.


    Wednesday, September 21, 2016

    Balsamic Flank Steak Salad with Parmesan


    Yum

    Who doesn't love a good steak?

    Steak happens to be my favorite cut of meat although we don't see it pop up often in our weekly menu.  Chicken seems to be the go to protein around here, but sometimes I just gotta break out a good steak for variety.


    At home when we want a quick steak I gravitate toward a flank steak.  It's a long flat cut of beef that has a very prominent grain running through it.  Make sure to always cut across the direction the grain is running to ensure a tender cut of meat.  It's perfect for grilling, broiling, or even braised.  Buying this meat save me money over the well coveted filet mignon that I love.  A good flank steak that isn't cooked past medium will be just as tender and juicy.

    This Balsamic Flank Steak Salad with Parmesan makes a wonderful salad for lunch or dinner.  I marinated the steak in the morning and then took it out to grill on my indoor grill pan.  Lunch turned out perfect with the most flavorful and yet tender steak, sitting on top of crisp lettuce slightly dressed with a simple olive oil and lemon mixture.  To give it a pop I shaved long Parmesan strips over the top for a little saltiness.  The result was a perfect, light, and very tasty salad.


    Once you get past the marinade time the cooking goes quickly.  So plan a little ahead and be sure to try my Balsamic Flank Steak Salad with Parmesan.  It's a winner!

    Enjoy!


    Balsamic Flank Steak Salad with Parmesan

    1- 1/2 pounds flank steak  
    1/3 c olive oil    
    6 Tbls   balsamic vinegar
    1/4 cup red wine
    1/2 tsp black pepper  
    8 garlic cloves, peeled and crushed
    1/2 tsp salt   
    2 1/2 cups chopped romaine   
    1 Tbls olive oil
    2 teaspoons fresh lemon juice  
    1 tablespoon chopped fresh parsley
    1 tablespoon chopped fresh chives
    1.5 ounces Parmesan cheese, shaved (about 1/3 cup)

    Combine marinade ingredients of olive oil, vinegar, wine, black pepper, and garlic cloves a large sealable plastic bag. Add steak to bag and tightly seal.  Turn to coat steaks with marinade. Refrigerate 4 hours, turning bag a couple of times while marinating.

    Heat a grill pan or a large cast-iron skillet over medium-high heat. Coat the pan with cooking spray. Remove the steak and discard the marinade.  Sprinkle steaks evenly with salt and add to the pan.  Cook about 4 minutes on each side until desired doneness.  Remove steak to a cutting board and allow to stand for 5 minutes before cutting.  

    In a large bowl add chopped romaine.  combine arugula and watercress in a medium bowl. Drizzle with 1 olive oil and lemon juice.  Toss to coat. Divide salad greens among 4 plates.

    Slice steak diagonally across the grain into thin strips.  Arrange steak strips evenly over salad. Sprinkle shaved Parmesan across the salad and serve.


    Friday, September 16, 2016

    Fresh Italian Pesto Pasta Salad


    Yum

    We are still hanging on to summer in Los Angeles as the weather is alternating between very hot, to mild.  It's that time when it is noticeable that the season is starting to change. 

    We've eaten salads all summer long and I'm not stopping yet.  I'm going to make all my summer favorites until the leaves fall.  Pasta salad is a classic dish and I love it.  So I thought I'd make one more for good measure.  Something a little different this time, just for fun.

    I must confess that I'm addicted to visiting Barnes and Noble and sitting there having an iced tea and pastry while reading special edition cooking magazines.  I also might be know to buy a few!  So browsing one by BHG I came across a wonderful Italian Pesto Pasta Salad.  I also found the recipe on line and you can view it here.


    This recipe was calling my name, and I know that MGG loves pesto.  I decided to make this Fresh Italian Pesto Pasta so we could munch on this throughout the week.  I followed their recipe with the exception of substituting the elbow macaroni with rotini.  The jarred pesto really helps pulling this together quickly.  I also wilted the arugula on the hot pasta as it was draining to give it a different texture. 

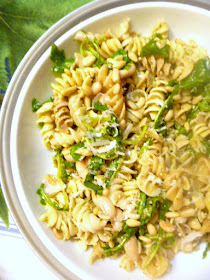
    Fresh Italian Pesto Pasta Salad - Another summer staple

    Tender white beans, spicy arugula and toasted pine nuts really go well with the pesto.  Topped with fresh grated parmesan set's this off with a salty bite that finishes this dish beautifully.


    Serve this along side grilled chicken or fish. You can easily make this in 30 minutes.   It's light and flavorful and has the fresh ingredients that go so well together.  If you love pasta salads then this will need to be in your recipe box.  It will quickly become a family favorite.

    Enjoy!


    Fresh Italian Pesto Pasta Salad

    serves 10

    8 oz of rotini pasta
    1 7oz jar of basil pesto
    1/4 c red wine vinegar
    1/4 tsp kosher salt
    1 15oz can cannellini beans, rinsed and drained
    2 cups baby arugula
    1/4 c pine nuts, toasted
    Freshly grated parmesan

    Cook pasta according to package directions. Drain and rinse under cold water; set aside.


    In a large bowl stir together pesto, vinegar, and salt. Add beans, pasta, arugula, and the pine nuts. Toss well. At this point you may serve it or refrigerate several hours.  Top with freshly grated cheese before serving.


    Sunday, September 11, 2016

    Easy Double Chocolate Ice Box Pie


    Yum


    Late summer entertaining wouldn't be complete without a Southern classic like Ice Box Pie.

    Who wants to turn on an oven long enough to cook a pie when it's sweltering hot outside.  Although the weather may be changing in parts of the country, Los Angeles is still blazing and there's nothing better than a cool dessert to cool you off on a sultry night.  An ice box pie sounds just about right.


    I was digging around in my mom's old recipe box the other day and came across several ice box pies that sounded delicious.  I remember her making these and just see her serving a slice while we all sat around outside to enjoy the evening.  So I chose the one that spoke to me most (chocolate of course!) and decided to make her Easy Double Chocolate Ice Box Pie. 

    I did change this up a bit and took the easy route by purchasing a pre-made graham cracker crust, but you could certainly make your own if you like.  The rest is easy as this pie uses instant pudding and some whipped topping for the filling.  Once you mix that up you just fill and refrigerate the pie for a few hours and your done! 


    This pie was creamy and delicious.  Two different layers of chocolate fill this light as air pie.  Topped with some extra whipped topping and drizzled with a little chocolate syrup and you have a wonderful dessert.  Just the right touch to end the day.  This would be equally good to serve during a ladies lunch, afternoon tea, bring to a potluck, or serve at a bridal shower.  It's the comfort and hospitality that goes along with a piece of pie that makes this a special treat. 


    Enjoy my mom's Easy Double Chocolate Ice Box Pie!


    Easy Double Chocolate Ice Box Pie

    serves 6-8

    1 graham cracker pie crust (pre-made 6 oz.) or homemade
    1 3.9 box of Chocolate Fudge Jello pudding
    2 cups of 2% milk
    1 tub (8 oz) Lite Cool Whip Whipped Topping, thawed and divided
    chocolate syrup for drizzle (optional)


    In a large bowl whip together the pudding and milk for about 2 minutes.  Spread half of the pudding into the crust.  Add 1/2 of the tub of Cool Whip to the remaining pudding.  Add on top of the first layer.  Refrigerate for 2-3 hours. 

    This may be served as is with a dollop of whipped topping or you may add a layer of whipped topping to the pie desired.  To serve, slice pie and plate.  Drizzle with chocolate syrup if desired.


    Friday, September 9, 2016

    One Pot Tortellini with Sausage and Spinach in a Tomato Basil Sauce


    Yum

    Do you ever get a craving for something that you think is strange?

    Well I do.  Every now and then I crave marinara sauce, or meat sauce.  Any red Italian sauce actually.  I know, I think it's strange too.  It's not the pasta that I'm craving (although who doesn't crave pasta!) but it's actually the sauce.  I know this because I can have a delicious chicken Parmesan dripping with marinara and be perfectly satisfied without any pasta.


    So this 'red sauce' craving hit me big time over the long holiday weekend.  I mean I was rooting through my food on hand looking for anything I could make that a red sauce would go on.  I only had 1 can of diced tomatoes on hand!  How could that be???  I'm always stocked, but not on the day the craving hit.  Figures....but I did find a jar of a yummy tomato basil sauce in a jar that I had hidden away.  So it hit me that will make a variation of a one pot dish that I love, Ravioli Florentine which is a family favorite. 


    Oh boy, no ravioli to be found in the frig or the freezer, but I did find some tortellini.  Bingo!  Substitution time, and with a few alterations on the original dish I came up with a winner!

    Adding a nice Italian turkey sausage to the sauce gave it some body and wonderful spicy flavor.  The flavors of fresh basil add a fresh taste that jazzes it up.  Just look at this meaty sauce! 


    All in one pot.  Don't you love that?  Plus the clean up is a breeze and I hate doing dishes!  This would work great as a weeknight meal as it can be done in 30 minutes.  So the result is we both loved it, and it satisfied my craving...until next time.

    Enjoy!


    One Pot Tortellini with Sausage and Spinach in a Tomato Basil Sauce

    serves 4
      2 Tbsp olive oil
      2 cloves garlic, minced
      1/2 lb turkey Italian sausage, casings removed (about 3 links)
      1/2 (24 oz) jar tomato basil sauce
      1 (14.5 oz) can finely diced tomatoes
      1/4 cup water
      1 tsp Italian seasoning
      1 (9 oz) pkg refrigerated cheese tortellini
      2 cups packed fresh spinach, roughly chopped
      salt & pepper to taste 
      2 Tbsp basil, chopped


      Heat olive oil in a large skillet medium heat. Add garlic and sautĂ© 30 seconds then add sausage using a wooden spoon to break it into pieces as it browns.  Cook until it is cooked through, about 6-7 minutes.  

      Add in tomato basil sauce, tomatoes, water, and seasoning and bring to a simmer. Add tortellini making sure they are covered in the sauce.  Cook on medium low about 10 minutes until pasta is tender.  Stir occasionally.  Add spinach and season with black pepper and salt if needed.   Cook several minutes until spinach has wilted.  Remove from heat and sprinkle with chopped basil.  


        Tuesday, September 6, 2016

        Greek Chicken Salad (2 Ways)


        Hi there!  I hope everyone had a wonderful Labor Day yesterday.

        Phew!  I'm actually glad it's over.  We ate way too much carbs yesterday!  I wasn't my intention but little things kept sneaking in to the menu and they added another level of carbs to the menu.  I am so ready for a salad today.

        SALAD TO THE RESCUE


        salad #1

        I did double duty yesterday while we were grilling a wonderful juicy steak and snuck on a couple of chicken breasts to grill for today's salad.  Love doing that. Today we are gravitating toward Greek flavors.  This Greek Chicken Salad can be served two different ways.  I like mine to be about the chicken and array of Mediterranean vegetables along side, all covered with a delicious vinaigrette.  MGG loves same but wants some sort of lettuce mixed in with his vegetables to make it fuller.  Same salad two ways!


        salad #2

        The flavors of the Mediterranean really shine in this salad.  The marinade doubles as a salad dressing which makes things easy, and the lemon and oregano flavors pop in your mouth!  The chicken comes out juicy and so tasty and is perfect next to the cucumber, tomato salad mixture.  If you like olive, throw them in.  This is a versatile salad. 


        It's hearty and easy to make.  Again, you can cook the chicken ahead and throw this together in no time at all.  Overall it's a great 30  minutes meal that you could make any weeknight. 


        So Greek Chicken Salad is saving the day today, with a great low carb meal.

        Enjoy!


        Greek Chicken Salad (2 Ways)

        Serves: 4

        Ingredients:
        2 large skinless boneless chicken breasts, cut in half to make four cutlets
        4 Pita Bread, cut into eighths
        Tazatziki (store bought)
          Marinade / Dressing:
          ¼ cup olive oil
          juice of 1 lemon  ( 2-3 Tablespoons )
          1 tablespoon red wine vinegar
          2 teaspoons minced garlic
          2 tablespoons dried oregano
          1 teaspoon salt
          Fresh ground black pepper
            For Salad #1:
            3 Persian or 1 English cucumber, halved lengthways and sliced thick
            1 pint cherry tomatoes (I used orange and red)
            1 orange bell pepper, sliced into strips
            ½ red onion, sliced thinly
            1/4 c Feta cheese, crumbled
              For Salad #2:
              1/2 head of romaine or red leaf lettuce, torn
              all other ingredients listed in Salad #1

                Whisk together all the marinade / dressing ingredients in large, shallow dish. Pour out ⅓ cup to use as the dressing; reserve in the refrigerator for later.

                Add the chicken to the marinade and evenly coat; cover and allow to marinade for 30 minutes to 1 hour. 

                To a large bowl, add all vegetables and toss.  Set aside.   

                Heat a outdoor grill to medium-high heat.  Add chicken, discarding the marinade to the grill.  Cook 5-6 minutes per side until cooked through (180 degrees) Remove from the grill and allow to rest 5 minutes.  Slice the chicken and arrange on plates.  Add dressing to the salad and toss.  Sprinkle with feta cheese.  Add salad to the side of the  chicken and add several pieces of pita bread to each plate.   Drizzle with any remaining dressing and serve with the tzatziki.


                adapted from Café Delites