Pages

Tuesday, June 28, 2016

Summer Drinks: Tropical Green Tea Cooler


Yum

I've found my drink love for the summer. 

I was wandering around the mall parched from all the shopping, when I stopped in a random coffee house to get something to quench my thirst.  They had a wonderful array of cold drinks.  Typically I gravitate to iced tea.  That's my main stay.


But today something came over me and I decided to try their Green Tea Specialty Drink.  I was blown over by the light refreshing taste.  So much so that I new I had to try and recreate this at home.  After several tries I got it down.  I dare say, mine is even better!

You don't need a fancy blender for this recipe.  Nope!  Just a couple ingredients, a tall glass and some ice and you are set.  This will become your drink of the summer as well.  Just one taste and you'll be hooked.  Promise.


This is the perfect non-alcoholic drink, so it's kid-friendly.  Serve this at a BBQ, picnic, or a potluck.  It's versatile and oh so tasty!

Kitchen Note:  This recipe is based upon a ratio of liquids instead of exact measurements.  This will allow you to use this ratio for a glass or a pitcher of drinks.  Also, I used a sweetened ice tea.  If you use one that is unsweetened you may need to add 1 tsp of sugar to the drink.  Try it first unsweetened and then add to taste.


Enjoy!


Tropical Green Tea Cooler

serves 1

Ice cubes
Green Iced Tea ( I used Gold Peak Green Iced Tea)
Mango Puree ( such as Kern's)
1 tsp lime juice
optional:  sugar to taste, if not using sweetened tea

Fill a tall glass with ice cubes.  Pour in 2/3 of the glass with Green Iced Tea.  Fill in the last 1/3 of the glass with Mango puree.  Add the lime juice and stir to combine.  Serve immediately.


Sunday, June 26, 2016

Fruit Salad with a Red Currant Raspberry Sauce


 Yum

Summer fruit is everywhere and what a better way to use it than in a cooling fruit salad.

This salad isn't any old fruit salad though.  No, it is one that is tossed in a wonder sauce.  Yes, a sauce that just lends another layer of fruit flavor to the mix. 


Recently I had the leisure of attending  a Cool "No Cook" Sauces cooking class taught by Phillis Carey (one of my favorite chefs) down in San Diego.  She made some fabulous sauces using oils and vinegars from Vom Fass.  I love them all but new that I would make the Red Currant Raspberry Sauce first.  She placed it on a fruit salad and I loved it so much that I kept my dish simple as well.  


We had this for Memorial Day, but guess what?  The 4th of July holiday is coming up next week and this would be the most PERFECT dish to serve at any BBQ festivities you may be having.  Perfect for a picnic, grill, potluck, outdoor concert, beachside, lakeside...you name it.  Everyone loved this fruit salad so since it was such a hit, I wanted to share it with you today.

Kitchen Notes:  This uses a Red Currant Jelly.  Bonne Maman' make a good Red Currant jelly.  You also may find it from Knott's jelly.  If you can't find the red currant use a good grape jelly.  It tastes delicious as well.  This also uses raspberry vinegar which I've seen at most major grocery stores as well as Walmart.  You can also get one here. It's also perfect in salad dressings.  The 3rd item is that she uses grapeseed oil.  This is a great base to the dish as it a healthy choice and has a clean, light mild taste which is perfect for a dish where you want the fruit flavors to shine.  This can be bought at most grocery stores, Walmart, and Trader Joe's.


This serve a crowd but you can adjust this to suit how many you are serving.  I used little ice cream cups to serve our in.  They look adorable!

Enjoy!


Fruit Salad with a Red Currant Raspberry Sauce

5 cups of mixed fruit ( I used watermelon, cantaloupe, pineapple, honeydew melons)

Sauce:
1/4 cup red currant jelly, melted and slightly cooled
2 T raspberry vinegar
1 T sugar
1/2 tsp Dijon mustard
1/4 tsp paprika
1/4 tsp salt
1/2 cup grapeseed oil

Place the mixed fruit into a large mixing bowl.  To make the sauce, whisk together the melted jelly, vinegar, sugar, mustard, paprika and salt until well mixed.  Slowly whisk in the oil.  At this point the sauce may be chilled until serving time.  When ready to serve, pour over fruit and toss to combine.  Serve immediately or may be refrigerated up to 4 hours before serving. 

Source:  sauce if from Phillis Carey Cool 'No Cook' Sauces cooking class


Wednesday, June 22, 2016

Side Dish Galore: Sautéed Zucchini with Mint, Basil & Pine Nuts


 Yum

It's summertime, the zucchini is plenty and I need a side dish!

This dish is so fresh and light that it's one of the best I've made in a long time. 

The original recipe is from Food 52 but I found an adaptation that I liked on Alexandra's Kitchen.  The dish uses a great gremolata of garlic, mint, and basil, and then is topped with pine nuts.  Add this to sautéed zucchini and you have a wonder light side dish.


I changed up the recipe just a tiny bit by using all zucchini where she used a combination with summer squash and I left out the capers since I didn't have any handy.  I'm sure they would be fantastic in this dish so add them if you like.

The dish was wonderful.  MGG loved it and so did I.  We served it along side a nice grilled chicken, but would go great with pork, beef, or fish as well.


Another hit found on Pinterest.  Love that site!

Enjoy!


Sautéed Zucchini with Mint, Basil & Pine Nuts

1 pound zucchini, sliced into 1/2-inch rounds
3 tablespoons (or less) olive oil, divided
3 cloves garlic
10 mint leaves
5 basil leaves
2 tablespoons pine nuts, lightly toasted
2 teaspoons red wine vinegar
salt and freshly ground pepper, to taste
Garnish with additional mint and basil

Heat 1 tablespoon of olive oil in a large skillet over medium-high heat. Working in batches, add half the zucchini and sauté, flipping and turning every few minutes, until golden brown, about 15 minutes.

Meanwhile chop the garlic, mint, basil, and place them together in a small bowl.  Remove the 1st batch of zucchini and cook the remaining batch adding another tablespoon of oil.  

Once the 2nd batch is done add the 1st batch back into the pan.  Add he mint mixture along with the vinegar.  Add salt and pepper to taste.  Toss together.  Place in a serving bowl and sprinkle with nuts. 

Garnish with additional herbs if desired and serve warm.


Sunday, June 19, 2016

Crispy Parmesan Chicken Strips


Yum

Boy did I have a craving today!  Do you ever get those?

Out of the blue I started to crave chicken strips.  You know the kind.  The ones that kids are so fond of.  The ones that you dip in some tasty sauce and gobble down with a grin on your face?  Oh yea, those!

So what do you do when a craving is so strong?  Stop by the local fast food joint....I think not!  You make your own wonderful crispy juicy chicken strips.  That's right, they are simple to make and they taste 1000 times better.  Why bother with those deep fried things that may or may not be all chicken when you can have the real deal, only better.  I'll show you how...in under 16 minutes!


Grab your chicken breasts and cut them into strips.  Or if you have chicken tenders that's perfect as well.  We're going to turn these babies into some wonderful tasty Crispy Parmesan Chicken Strips.

All you need is a skillet, oil, chicken and a coating mixture (eggs, flour, panko, and Parmesan)  You'll have a nice lunch or dinner on the table in no time.  A quick pan fry ensure tender yet crispy results.  And don't forget the dipping sauce.  It's crucial in my book.  Honey mustard, or in my case a nice ranch sauce is a must. 

This is one dish the kiddos will love and ask for more...even the whole family will enjoy them.
And if you happen to have leftovers (possibly not with these) they are the perfect take along for picnics or roll them up in a wrap with some lettuce and carrots, or even cut and tossed into a salad.  Heaven!


One last note:  I hope that everyone is enjoying their Father's Day and honoring those that are still with us, and thinking of those that are not.  I love my dad and miss him dearly.  Happy Father's Day!


Crispy Parmesan Chicken Strips

serves 4

½ cup all-purpose flour
2 eggs
1½ cups panko bread crumbs
¾ cup grated Parmesan cheese
1 lb chicken breast, cut into 1-inch strips, or chicken tenders
¼ cup vegetable oil

Dipping Sauce:  honey mustard, BBQ, or Ranch sauce (optional)

Add flour to a shallow pan, eggs beaten to another pan, and the panko bread crumbs and Parmesan into a third pan.  This will become your dredging station.

Heat oil in a large nonstick skillet over medium-high heat. Take your chicken strips and place them first into the flour, 1 or 2 at a time, coating both sides.  Dip them into the egg, and then finally into the panko mixture.  Add them to the hot oil and cook 3-4 minutes on each side until golden brown and cooked through.  Repeat with all remaining chicken strips.

Remove cooked chicken and place on a paper towel lined plate to drain off any excess oil.  Serve warm with dipping sauce.


Saturday, June 11, 2016

Blueberry Muffin Bread


Yum


What's in season now?  Berries...and I'm a big berry fan!

Let's talk a little bit about berries.  

Berry Basics
What are they?  Berries are small, succulent fruits that grow on bushes, vines or canes. (Some types are strawberries, raspberries, blueberries, blackberries, huckleberries etc) You can usually find them available year-round, but they are more flavorful, plentiful and affordable in the spring and summer months.  

How do you choose the best ones?  Never buy them if they are moist, overly soft, pale colored or show signs of mold. Do not buy berries if their cartons are leaking and wet. We don't want any mold!

How do you prepare them?  Rinse berries, but never soak them as they will absorb the water and become mushy. Leaving berries whole is best for snacking. You can also macerate them by putting them in a bowl and sprinkling a tablespoon of sugar over them for every pint and allowing them to sit for 15 minutes. This will draw out the moisture and create a sweet natural syrup.  Perfect over yogurt or as a dessert over pound cake or ice cream.

How do you store them?  They are fragile, so handle them gently.  They all require refrigeration, and they freeze well.  I freeze a variety of them every year so we have fresh berries come winter. Make sure not to rinse them until right before use so mold does not accumulate.  When you freeze them you can place them in a single layer on trays and then freeze.  Then place them in a zip lock freezer bag or a plastic container.  I even mix some of the berries into portions for quick making smoothies.  It's all up to you and is as easy as that!  


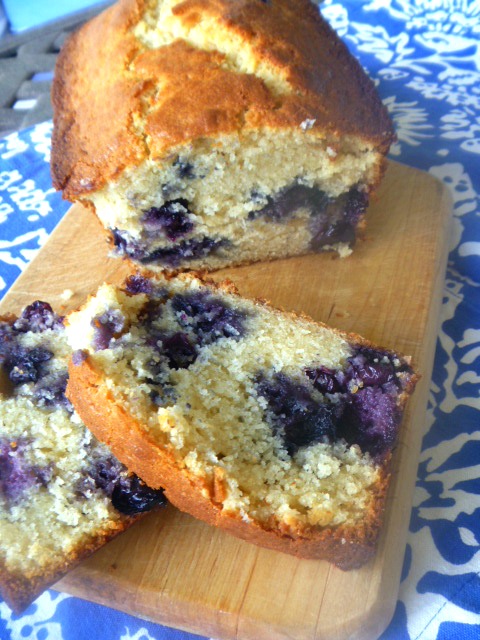
Now that we have the basics out of the way let's make something with blueberries.  I typically turn to muffins but let's think out of the muffin pan for a minute!  What about a nice quick bread.  Similar to muffins but just different enough to make it feel a little special.  

This quick bread is soft and moist and just loaded with fresh blueberries! It is like the most incredible blueberry muffins you've ever had, but in loaf form.  Who says we can't have cake for breakfast?? Not me!  This Blueberry Muffin Bread would be perfect with a cup of coffee or tea in the evening, snacking after work or school, or have it for your weekend breakfast like we did.

So go forth to the farmer's markets or your local grocery stores and buy all the berries you can handle.  


Enjoy!

Other quick breads you may enjoy:

Strawberry Banana Bread
Lemon Blueberry Bread
Lemon Tea Bread
Cinnamon Streusel Banana Bread


Blueberry Muffin Bread


makes 1 loaf


1/2 c Splenda Bend or 1 cup of sugar
1/2 c Butter, softened
2 eggs
1 Tbsp Vanilla Extract
1 c 2 % Milk
2 c flour
2 tsp Baking Powder
1/2 tsp salt
1 1/4 c Blueberries

Preheat the oven to 350 degrees. Spray a 9" loaf pan with non-stick cooking spray. 

Cream together the butter and sugar using a stand or hand mixer.  Add the eggs one at a time, beating well after each addition.  Add the vanilla and milk and mix together.   Turn off the mixer

At this point you can add the flour, and baking powder, and salt.  Using a rubber spatula mix until just combined.  Don't overmix.  Sprinkle the blueberries with a little flour then fold them in gently. 

Pour into the pre-treated pan and back for 60-70 minutes or until golden brown and a toothpick comes out clean when inserted in the middle.

Cool on a wire rack for 10 minutes.  Invert the pan to release the bread and continue to cool on a wire rack to continue cooling.  Slice and serve.


Thursday, June 9, 2016

Springtime Pasta Salad


Yum

The weather is warming up, we are grilling outdoors more and I'm in the mood for summer.

Summer is "salad season".  Actually every season is salad season for those people trying to eat healthy.  I try, I really try. Fresh foods are our daily goal and we've been doing a great job of cutting out the processed foods.  Yea!

Summer reminds me of farmers markets with their abundance of fresh fruit and vegetables.  So this does spur me on to eat a lot more light and fresh salads.  


A sub-category of salads is Pasta Salads.  Hurray for pasta! I really like my pasta salads.  You can use all types of different pasta shapes and then you can customize what goes in it! Make a theme of it....are you feeling Greek today? How about a Greek pasta salad.  Or maybe you feel a little Mediterranean or even straight up American.  You can tailor a pasta salad by the veggie or ingredients you use to fit your theme.

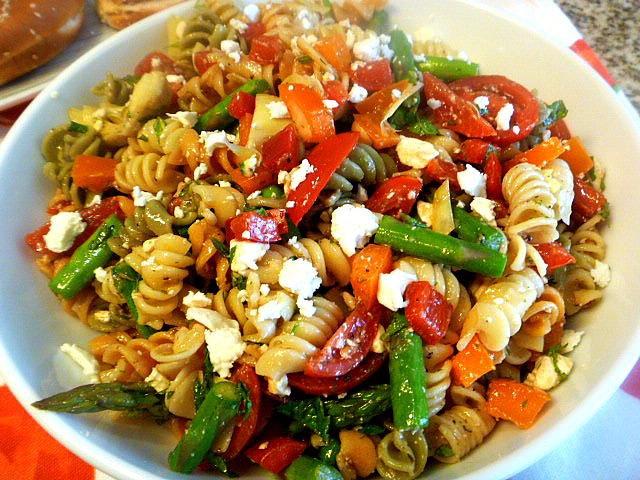
Today, I'm feel Springy.  Fresh and light.  So I created a Springtime Pasta Salad loaded with asparagus, artichoke hearts and more.  It is the perfect as a side dish to a picnic, BBQ, or pot-luck.  


It's made with a vinaigrette so it keeps really well, and since there is "no mayo" you don't have to worry about the temperature.  

The 4th of July is coming up soon....keep this in mind.

Enjoy!


Springtime Pasta Salad

1/2 lb tri-color rotini pasta

1/2 bunch of asparagus
1/2 red bell pepper, diced
1/2 orange bell pepper, diced
1 c cherry tomatoes halved or quartered if large
1/2 can quartered artichoke hearts, chopped
1/3 c feta cheese, crumbled (more for sprinkling)
1/2 package dry, Italian-style salad dressing mix
1/4 c extra virgin olive oil
2 Tbls balsamic vinegar
1 tsp dried italian seasoning
1/4 tsp salt
1/4 tsp ground black pepper 

Cook the pasta according to the directions on the package. Cook al dente. During the last 1 minute of cooking add the asparagus to the water with the pasta. Allow to cook 1 minute and remove with a slotted spoon to a cutting board. Drain pasta. Allow to cool 5 minutes. Cut asparagus in 1 inch pieces and add to a large bowl.

Add red and orange bell peppers, tomatoes, chopped artichoke hearts and feta cheese to the bowl. Add cooled pasta and toss to combine. Sprinkle with the dried salad dressing mix and cover and refrigerate for 1-2 hours.

In a small mason jar add the olive oil, balsamic vinegar, Italian seasoning, salt and pepper. Shake to combine. Set aside.

When ready to serve toss the pasta salad with enough dressing to coat well. Transfer to a serving dish and serve.


Thursday, June 2, 2016

Beefy Quesadillas


Beefy Quesadillas - perfect use for leftover taco meat.  Delishhh! - Slice of Southern


Yum

Hi there!  I hope everyone had a fantastic holiday weekend.  You know, Saturday is National Tortilla Day.  Since I have some leftover ground beef from our Memorial Day cookout, I was inspired to combine the beef and tortillas into a wonderful lunch of Beefy Quesadillas!  Oh yeah...so good.

I love Mexican food and these Beefy Quesadillas were simple to make and really hit the spot for a light lunch.

Beefy Quesadillas - perfect use for leftover taco meat.  Delishhh! - Slice of Southern

It's really just burrito filling that I made quesadilla style instead.  Packed with seasoned ground beef, beans, cheese, a little green chilies, and some hot sauce.   Oh boy, these were good!  Serve them with a plop of sour cream or some salsa and you are set.  Lunch is served!


Beefy Quesadillas - perfect use for leftover taco meat.  Delishhh! - Slice of Southern

A perfect way to use up any leftover ground beef and so get your Mexican craving on!

Enjoy!


Beefy Quesadillas

serves 2

1/2 lb. ground beef or sirloin
1/4 c refried beans
4-6 dashes of hot sauce
1 Tbls. of chopped green chilies (from a 4 oz can)
2 Tbls taco seasoning
4 8 inch flour tortillas
1 cup monterey jack cheese, shredded

In a large skillet, cook ground beef over medium heat until no longer pink. Add 1/4 c water, the taco seasoning, and the green chilies, and bring to a low boil until a sauce forms and most of the water has evaporated.

Meanwhile in a small saucepan, add the refried beans and the hot sauce.  Heat over low heat until warm, stirring to combine.  

Heat a clean skillet over medium heat.  On a board place one tortilla flat and spread half of the refried beans on the bottom from the middle out to the edges.  Layer on the meat mixture and then the cheese.  Place in the skillet and cover with a lid.  Cook for 2-3 minutes or until golden brown.  Flip and cook the other side 2-3 minutes until brown.  Remove from the pan and cut with a pizza cutter or knife and serve with sour cream, salsa, or guacamole.