Pages

Wednesday, February 27, 2013

Easy Mexican Rice

Mexican Food is almost a staple when you live in Southern California.

If you grew up here the Latin influence in food was sure to have been part of your diet.  So it's no surprise that it's made in the home...and often!

A few days ago I brought you a wonderful Mexican chicken dish called Chicken Milanesa.  What a great way to eat chicken!  An even better treat is the side dish.  My Easy Mexican Rice is the perfect accompaniment for many dishes.  You know that rice goes with just about everything!  Being a starch it is a perfect foil for all types of protein. 


 This dish is easy to make.  It only takes a few ingredients, and cooks up in about 25 minutes so it's a great dish to make anytime.  This dish is always a big hit with friends, family, and children, plus it's easy to double and make a large batch.  Use leftovers in a quick Arroz con Pollo, which is a baked dish useing rice, shredded cooked chicken and cheddar cheese.  Yum!


Easy Mexican Rice

Serves 4
Time:  25 min plus prep

1 cup long-grain white rice, uncooked
1/4 cup Pure Wesson® Vegetable Oil
1 large onion, chopped (1 large = about 1 cup)
2 cans (8 oz each) Hunt's® Tomato Sauce
1 can (14 oz each) chicken broth


Cook rice and oil in large skillet over medium-high heat 3 minutes, or until rice is lightly browned, stirring frequently.

Add onions cook and stir 5-7 minutes, tender. Stir in tomato sauce and broth.  Bring to a boil over high heat. Cover skillet with lid; reduce heat to low.
Cook 25 minutes, or until rice is tender. Stir before serving.

Monday, February 25, 2013

Chicken Milanesa


When I first moved to my current home, about 20 years ago (wow...reality time check..ouch!) we had a great social atmosphere here.  Lots of parties, dancing, hanging out by the pool, just lots of activities going on.  One things that was always a plus at that time was that there is a local Mexican joint down the street.  You know, a hole in the wall type.  We have these little Mexican joints all over Los Angeles, some are good, some are so-so, and some...well let just say your wouldn't want to step inside.

The one down the street is pretty good.  Their food is fresh, inexpensive, and filling.  Plus it's in walking distance!  What's better than to grab your friends in the evening, especially when you don't want to cook, and go have some Mexican food and a beer.  Good times, and good friends.  One of my friends used to bring his son with us.  He was about 12 at the time.  I always thought it was so strange that he would order Chicken Milanesa and french fries.  I mean, we're in a Mexican restaurant right?  What about eating something that tastes like Mexican flavors, like a taco, or a burrito, or arroz con pollo?  But he continued to eat that same dish of breaded chicken and french fries over the years.

(hehe! my chicken is the shape of a lobster!)

One day I finally tried it and BAM, it hit me.  This chicken is really, really good!  The hint of the flavored bread crumbs, and the thin, thin chicken breasts that are pan fried and juicy.  But still I didn't eat it that often.

The other day something reminded me of that young boy and his breaded chicken and I decided to make Chicken Milanesa at home.  And I did.  What took me soooo long??? Man! This chicken really is the bomb!  Nice subtle flavors and crispy on the outside, juicy on the inside.  Served with my Easy Mexican Rice, this dish is a winner (rice recipe will follow soon!)  All that I can say is that I'm a dork for waiting so long to make this.


Don't be like me....make yours tonight.  You'll thank me for it, as I thank that young boy for introducing me to a winning chicken dish, Mexican style!


Chicken Milanesa


serves 4

1 egg, slightly beaten
¼ t garlic powder
½ t salt
¼ t pepper
1/8 t cayenne pepper
1 lb boneless, skinless chicken breasts, pounded to ¼ “ thick
3/4 cup plain bread crumbs
Canola oil

Beat the eggs in a shallow pan.  Place bread crumbs along with garlic, salt, pepper, and cayenne pepper in another shallow pan, mixing to combine.  Dip chicken breasts into egg mixture on both sides. Dip into bread crumbs, and then set on a wire rack for a few minutes to allow the crumbs to set. 

Heat oil in a large skillet over medium heat. Place the chicken breasts in the oil and cook 4-5 minutes per side, turning once until golden brown and cooked through.  Serve immediately.  

Saturday, February 23, 2013

Granger Cookies


Sometimes you need a little sweet treat!

Even though we all strive to eat healthier every year, sometimes to curb cravings you should treat yourself (in moderation) to a treat.  Part of the Eat Well 2013 motto is to strive for fresh, clean eating and to limit the amount of processed foods.  But, it also allows for an indulgence every now and then.

These are my sweet treat (ok, not counting the Valentine's Day dessert!).  So I stole found another old time cookie recipe from my mom's sacred recipe box.  Mom said they are a cookie from the 50's from a man name Granger in Australia.  Great era don't you think!  The web shows may versions of these cookies floating around.  I'm glad to have the ones mom thought were great.  These cookies were very popular and once you make them you will see why.  They are a spin off of a chocolate chip cookie.  A little sweeter, and crispier than your average cookie, but great nonetheless.  


Easy to whip up on the weekend with your kids...or not and make them for yourself!  Isn't it great to be able to share recipes of old with new generations, and teach them the fundamentals of cooking??  

Share some love this weekend by making a batch of these great cookies!

Granger cookies 
mom's recipe

Ingredients

½ cup soft butter
1 1/4 cup brown sugar
1 tsp vanilla
1 egg, beaten
1 1/2 cups plain flour
1/2 tsp baking powder
1 1/2 cups chocolate chips 
1/2 cup raisins or dried cranberries

Method

Preheat oven to 180°C (350°F) and grease a baking tray (cookie sheet).

Cream butter and sugar. Beat in vanilla and egg. Stir in sifted flour and baking powder until just combined. Stir through chocolate chips and cranberries.

Log method: Form the mixture into a log and either use now or freeze for later.   To make now slice into 1 inch thick rounds and bake 15 - 20 minutes until brown.

Drop cookies:  Place spoonfuls of mixture onto baking tray, allowing room for spreading. Cook for 15 – 20 minutes or until golden. Allow to cool.


Thursday, February 21, 2013

Easy Tomato Soup with Grilled Cheese Croutons


They say it's our storm of the season.
I say it's time for some more soup. 

Today's soups is a comforting old stand by; tomato soup.  What makes this so special?  The fact that it's quick and easy, easy to make.  Plus it tastes like it's been slow cooked.  PLUS, it's topped with grilled cheese croutons!  You know that tomato soup and grilled cheese sandwiches go hand in hand.  So my spin on  this combination was to make croutons to give that cheesy flavor but keep light in calories.


Winner!

This soup takes about 40 minutes with prep time.  Quick enough to make on a weeknight.  Simple enough to make for lunch on the weekend! I'm sure you could also put this in a slow cooker and allow it to meld together for about 4-5 hours, but it's not necessary.  The flavor is that good.  It's one of my go to soups when you want something hot, satisfying and good enough to comfort you during this season's "storm"!


Easy Tomato Soup with Grilled Cheese Croutons

8 Servings - - Time: 30 minutes

2 (14.5 oz) cans diced tomatoes with basil, oregano and garlic
2 T butter
1/2 c red onion, small dice
2 minced garlic cloves
6 tablespoons flour
6 c low-sodium chicken broth
2 slices of Italian bread
2 slices of American Cheese
1 T butter, softened

Place tomatoes with their juices in a blender.  Blend until smooth.  In a large saucepan, heat 2 T of butter over medium-high heat. Add onion to pan and cook about 6 minutes until tender.   Add garlic; cook another minute longer.

Sprinkle flour over the onions.  Cook for 1 minute, stirring. Add broth, whisking to incorporate.  Add tomatoes.  Bring to a boil over medium heat, stirring occasionally.  Reduce heat and simmer for 30 minutes stirring occasionally. 

Meanwhile, heat a skillet over medium heat.  Take the bread slices and top one slice with 2 slices of cheese.  Top with other bread slice.  Spread softened butter on the outer sides of the sandwiches.  Place in heated skillet and cover, cooking for about 1-2 minutes or until well toasted.  Flip sandwich over and cover and cook another 1-2 minutes until well toasted and cheese is melted.  Remove from skillet to a cutting board.  Allow to sit a few minutes to cool and so that cheese sets.  Cut into 1” cubes.

Serve soup in bowls topped with several grilled cheese croutons.

Tuesday, February 19, 2013

Apricot Lemon Chicken


I got a new cookbook!

Something I picked up at Home Goods.  I love that store!  As I was walking by browsing all the cool kitchen stuff this book was staring at me...it was.  And then it was calling me, "come over, buy me, buy me!"

I browsed through a couple of pages and I was hooked.  I know, it's not hard to do with me and cookbooks.  I already have a ton of them.  But one more won't hurt, will it?  What really grabbed me was all the pictures.  Don't you just love pictures in cookbook?  I don't want to buy a book if there aren't any pictures.  I like to ooohh, and aaahh over the pictures, and drool over what the finished product looks like.  They say we eat with our eyes, so putting pictures of wonderful food in a book only makes sense, right?  I know!


So "My Recipes America's Favorite Food" enters my life and BAM!  I open the book and land on a page with a killer recipe from Cooking Light.  Fast simple good food is what it's all about.  This chicken dish hits all the notes.  It cooks up in about 20 minutes so dinner's on the table in a flash.  The flavors are spectacular.  The curry powder lends a little heat to the chicken while the apricot and the lemon add sweetness add tang to the dish.  What a great compliment to each other.  

Once again MGG was "Mmmnnning" through the whole meal.  So I promptly told all my co-workers about this dish the next day at work.  Two of them made it and said their families just loved the flavors, and the cooks loved the quick and ease of the preparation.  


If you want to do yourself and your family a favor...make this!  You'll see!

I can't wait to make my next recipe from this book.


Apricot Lemon Chicken

by My Recipes America's Favorite Food - Cooking Light

4 servings - - Time 20 minutes

1 teaspoon curry powder
1/2 teaspoon salt
1/4 teaspoon freshly ground black pepper
4 (6-ounce) skinless, boneless chicken breast halves
Cooking spray
1/3 cup apricot spread (such as Polaner All Fruit)
2 tablespoons fresh lemon juice
2 tablespoons water
2 teaspoons grated lemon rind 

Preparation
1. Combine first 3 ingredients in a small bowl; rub mixture over chicken.

2. Place a large nonstick skillet over medium-high heat. Coat pan with cooking spray. Cook chicken 6 minutes on each side or until done. Remove chicken from pan, and keep warm.

3. Add apricot spread, lemon juice, and 2 tablespoons water to pan, stirring until smooth. Cook over medium heat 1 minute. Spoon sauce over chicken; sprinkle with lemon rind.


Sunday, February 17, 2013

Italian Grilled Cheese and a Panera Tutorial


It's the weekend and time for another great sandwich!

As you may recall I love hot sandwiches.  They just make them feel heartier...and toasty...and comforting.  So great during this cold winter we are having.

What could be more comforting that a grilled cheese sandwich.  We all grew up with them, didn't we?  I know I did.  All the ooey gooey cheese oozing out from between two toasted pieces of bread.  Today's sandwich doesn't disappoint, and it's bursting full of flavors.  It's the Italian version of a grilled cheese.  Every bit as good as the original.  Maybe better...you be the judge!


Before we get to the recipe though I had the opportunity to learn some sandwich tips from some great people over at Panera Bread.  Don't you just love Panera?  My whole family goes there and oohs and ahhs over the pastries and bread.  And then there's the salads, sandwiches and soups that are to die for.  Well, Panera really knows how to put a great sandwich together, and I'm going to share the 7 basic rules with you so you can create masterpieces of your own. 


Here are the seven basic sandwich making rules:

1.Start with great bread: The bread should be the inspiration for the filling, not vice versa. Bread isn't the carrier for getting things into your mouth, it’s the leading principle.
2. Slice it right: Denser breads, such as Whole Grain, should be cut to no more than 5/8 inch. More tender breads, such as Tomato Basil, should be sliced thicker (¾ inch). This ensures a happy marriage of bread and ingredients, plus you’ll make a sandwich that won’t fall apart.
3. Keep it simple: Keep the number of ingredients low but make sure they’re of the highest quality. Too many sandwiches are impressive to the eye but not to the palate. Here’s another way to look at it: The average mouth should be able to get all the elements in one bite. Stay away from the Dagwood effect.
4. Use a thin veneer of spread: Whether its mayo, mustard, or something special, spread it uniformly and completely across the surface of the bread. Every bite should feature its flavor.
5. Include an element of freshness: a slice of ripe tomato, a sprinkling of fresh herbs, some crunchy lettuce, or a bit of raw onion on a hot sandwich. A fresh pop makes the difference between a good sandwich and a great one.
6. Cut it carefully: Lots of promising sandwiches are ruined in the final stage by a dull knife. Use a serrated knife and let its weight do the work. Use a long sawing motion like you’re carving a turkey.
7. Eat it now: Sandwiches should be eaten within a couple hours of construction. You can extend their life by not putting tomatoes or spreads on the bread, but generally speaking, sandwiches are best when consumed immediately.


Isn't it interesting that there is a method and formula to making great sandwiches?  Hope you found these as helpful as I did.  Now onto today's recipe....yum!  Great ready for some cheesy goodness!

Italian Grilled Cheese
serves 2

Homemade or store-bought pesto
4 slices Italian bread, each no more than 1-inch thick
4 slices mozzarella cheese, sliced thin
butter

Line two of the bread slices with mozzarella and spread pesto on the other two bread slices, then put them together to make two sandwiches.


Butter both sides (on the outside) of each sandwich.  Place them in a heated skillet over medium heat.  Cover with a lid.  Cook, flipping once when the first side is golden brown.  Cover and cook the second size until the mozzarella melts and the bread is golden and toasty. Serve immediately.


Saturday, February 16, 2013

Cheesy Potato Soup (Cooking for Two)


I just bought a new slow cooker.  A cute little 2 1/2 qt one.  One for just me and my man.  Small little intimate meals.

Actually that sounds nice and all but I bought with the thought of soups in mind.  Love soups, and during this cold spell we can't shake, they are great to warm your soul.  So while we are out running around during the day I can have a great soup waiting for us when we get home.  Soups on!


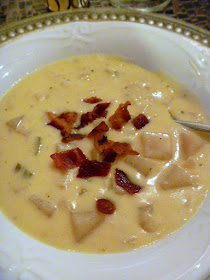
So I been cooking soups quite a bit lately experimenting with my new toy.  I typically like clear broth soups.  I just love the flavor of broths.  That didn't last long when I came across this crockpot recipe for Cheesy Potato Soup (Cooking for Two) in a Pillsbury.com email. How perfect is that?  A new tool and a new soup for it's debut.  Something about the fact that there is CHEESE in this potato soup appealed to me.  Sounds like a loaded baked potato with the bacon on the top.  Who wouldn't like that?

So as it turned out this soup was fantastic.  Creamy, cheesy, comfort food.  Perfect on a cold night with some hot rolls and a salad.  So if you are looking for a simple comfort food dish...look below for the recipe.  Oh, and if you want to feed more people, just double the recipe and use the standard 4 or 5 qt crockpot.


Cheers to my new 2 1/2 qt crockpot!  I'll be putting the large one away for another day.


Cheesy Potato Soup (Cooking for Two)
serves 3

2 slices bacon
¾ cup chopped onion
2 ½ cups diced peeled russet potatoes (about 3 small)
¼ cup chopped celery
2 cups Progresso® chicken broth (from a 32-oz carton)
¼ teaspoon salt
1/8 teaspoon pepper
¼ cup all-purpose flour
¾ cup half-and-half
1 cup shredded Cheddar cheese (from an 8 oz bag)

In 10-inch skillet, cook bacon over medium heat, turning occasionally, until browned and crispy. Remove from skillet, reserving fat in skillet. Drain bacon on paper towel, then refrigerate. In same skillet, cook onion in bacon fat over medium heat 4 to 5 minutes, stirring frequently, until tender.
Spray 3- to 3 1/2-quart slow cooker with cooking spray. In cooker, mix onion, potatoes, celery, broth, salt and pepper.
Cover; cook on Low heat setting 6 to 7 hours.
In small bowl, beat flour and half-and-half with wire whisk until well blended; stir into soup. Increase heat setting to High. Cover; cook about 20 minutes longer or until thickened. Stir in cheese until well melted. Crumble bacon; sprinkle over soup.

Friday, February 15, 2013

Pineapple Mango Chia Smoothie


It's smoothie time!

Winter is still a good time to have a smoothie, especially for breakfast.  What a great way to fill up with wonderful juices and fruit.

I know I've posted many, many smoothies before, but as part of my Eat Well 2013 motto, adding juices to your diet is good for you.  Fresh, natural fruit and vegetable juices can improve nutrition and help with weight maintenance.  They are wonderful to drink with and great to cook with as well.   I saw a great book the other day that gave me inspiration to make this drink.  It has some great recipes to incorporate juices into your diet.  


Juicy Drinks: Fresh Fruit and Vegetable Juices, Smoothies, Cocktails, and More

So here's to the second healthy smoothie for 2013.

Two great flavors make up this smoothie.  Pineapple and mango gives it that tropical feel.  A great combination that will leave you wanting more. 

What's new about this?  The chia seeds. They are mottle-colored seeds with brown, gray, black and white.  They are rich in omega-3 fatty acids and high in fiber which is very good for your health.  Chia seeds can be added to foods as a topping or put into smoothies, oatmeal, yogurt without altering the taste.  They also help you feel full faster, and are easier to digest than flax seed.  Good stuff!  You can find them in the bulk item section of Whole Foods or other stores such as Sprouts.  Try them, you will never know they are there, but will reap the benefits.


Enjoy!


Pineapple Mango and Chia Smoothie

1-2 servings

1/2 mango, cut in chunks
1 small container of Dole pineapple tidbits in juice
1 6 oz container of lite vanilla yogurt
1/4 c milk
1/2 banana

1 tsp chia seeds
1 cup of ice cubes

Place all ingredients in a blender.  Blend on high until smooth.  Serve
.

Wednesday, February 13, 2013

Raspberry Sour Cream Muffins - A Valentine Breakfast

Muffins hot from the oven loaded with raspberries and moist from the sour cream makes these a special Valentine's Day muffin! - Slice of Southern

I made a special muffin just for my love on Valentine's Day!

When I think of Valentine's flavors, pink, strawberry, chocolate, and raspberry come to mind.  So I'm in a pink mood this year...and the delicate love it emits.  So why not make a wonderful breakfast treat for your loved one that's pink.

I remember a cookie I once had that was raspberry and white chocolate.  At the time I thought...this is Valentine's in a cookie!  One thing though was that the white chocolate made it a little two sweet for me.  So when I set out to make this muffin, I thought of that cookie and decided to leave out the white chocolate.  But to give it that moist decadent feeling I added sour cream to the muffin mix.  Heaven!  With the addition of raspberries I ended up with a beautifully moist, tart yet sweet masterpiece of a muffin.


Muffins hot from the oven loaded with raspberries and moist from the sour cream makes these a special Valentine's Day muffin! - Slice of Southern

Of course the cute little heart muffin papers didn't hurt!

What a special way to say "I Love You" than with these muffins.  They taste THAT good!  See for yourself...


Muffins hot from the oven loaded with raspberries and moist from the sour cream makes these a special Valentine's Day muffin! - Slice of Southern

The recipe makes twelve, but you can halve it if you would like less muffins.  Perfect for breakfast with some eggs and bacon.  A wonderful way to start off the day.  And made with love....

Happy Valentine's Day!


Raspberry Sour Cream Muffins

Makes 12

2 c flour
1 T baking powder
1/8 t salt
½ c sugar or ¼ c Splenda sugar blend
2 large eggs
1 c sour cream
6 T canola oil
1 t vanilla
1 c frozen or fresh raspberries

Preheat oven to 400 degrees.  Spray a 12 cup muffin tin with non-stick cooking spray or line with paper liners.

In a large bowl add flour, baking powder, salt, and sugar.  Stir to combine.  In another small bowl lightly beat eggs.  Add in sour cream, oil, and vanilla.  Beat slightly to mix.  Pour the wet ingredients into the dry ingredients.  Stir until moistened.  Do not over mix.  Fold in raspberries, being careful not to mash them.

Spoon batter into the prepared muffin tin.  Bake for about 20 minutes or until golden brown.  Allow to cool 5 minutes in the pan, then remove to a wire rack to cool completely.

Monday, February 11, 2013

Be My Valentine Dessert


The magic of  Valentine's day is upon us.  

How will you celebrate?  Will it be a lavish dinner out, or something quite at home.  Or perhaps not a dinner at all but a special day planned for the two of you.  We usually do something memorable such as a museum, or day out.  This year we're talking about attending a Flamenco concert...how passionate is that?

So in honor of that passion I thought I would bring you a dessert to make for your loved one that will knock their socks off.  I saw this wonderfully easy dessert over on Stonegable.  I absolutely love Yvonne's blog, so if you get a chance make sure to pop over and check it out for yourself.  She called it "Be My Valentine Dessert".  What a perfect name!  I knew I had to recreate it for MGG, and I did, and he loved it!


(see the medium and tiny puff hearts!  adorable...)

So here' my adaptation of her wonderful recipe.  It's very easy to put together.  The hearts are made from puff pastry, which you can make several days ahead and keep them in a storage bag.  Assembly on the big day is quick and easy.

I hope you and your loved ones enjoy this special treat.  I can't wait to make another one!!!


Look for a wonderful valentine breakfast muffin later in the week.  They'll put love in the forefront of your day!

Be My Valentine Dessert
adapted from Stonegableblog.com

serves 2

2 4" square puff pastry sheets, or 1 large sheet puff pastry
8 strawberries
1 T sugar
chocolate syrup
strawberry ice cream
whipped cream


Preheat the oven to 400 degrees.  Thaw puff pastry for 15 minutes.

In a small bowl, cut all but 2 strawberries and sprinkle with sugar. Gently mix and set aside.  Cut the 2 strawberries from the tip almost to the base in 5 slices and open like a fan.  Don't cut all the way through so the base stays together.

Place the puff pastry on wax paper on a work surface.  Using a large cookie cutter cut out 2 large hearts. You can also cut out several medium hearts, and several tiny heart for garnish.  

Put the pastry hearts on a parchment lined baking sheet. Leave a little room between each heart.  If the pastry is still cold you can now cook them.  If they are more like room temperature put them back in the refrigerator for 15 min, as cold puff pastry will puff better when cold.  

Bake at 400 degrees until they are puffed and golden, about 15 minutes.  The tiny hearts will only take about 10 minutes so if you are cooking those remove them after 10 minutes.  Cool the hearts completely. At this point they can be saved in an airtight container for several days.

To assemble: Gently cut the two largest puffed hearts in two.  I used a serrated knife so the pastry would not break.  Drizzle the chocolate syrup over the bottom of a small plate.   Put the bottom heart shell in the pool of chocolate and top with a scoop or two of the ice cream.  Place the sliced strawberries on top of the ice cream.  Add the top heart shell and drizzle a little syrup over the top.

Garnish with whipped cream, and a fan cut strawberry and medium and small heart puffs.  

Friday, February 8, 2013

Orange Chicken Stir Fry


One great thing about living in Southern California is the amount of great Chinese and Thai restaurants that we have.  So many to choose from and so little time!

While we have many favorite dishes that we typically order when we go out, there are a few that I just love.  Chicken is probably my favorite protein in  Asian dishes, so I tend to order that more. Getting a couple of main dishes and sharing them is our favorite thing!  I love Cashew Chicken, General Tao's Chicken, Lemon Chicken...you get my drift.  Another popular one is Orange Chicken, and I love it as well.  The unfortunate thing is that this dish tends to be fried.  So we don't end up ordering it as often as I'd like to.

So everyone loves a good stir fry right?  They are easy and quick to make at home.  You can make a small or large quantity with no problem, and the taste is fresh...outstanding!


So missing my Orange Chicken, I set out to make a dish worthy of the name with the flavors I crave...but with out the frying.  Out came the ingredients to whip up a wonderful glaze and using my base techniques for stir fry it was done!  Quick and simple, fresh, light, and citrusy.  My cravings were satisfied...ahhh!
What a great meal to cook on a weeknight.  This can be done in under 30 minutes.  Prep is the key, and make sure to start the rice first.  A nice bed of fluffy brown or white rice will set the dish off.  The rest is a piece of cake.


Next time you are craving take out, make it at home.  It will be healthier for you and more cost effective. The best part is it will taste just as good as your local Chinese restaurant.

Orange Chicken Stir Fry

serves 4
time:  under 30 minutes

1 T cornstarch
2/3 c orange juice
1/2 t ginger
1 pound boneless skinless chicken breasts, cut into bite size cubes
1 large zucchini, halved and sliced
1 medium onion, thinly sliced and separated into rings
3 teaspoons canola oil, divided
1/3 cup reduced-sugar orange marmalade
3 tablespoons brown sugar
1 tablespoon lemon juice
Roasted peanuts, optional
Hot cooked rice, optional

In a small bowl, combine cornstarch and orange juice, and ginger until smooth; set aside. 

In a large nonstick skillet or wok, stir-fry chicken 2 teaspoons canola oil about 5-7 minutes until golden brown and cooked all the way through.  Remove and keep warm.

In the same pan,  add another teaspoon of canola oil and stir-fry zucchini until tender, about 5 minutes.  Add chicken back to the pan.  Stir in the marmalade, brown sugar and lemon juice until marmalade is dissolved. 

Stir orange juice mixture.  Bring to a boil; cook and stir for 2 minutes or until thickened. Serve over rice and top with roasted peanuts if desired.


Tuesday, February 5, 2013

Peppermint Vanilla Ice Blended Drink


My favorite coffee shop is The Coffee Bean & Tea Leaf.
Love them!

I'm not a coffee drinker, you see.  What is a girl to do in this age of coffee drinking, coffee shop going people?  MGG is a coffee-aholic...so we visit Starbuks often.  Not my 1st choice mind you, since they don't have many drinks that are not coffee flavored.  But Coffee Bean....ahhh!  teas and blended drinks galore! I'm in heaven.

We actually have a Coffee Bean & Tea Leaf (CB for short!) on the business campus where I work.  How convenient!  So we take a little break and walk over to CB for something wonderful.  One of the best drinks there are their Ice Blended drinks.  They have a variety of flavors such as chocolate, mocha, vanilla, etc...that are flavored powders blended with milk or soy and ice.  Like a milkshake really.  So cool and delishhhh!  You would think they are sinful. 

Even though it is winter time I still love my ice blended drinks.  So today I decided to create one at home using one of my favorite flavors this time of year.  Peppermint.  Love, love peppermint.  One of the great joys of the holiday season, and now captured in a frosty, thick drink!

So to make this winter drink at home you will need some vanilla powder.  I purchased Coffee Bean's French Vanilla No Sugar Added Powder, but you could use your own favorite vanilla powder for drinks.  Here's another good one to try.  The peppermint flavor comes from Torani's flavored syrups.  I picked mine up at my local Cost Plus World Market.

These are easy to whip up, just like making a smoothie in your blender.  You will love the crisp flavor of this drink. 


Enjoy!

Peppermint Vanilla Ice Blended Drink

serves 1

1/2 c low fat milk
1 T heaping, vanilla powder
1 T Peppermint sugar free syrup
1 c ice cubes

Place all ingredients in the blender, liquid first.  Blend on high speed until ice is crushed and ingredients are all mixed together.  Serve immediately.


Sunday, February 3, 2013

Cranberry Orange Quick Bread


I just love a good quick bread don't you?

One reason, is that they are is easy to make, and quick to pull together.  You can eat if for breakfast, a snack, or serve it for dessert.  What can be more versatile than that?  

I have a collection of quick bread recipes that I've had for years, but one of my favorites, along with my mom's is a Cranberry Orange Quick Bread.  There is just something about cranberries combined with orange that works so well.  To give it a southern twist we always throw toasted pecans in our quick bread for a little crunch.  It's just the best addition.


So when I visited my mom recently, one thing I always do is make some type of sweet to snack on during the week.  This time it was this wonderful quick bread.  Mom likes to toast it with a smear of butter for breakfast.  Yum Yum!  

This recipe goes together quickly and comes out perfectly.  A nice dense cake like bread that is both sweet and tart, and has the perfect crunch!


Hope you take time out to try this family favorite, it's scrumptious!

Cranberry Orange Quick Bread

make 1 loaf
time: 1 hr 20 min.

1 cup low fat 2% milk
1/4 cup vegetable oil
1 T grated orange peel
1 egg
2 cups all-purpose flour
1/3 cup sugar
3 t baking powder
1/2 t salt
3/4 cup fresh or frozen cranberries, chopped

1/2 cup toasted pecans, chopped

Heat oven to 400°F.  Spray a 9"x5"x3" loaf pan with cooking spray.  

Whisk milk, oil, orange peel and egg product in large bowl with spoon. Stir in flours, sugar, baking powder and salt just until flour is moistened (batter will be lumpy). Fold in cranberries.

Pour batter in loaf pan.  Tap on counter to remove any air pockets. Bake 1 hour 10 minutes to 1 hour 20 minutes or until toothpick inserted in center comes out clean. Cool 10 minutes. Loosen sides of loaves from pans; remove from pans and place top side up on wire rack. Cool completely, about 2 hours before slicing. 


Friday, February 1, 2013

Roasted Spaghetti Squash with Meatballs


Ever tried that strange looking squash named spaghetti squash?
What's that all about anyway?

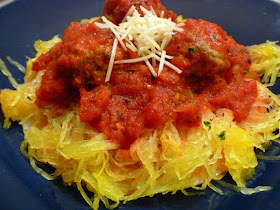
Let me tell you!  Spaghetti squash has a mild flavor, (slightly sweet) it's easy to cook, and is a great replacement for spaghetti.  To prepare the squash you have to cut it in half and clean out the seeds, and stringy pulp.  Much like a pumpkin.  Then you roast it and when it is done it will be soft and tender.  To make the "spaghetti" you just take a fork and scrap the flesh out of the shell and it will separate into strands that look like spaghetti.  Easy!

Today's dish is part of my "Eat Well 2013" motto because this dish is low in calories and carbs.  Replacing your typical pasta with spaghetti squash allows you to get more servings of veggies and fiber in your diet.  Plus it tastes good.  Even the kids will love it.  What a great way to get them to eat more veggies, right?  This version includes meatballs for protein along with a quick marinara sauce to top the squash with.  


The marinara has a little kick from the cayenne pepper, so if you are feeding the kiddos, omit or use less.  I love the heat myself.  It lends another depth of flavor to a simple sauce.  

For the meatballs, you could make homemade using my meatball recipe.  Better than that to make this a quicker dish to prepare, make the meatballs and freeze them for use later on.  This will allow you to take out the amount of meatballs that you need (about 3 per person is good) and thaw them in the microwave before adding them to the sauce.  Or if you want more convenience you could by frozen meatballs, beef or turkey, and thaw them and add to the sauce as well.  Whatever works best for you.  


All in all, this dish is healthy, smart, and super tasty!  Hope you enjoy my version.


Roasted Spaghetti Squash with Meatballs

Makes: 4 servings
Prep:  20 mins
Bake:  50 mins

1 2 pound spaghetti squash, halved and seeded
Nonstick cooking spray
12 meatballs, cooked (from meatball recipe) or store bought
1 T dried Italian seasoning, crushed
2 14 ½ oz cans crushed tomatoes
½ t crushed red pepper
1 t Italian seasoning
½ t salt
¼ cup grated Parmesan cheese

Preheat oven to 400 degrees.  Lightly coat the cut side of the spaghetti squash with cooking spray.  Place squash halves, cut sides down, on a large cookie sheet or baking pan. Bake for 50 minutes or until squash is soft.  Allow to cool slightly, about 10 minutes. Using a fork scrape the insides of the squash to separate the strands.  Place in a medium bowl.

For meatballs:  Lightly coat a large skillet with cooking spray.  Preheat skillet over medium-high heat.   Add meatballs and cook until browned, turning occasionally to brown evenly.  (If using frozen meatballs, thaw using the microwave first then add to the skillet.)  Add tomatoes, crushed red pepper, Italian seasoning, and salt. Bring sauce to a boil.  Reduce heat and simmer, uncovered, for 3 to 5 minutes or until sauce starts to thicken.

Divide squash among plates and top with meatballs and sauce. Top with grated Parmesan cheese.