Pages

Thursday, September 29, 2011

Sicilian Sauce


Everyone loves comfort food. 

Fall brings us feelings of home and hearth.  Cool weather, beautiful autumn colors, and comfort food.

One of my friends shared this story with me and I thought it was so heartwarming.  It's the essence of comfort food.  Food made with love.

My friend is Italian.  As a little girl she traveled from Italy by boat to come to America, landing in New Orleans.  Visions of a small slender girl with chocolate brown braids come to mind.  Her handmade dress was almost threadbare but she was filled with hope of a new land, and memories that she would carry with her.  Nettie (Antoinette), would often invite me over and cook her grandmother's Sicilian Sauce and tell stories of her youth.  

She recalls many times where she would run in to her grandmother's kitchen for a hug, and her Nonna would be at the stove stirring a big pot of sauce for their dinner.  When she was older her Nonna began to teach her how to cook.  The old fashioned way.  From scratch.  Using your taste and senses and love to create a dish.  Nettie told me of her Nonna standing in the kitchen, full or smiles, wearing her old ruffled apron, and singing while she cooked.  She said that a beautiful song helps the food sing as well!

Nettie loved her Nonna.  You could see it in her eyes, in her voice, and in her smile. 

I was very fortunate to have been able to get to know Nettie and to learn some of her family secrets.  Nettie was in her 80's when I met her and had such a spunky personality!  Something a young girl coming to America needs to go forward with her new life.  I believe it's true about the singing because her food was fabulous...I sing in my kitchen now.

So let me share with you Nettie's Nonna's Sicilian Sauce. It features her Sicilian Seasoning that I posted several days ago.  You can find the recipe here.  It's a versatile red sauce that can be used in many, many ways. Obviously my first reaction is to spoon this over some nice, tender pasta.  YUM!  I've updated this recipe a bit with the use of a food processor for ease, but you can still make it the original way.   I hope you enjoy it!

Thank you Nettie!


So let's make Sicilian Sauce.

Sometime the simplest recipes are the most tasty things!  This one is that way.  Simple, quick, but full of flavor.

So help your self to a can of San Marzano tomatoes.  I use the whole ones.  Make sure to use the good stuff, which is San Marzano.  These are best tomatoes for flavor, and make the tastiest sauce...straight from Italy. (If you want to use fresh Roma tomatoes you can.  Just about 1 3/4 pounds.)


Place the tomatoes in your food processor.


Pulse the tomatoes.  I use the pulse so I can watch them and obtain the chunkiness or texture that I like.  I leave mine a little bit chunky.

Place the pureed tomatoes in a large saucepan and add the Sicilian Seasoning.

This step is a must!  You can find the recipe here. 


Bring the pot to a boil and then turn down to a simmer.  Cook for about 20 min to let the flavors meld together.

Buon Appetito!


More recipes using this wonderful sauce to come in future posts!

Sicilian Sauce
adapted from Nettie's family recipe

1 28oz can of whole San Marzano tomatoes
5 tsp. Sicilian seasoning
1 T extra virgin olive oil
Salt to taste

In a food processor, add the can of whole tomatoes. (Nettie used fresh whole tomatoes that she crushed with her hands.)  Pulse until desired consistency of chopped tomatoes is reached.

Place in a large saucepan.  Add seasoning and olive oil.  Bring to a boil and then turn the heat down and simmer for 20 minutes.

Tuesday, September 27, 2011

Cheesy Italian Bread


SURPRISE!
Seems like everyone loves bread.


Is that true?


One of my most popular recipes on my blog is the Cheesy Garlic Herb Bread.
Remember this one?


Oh yea...


So I got to thinking that we need to take this bread and mix it up a bit.  I've thought of tons of variations for this appetizer.  This time around I experimented with Italian flavors.  (the other variations will have to just wait...)


So I came up with a new wonder...this bread is sooooo good!  I mean, man! I could eat the whole thing, and that would bad....really bad.


So you remember that Sicilian Seasoning mix I posted yesterday?  Yeah...it's in the bread!  In the sauce I used specifically on the bread!  OH MY the flavors are OUTSTANDING!


So let's make this wondrous bread.  


Pick up a round loaf of bread, french or sourdough will do.  Slice the bread into 1 1/2" slices, but don't cut through to the bottom.  Now rotate the loaf and slice again in 1 1/2" slices, making sure they remain attached at the bottom.  Now you have a checkerboard looking sliced bread.


Place your loaf on a pan, covered with foil if you like to reduce the clean up.  In a separate bowl dump a bottle of your favorite marinara sauce.  I used a tomato basil sauce.  To that you need to add about 4-5 Tablespoons of the Sicilian Seasoning.  (click here for the recipe).  This is a secret, as it has a little bit of red pepper flakes to give it a zing!  Stir the two together.


Gently spread the sauce into the cracks of the bread.  Make sure to do all sides, horizontal and vertical, of the bread.  


Next, stuff the mozzarella cheese into the cracks.  Use your judgement on the amount of cheese.


Bake at 350 degrees for 15-20 minutes, or until the bread is toasty on top and all the cheese is melted.


NOTE:  You will need to eat this right away....I don't think this will be a problem though.  However, if you tend to leave it sitting out for a long period of time like I did and then go back to it in hopes of having some more, or wanting to store any leftovers for another day....Nuh Uh!  So sad, but due to the large amount of sauce, the bread gets soggy.  If you like that sort of thing then you'll be in heaven...but me..no soggy bread for me.
So just try and eat it hot, and soon after you make it.


Yummy!


Cheesy Gooey!


Heaven!  Need I say more?


Hope you liked your surprise!


Cheesy Italian Bread


1 round loaf of French or Sourdough bread
1 bottle of marinara sauce
4 T Sicilian Seasoning
1 1/2 c Mozzarella cheese, shredded


Cut bread across horizontally into 1 1/2" slice, not cutting all the way through the bottom.  Cut bread vertically into 1 1/2" slices as well, not cutting all the way through to the bottom.


Mix the entire jar of marinara sauce with the Sicilian seasoning in a medium bowl.  Spread the sauce into the cracks of the bread covering all four sides.  Add cheese to the cracks, pushing down to cover all areas.


Place on a baking sheet covered with foil.  Bake at 350 degrees for 15-20 min. until toasted and cheese is melted.


Linked to: Melt in your mouth Monday


Monday, September 26, 2011

Sicilian Seasoning


I have a surprise for you tomorrow.  Ssshhh!

Let's just say it involves bread and cheese...oh my!

But first, in order to make our little surprise tomorrow we first have to whip up a little seasoning mix.

Not just any mix...oh no!  This is a Sicilian Seasoning mix.

This is a great all around mix that you will find many, many, uses for.  I mean MANY!  Just think of the possibilities.

So whip this up right away and seal it in an airtight jar or bottle, it is so worth it!  And...when you see what tomorrow's treat is you will be glad you did!

(Oh yea, and there will be some other great recipes soon using this same mix as well.)

Sicilian Seasoning

2 Tablespoons dried basil
2 Tablespoons dried marjoram
2 Tablespoons dried oregano
2 Tablespoons dried thyme
2 Tablespoons dried savory
1 Teaspoon red pepper flakes
1 Tablespoon dried rosemary (optional)

Combine spices in a bowl.  For storage place mixture in an airtight jar or bottle.

Sunday, September 25, 2011

Flavored Water


Taking advantage of the weather and the somewhat late evenings we still have at the end of summer is a great way to explore our local neighborhoods and get some exercise.

This was our goal the other night.  Our destination was Brand Park.  This is a 31 acre park at the base of the Verdugo Mountains.  It has a lot of hiking and biking trails, along with picnic areas, a traditional Japanese teahouse, gardens, and sporting facilities.  The nature here is beautiful. 

Where a library now sits used to be a 1904 home to Leslie C. Brand, inspired by the East Indian Pavilion built for the 1893 Columbian World Exposition held in Chicago.

Here's the entrance to the property...and MGG.


It is also the home of The Doctors House, built in 1888. A wonderful old Victorian home.


So we had a lot of fun hiking around the park that evening, and plan to go back for some picnic action.

So this leads me to hydration...

When you expend a lot of energy it is important to stay hydrated.  Even working around the house or yard during these remaining hot days of summer is cause for drinking plenty of water.

For a cool and refreshing beverage, nothing is better than naturally flavored water.  Two fruit combinations that we enjoy are lemons, raspberries, and water. and oranges and water.   This method gives the water a hint of fruity flavor, and it tastes great!  Make sure to chill the water with the fruit for about an hour before serving. 

Enjoy!


Flavored Waters

Lemon Raspberry Water

1 pitcher or jug filled with bottled or filtered water
1 lemon
1/2 pint of raspberries
ice if desired

Fill your container with fresh drinking water.  Slice a lemon in to slices.  Add the slices of lemon and the raspberries to the water.  Add ice if desired.  Chill for about 1 hour to impart flavors into the water.


Orange Water

1 pitcher or jug filled with bottled or filtered water
1 orange
ice if desired

Fill your container with fresh drinking water. Slice a orange in to slices.  Add the slices of oranges to the water.  Add ice if desired.  Chill for about 1 hour to impart flavors into the water.


Friday, September 23, 2011

Breakfast Quesadilla


Need something hearty, fast, and filling for breakfast?
Something that you can take on the go?

This Breakfast Quesadilla is perfect for you!

Super simple to make, only a few ingredients and you're done.  So take your normal scrambled eggs, jazz them up a bit and put them in a quesadilla with some melty cheese and you have a new version of a breakfast staple.

So let's make breakfast quesadillas.

You don't really need a recipe for this one, it's that easy.  I made this recipe for one.  This would be your basic recipe and you can increase the amount as necessary to serve your family.

First you'll want to scramble up 2 eggs.  I sprinkled on some Italian seasoning to jazz mine up a bit. Use whatever spice you like, or keep them plain in simple.  Whatever gets you going!


Take one flour tortilla, 6 inch is a good size, and place the scrambled eggs down one side of the tortilla.


Now add your shredded cheese.  I used Monterey jack.  Use what you like best.


Fold the tortilla over and place it back in a hot skillet that is on medium heat.


Place a cover over the skillet and allow the tortilla to brown on the first side and allow the cheese to start melting.  About 1 1/2 minutes.

Turn the quesadilla over and brown the other side, replacing the lid so all the cheese gets oooey gooey. Another 1 - 1 1/2 minutes should do it.


Remove from the skillet and cut in half!  There you go!


A hearty, breakfast, done in a flash!


Breakfast Quesadilla

serves 1

2 eggs
a splash of milk
2 t Italian seasoning
1/2 c Monterey Jack cheese, shredded
1 Flour tortilla, 6 inch

In a bowl, crack your eggs and whisk together with a splash of milk.  In a skillet over medium low heat pour your eggs and allow to set up on one side about 1 min.  Sprinkle on Italian seasoning.  Using a spatula scramble your eggs moving any uncooked eggs to the bottom of the skillet.

Take 1 flour tortilla and spoon the scrambled eggs on one side of the tortilla.  Top with shredded cheese.  Fold over tortilla and place in a hot skillet on medium heat.  Allow to cook one minute, covered.

Turn over and cook for another minute until golden brown and cheese has melted.  Cut in half.

Enjoy!

Linked to:  Sundae Scoop
Liked to:  Your Recipe My Kitchen
Linked to: Totally Tasty Tuesdays
Linked to: Melt in your mouth Monday

Tuesday, September 20, 2011

Tuscan Pork Chops


I was dreaming of fall yesterday...wishing it was here.

While it is still in the 90's in LA I can pretend can't I?  I'm thinking of fall in LA, different from everywhere else I'm sure.  Golden leaves...(that's about all we see around here) and warm Santa Ana winds (aaah chew! my allergies!).  We usually have hot and cold weather, back and forth, through October.  Not ideal, but I'll take it.  Anything for some change in the weather...just a little!

So in dreaming about it I also think of rustic food.  Something homey, comforting, and something you can sink your teeth into.  Don't you love rustic food?

This dish fits that perfectly.  My Tuscan Pork Chops remind me of fall.

So, I made them last night for our dinner.  This is one of my Favorite dishes and is a great weeknight dinner that provides some really good flavors from the addition of balsamic vinegar to the sauce.  You can have this on the table in 30 minutes, and enjoy a meal that satisfies your palate, and your tummy...and makes you think of fall!

So let's make some Tuscan Pork Chops.

First, you will want to have some thin cut boneless pork chops.  They cook up really quick.  Dredge them in some flour that seasoned with salt & pepper.


Place them in a hot skillet that has a Tablespoon of olive oil in it so they don't stick.  Brown them on each side for about 3 min.


Remove the from the pan so you can make the sauce...they will finish cooking once you return them back to the pan.

Next, throw in the minced garlic and some sliced mushrooms.  If you don't like mushrooms, leave them out, or you can use zucchini instead...whatever floats your boat!


Then add some chopped tomatoes.  I used a combination of red Roma tomatoes, and some yellow cherry tomatoes.  Use what you have, this is flexible.  Saute about 1 min.


Add the balsamic vinegar and the broth.  Stir scraping up any bits on the bottom of the pan.  Return the pork chops and any juices back into the skillet. 


Bring your sauce to a boil.  Cover with a lid and turn the heat down to a simmer.  Simmer for about 4 min or until pork is done.


Serve with sauce and mushroom-tomato mixture.  Soooo good!


You are gonna love the flavor!


Let me know how you like it....this is one of my FAVORITE dishes!

Tuscan Pork Chops

Serves 4

1/4 cup flour
1 tsp salt
3/4 t pepper
8 thin cut boneless pork chops
1 T olive oil
3 garlic cloves, minced
1 c mushrooms, sliced
3 Roma tomatoes, seeded and diced
1/3 c balsamic vinegar
1/3 c low sodium chicken broth

Salt & pepper your pork chops and dredge them in flour in a shallow pan.

Cook pork chops in hot oil in a large skillet over medium high heat for 2-3 minutes on each side, or until golden brown.  Remove chops from the skillet.

Add garlic and mushrooms to skillet, saute 3 min.  Add sliced tomatoes to skillet and saute 1 min.

Add vinegar and broth, stirring to loosen particles from the bottom of the skillet.  Return the pork and accumulated juice to the skillet.  Bring your sauce to a boil.  Cover, reduce the heat, and simmer 4-5 min. or until pork is done.  Serve pork chops with sauce and mushroom-tomato mixture.


Monday, September 19, 2011

Product Review: Trader Joes Mini Croissants


I love Trader Joe's.

Their products are very tasty and cost worthy too.

On a shopping trip to Trader Joe's the other day I spotted something I had not seen before in the freezer section.  Frozen Mini Croissants.

Apparently they've had these for quite a while.  Where have I been?

So I grabbed a box and promptly put them in my cart.  In the freezer they went, awaiting that special day when I could treat MGG and myself to some nice breakfast goodies.

Well that day came...and I must say that they were fabulous.  Light, airy, flaky, buttery, and steamy hot!

The trick to them is to take them out the night before you want to eat them.  Set them on a baking tray and leave them out overnight to rise (proof).  When you take them out they are teeny, tiny. 

The next morning...OMG they rose so MUCH!  They are not really that 'mini' after all.


Then you just pop them in a 350 degree oven for 20 minutes and you have some delicious, hot, croissants!  They are soooo good, they are amazing they were frozen.

See for yourself.


They go great with some jam or my Blueberry Butter.

We loved them so much we made turkey sandwiches with them for lunch....delicious!

Trader Joe's sells these for $3.99 for a box of 8.  Pick up a box and treat yourself!

Saturday, September 17, 2011

Peach Raspberry Crisp


Dessert is a good thing.

A sweet ending to a wonderful meal. 

When trying to come up with a dessert to take for our Hollywood Bowl picnic I looked to my fellow bloggers for ideas.  When I came across the Peach Raspberry Crisp recipe on Jo-Ann's blog, A Pretty Life in the Suburbs, I knew I had found the perfect dessert.  Jo-Ann has a wonderful blog full of fantastic recipes.  Stop by and say to hello to her sometime!

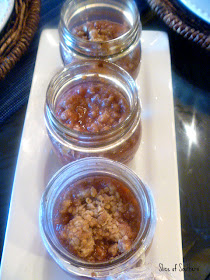
What makes this dessert perfect?  Natural fruit (good for you) in warm spices topped with a crunch crisp topping! YUM! But the best part?  They are baked in MASON JARS! 

How awesome it that?  I can bake them in the jars, and then pop the lids on them and take them along!!!

The result?  A wonderful warm dessert to end our meal....Tasty too! 

Here's a great tip I tried.  I made the crisps the day before and let them cool and stored them in the frig.  On the day of the picnic I put them in the oven on low for about 30 min to bring the temperature up.  I took the warm jars, topped them with the lids, and wrapped them in a little foil.  I even had a hot/cold bag from the grocery store and carried them in this insulated bag.  At the intermission of the show about 2 hours after we arrived, the dessert was still warm. Yeah!  We each had individual servings and used spoons to scoop up the delicious fruit right out of the jar.  All that was missing was the vanilla ice cream.  I need to work on how to avoid melted ice cream in transport for next time!

So here's how I made them.  I adapted the recipe just a little to suit my taste for cinnamon.  You can adjust it to fit your tastes as well!

Peel and slice your peaches.  Place the peaches, Splenda, and cinnamon in a medium bowl.  Stir to combine.


Add the raspberries and stir gently to mix.


Next make the crumb topping.  In a medium bowl combine AP flour, wheat flour, brown sugar, oats, and melted butter.  Stir until well combined and crumbly.


Divide the peaches evenly in each of the jars.  They should be about 3/4 full.  Top each evenly with the crumb topping.


In a preheated oven at 350 degrees, bake for 30 min. until bubbly.  I put the jars in a baking dish to make them easier to handle. 

Look at these colors...


Treat yourself to something very cute....so delicious!


Peach Raspberry Crisp

makes 6 servings - 250ML jars used

4 cups of peaches, sliced (I used 4 large peaches)
1 pint of fresh raspberries
1/3 c Splenda
1 1/2 t cinnamon
1/3 c all purpose flour
1/3 cup whole wheat flour
1/2 cup brown sugar
2/3 cup rolled oats
1/3 cup melted butter


Peel and slice your peaches.  Place peaches, Splenda, and cinnamon in a medium bowl.  Mix to combine.  Add raspberries and toss gently. 

In another medium bowl combine AP flour, whole wheat flour, brown sugar, rolled oats, melted butter.  Stir until all ingredients are coated and your have a crumbly mixture.

In 6 clean 250 ML jars divide your peach mixture evenly.  You will fill about 3/4 of the way up.  Top each peach mixture with the crumb topping, dividing evenly. 

Place jars (no lids please!) in a baking pan and place in a preheated oven at 350 degrees for 30 minutes.  Mixture should be soft and bubbly.  Serve warm.  Store any leftovers in the frig by placing the lid on the top!

adapted from:  A Pretty Life in the Suburbs