Pages

Saturday, July 30, 2011

Fast & Fresh: Grilled Pita Pizza


It's hot out, I'm hungry...and I don't want to deal with the heat in the kitchen!

To solve this dilemma I'm keeping it light, using fresh ingredients, and keeping the heat to a minimum...the kitchen heat that is!

So I bring to you a summer series of recipes that I call,

"Fast & Fresh"
              • Simple ingredients
              • Fresh and healthy
              • Easy prep
              • Delishhhh taste!

First up, is my Grilled Pita Pizza.  These are a low carb individual pizzas that you whip using pita bread.  This makes for a light and crispy crust, which reduces the amount of total carbs. 

It's summer, go light and enjoy the different variations of crusts that you can utilize.

By using the outdoor grill you reduce that hideous kitchen heat! Yeah! 

Using ingredients such as freshly grated mozzarella cheese and fresh basil helps give this pizza a flavor that's tasty and light.  

These individual pizzas are great for lunch, or as your main dish at your next BBQ.

Let's make grilled pita pizza!

Heat your gill to medium high heat.

Place your pita breads flat on the grill rack and toast each side for about 2 min or until it is toasty brown .  Remove from grill.


Now, the fun part!  You can have each person create their own pizza using various toppings.  We were craving pepperoni pizza so that what we used.

Top your pita breads with pizza sauce.  You can use fresh tomatoes, pureed into a sauce with Italian herbs added. YUM!  or you use your favorite store bought sauce...whatever works! The key is to get a great sauce with a flavor you love.


Add fresh shredded mozzarella cheese.  Top with turkey pepperoni (tastes really good and keeps the fat content down!)


Place the pizzas back on the grill.  Grill with the cover down about 5 min until cheese is melted and the meat is heated through.


Add fresh basil on top! Smell that fragrance??


And voila!  Your pizzas (masterpieces) are done.


Sorry but MGG and I have to try this NOW!


Grilled Pita Pizza

serves 2

Ingredients:

2 pita breads
1/2 cup pizza sauce (homemade or store bought)
3/4 cup shredded fresh mozzarella
turkey pepperoni
basil leaves

Directions:
Heat your gill to medium high heat.

Place your pita breads flat on the grill rack and toast each side for about 2 min or until it is toasty brown . Remove from grill.

Top your pita breads with pizza sauce. Add fresh shredded mozzarella cheese. Top with turkey pepperoni.

Return to grill and cook with the lid down about 5 min, until cheese is melted and meat is heated through.  Add fresh basil and serve.

Linked to:  Your Recipes My Kitchen


Tuesday, July 26, 2011

Summer Fruit Gazpacho


I'm not a fan of Gazpacho...

Nope.  Just not in to the whole cold tomato juicy thing....

So...when I ran across this Fruit Gazpacho in one of my favorite cookbook's the recipe just leaped off the page and said....Eat Me!! I'm REALLY Good!
The cookbook is Cooking Light's "Cooking through the Seasons".  You can see a picture of the book on the right side of my blog in my Cookbook Corner.  Great book!

Amazing recipe!  This is my new summer favorite cold soup.

It's great on it's own or would be great as a side dish to some grilled fish, chicken, or pork. It's spicy like a salsa, Latin in flavor, yet fresh and fruityDelishhhh!

It's very easy to make, it just is a lot of knife work...great time to enhance those knife skills!  A one bowl wonder that you make ahead, and will keep well in the frig for days.

So let's make Summer Fruit Gazpacho...

Get out a good sharp knife.  Dice up your tomato, honeydew, and cantaloupe and place in a medium sized bowl.


Next, dice up your mango, cucumber (seeded), and nectarines.  Place in the bowl.


Dice up your onion and add it to the bowl.  Next, add your orange juice. 


Chop up your fresh basil and mint.  Add it to the bowl.  Add your lemon juice, sugar, and salt.
Next, chop your jalapeno, mince it fine.  You can add more for stronger heat.


Now mix it up really well.  Stick it in the frig for about 2 hours to meld the flavors. 


Voila, you have Summer Fruit Gazpacho!!


Look at the colors...!


YUM!   So tasty!

Summer Fruit Gazpacho

adapted from:  Cooking Light's Chunky Tomato Fruit Gazpacho

Servings  4 (serving size: 1 cup)

Ingredients
1 cup finely chopped tomatoes
1 cup finely diced honeydew melon
1 cup finely diced cantaloupe
1/2 cup finely diced mango
1/2 cup finely diced seeded peeled cucumber
3/4 cup finely diced nectarines (about 3 medium)
1/2 cup orange juice
1/4 cup finely chopped Vidalia onion
1/8 cup chopped fresh basil
1 1/2 tablespoons chopped fresh mint
1 1/2 tablespoons fresh lemon juice
1/2 teaspoon sugar
1/4 teaspoon salt
1/2 jalapeno pepper, seeded and finely chopped

Preparation
Combine all ingredients in a large bowl. Cover and chill at least 2 hours.

Sunday, July 24, 2011

A Day in Santa Barbara

Santa Barbara is a beautiful town this time of year.  The white beaches, blue ocean, the food...the wine...and all the wonderful attractions they have to offer such as the Mission, the Zoo, and State street!

Great for a day trip and a little time away from the heat down in LA.

First up, Breakfast at the Summerland Cafe.


Me and MGG at Breakfast.


Great food!

Some of our friends at the zoo...


A wonderful lunch on the Beach at The Boathouse.


Such a beautiful place.  Look at this ocean!


In the evening we had a great time walking around State, people watching, stopping at some shops, and the coffee house, it's so nice to get away, even for a little while. Alas, we must head home.

Hope everyone had a wonderful weekend!!!

Friday, July 22, 2011

Homemade Vanilla Ice Cream


It's so hot outside, let's stay inside and make some homemade ice cream!

What a great excuse huh?  Anything to make ice cream.  It's a weakness of mine, you see.
It's one of those special treats in life that is a "must have". 

I'm sure I'm not the only one that is an ice cream monster...I know MGG is one too.  He's always looking around in the freezer stealing my ice cream!

Mom always made Vanilla ice cream.  Her favorite.  An old stand-by.
Such a versatile flavor, you can put strawberries on it....caramel sauce, hot fudge, nuts, and sprinkles...you name it!  It's the basis for all good toppings!

So in tribute of my mom, I've made a sugar-free version, or a low carb ice cream, if you will.  You can certainly substitute the sugar substitute for the real stuff...it will work out perfect!  Make sure to substitute equal amounts.

This recipe make about 1 1/2 quarts, and can be adapted to your specific ice cream freezer.

For another wonderful flavor try my Cookies and Cream Ice Cream recipe here!

Enjoy!!

See the pretty vanilla flecks??  YUM!


Vanilla Ice Cream


1 ½ c 2% milk
1 1/8 c splenda
3 c half & half
1 T pure vanilla or vanilla paste

Directions:
Place milk and Splenda in a bowl.  Using a hand mixer or a whisk, mix until Splenda is dissolved, about 3 min.

Add the half & half and vanilla. (I used vanilla paste because I like the flecks of vanilla in the ice cream!)

Pour the mixture into the ice cream machine.  Follow the directions of your ice cream maker processing until the desired consistency.

Remove to a freezer safe container and place in freezer to set up.

Wednesday, July 20, 2011

Grilled Greek Potato Salad


Boy is it hot outside.  Is it hot where you are?

We've had 90+ degree weather for a week now...and it's a dry heat...sauna heat.

I don't know about you but when it's this hot, I don't want to cook inside the house...don't even talk to me about the oven.

So I turn to grilling for a lot of meals.  Here's one of MGG's favorite dishes.

How does a grilled potato salad sound?  Simple...yummy...delicious?
How about a "Greek" grilled potato salad?

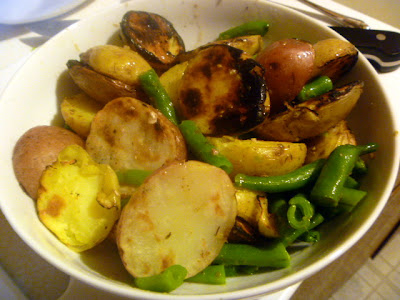
Well get your Greek on, cause we're having some warm, tender, grilled potatoes, mixed with green beans and feta cheese, in a Greek vinaigrette...Opa!

You will love this, trust me!


First, you take a large pot and put your potatoes in it.  I used a combo of baby red and yellow potatoes...use what you like.  Add water to cover about 3-4 inches above the potatoes and bring to a boil.

After they have boiled about 3-4 min, add your green beans.  Boil for another 6-7 min.  You want the green beans tender, and the potatoes undercooked slightly.

Drain your beans, and let them cool.  Drain your potatoes and let them cool.

Cut your green beans in to halves or thirds, trimming the ends if you like.  Cut the potatoes in half lengthwise.

Warm up your grill to medium high heat.  Put oil on the grill rack so the spuds don't stick!  Place the potatoes cut side down and grill those babies until they are nice and golden.

Take them and put them in a bowl with the cut green beans.  Add some Greek Vinaigrette and toss to coat. 


Add your feta cheese crumbles, and toss again!


Opa!!!

Soooooooo good....warm, and flavorful...!


Perfect potato salad, for a side dish along chicken, burgers, steaks, hot dogs...you name it!


Grilled Greek Potato Salad

Ingredients
½ lb fresh green beans
12 baby red and yellow potatoes (about 2 lbs)
Salt and pepper
Canola oil, for grilling
1/3 c Greek Vinaigrette
8 ounces feta, crumbled

Directions

Put the potatoes in a large pot, cover with 3-4 inches cold water. Bring to a boil and cook until a small knife inserted into the center of the potato meets with some resistance, about 3 minutes. Add the green beans to the pot as well, and cook another 5-7 min. 
Drain green beans, cool slightly and chop in halves or thirds. Set aside.  Drain potatoes.  Let cool slightly and then cut them in half lengthwise.

Heat the grill to medium heat. Toss the potatoes with canola oil and sprinkle with salt and pepper. Grill until golden brown on the cut side of the potato. 

Combine the potatoes and green beans in a bowl. Toss with the vinaigrette, taste and season with salt and pepper if necessary.  Add crumbled feta cheese, and toss again.  Serve warm. 

Tuesday, July 19, 2011

Blackberry Crumble


I love all the summer fruit and it's multitude of uses.  One of my favorite uses is as a dessert.  Fruit is so versatile your can freeze it, grill it, bake it, puree it, you name it....and it always turns out fabulous!

Today I'm bring your a crumble recipe.  A juicy, warm, blackberry crumble topped with a buttery, sweet crumb....baked to perfection and served along side a scoop of decadent ice cream!!!

Crumbles are really simple to make.  Very similar to a cobbler, brown betty, or pandowdy.  You just toss some fruit in your bakeware, make a little topping, and then pop it in the oven.  Easier than pie!!!

So if you are looking for a quick, delicious dessert, try a crumble.  You can use a variety of fruit such as apple, blackberry, peach, rhubarb, gooseberry, and plum.  It's great for these hot summer nights,  to take on a picnic, or to accompany a grilled dinner.  Enjoy!!

Here's how to make it:

Coat an 8 inch square pan with cooking spray, and add your blackberries. Sprinkle with some lemon juice.


Add flour, sugar, an egg to a medium bowl, stir together.


Then add your melted butter and mix well to form the crumble.  Spread over the fruit.  (Sorry I got so involved I forgot to take a pic of this part....oops!) 

Bake for about 30 - 35 minutes.  The top should be nice and golden and the fruit bubbly.


YUM!!!  Serve with some ice cream, or whipped cream!


Blackberry Crumble


4 cups fresh blackberries
1 tablespoon lemon juice
1 large egg
1 cup sugar
1 cup all-purpose flour
6 tablespoons butter, melted
 
 
Preheat oven to 375 degrees. Place blackberries in a lightly greased 8-inch square baking dish; sprinkle with lemon juice. Stir together egg, sugar, and flour in a medium bowl until mixture resembles coarse meal. Add melted butter and mix until the flour mixture forms together and is crumbly.  Sprinkle over fruit. Bake for 35 minutes until lightly browned and bubbly. Serve warm with ice cream or whipped cream.    

Saturday, July 16, 2011

Chicken Crispers - Chili's Version


Growing up we had a chicken joint called Pioneer Chicken.  Anyone remember that? 


I heard it was originated in Los Angeles, (Echo Park) .  Anyway, they were different than KFC in that the chicken had more of a batter coating to it.  Mom used to take me there and I would get their chicken strips.  (thanks Mom!) I loved those strips.  Tender, juicy pieces of breast strips dipped in a batter and fried to a golden brown, moist, pieces of heaven!!!

Unfortunately, Pioneer turned in to Popeye's...and I lost my heavenly chicken strips...Boy I can taste them now!!!

So in search of a chicken strip worthy of Pioneer Chicken.

I've tried chicken strips everywhere...and most don't hold up.   Recently, I tried Chili's Chicken Crispers.  They were battered, tender, moist...they were almost like Pioneer's!!! Woohoo!!!  and...Chili's serves theirs with a yummy honey mustard sauce!

Well guess what?  I found a copycat recipe from Top Secret Recipes for Chili's Chicken Crispers and the sauce too!  Whoop Whoop!  (Shssh!) 

Now I  can make my own...and I did!  They were AWESOME!!

Let me share this "top secret" recipe with you so you can make them too!!!


First, make the honey mustard sauce by mixing mayo, honey, Dijon, paprika, and salt in a small bowl.


Mix well and set aside.  This stuff is GOLD.


Next make your batter for the chicken.  Mix a beaten egg, milk, chicken broth, salt, pepper, and flour together. 


Next, heat up your shortening in a large sturdy pot.  You will need to deep fry these so that means, a lot of oil.  I don't think I used the whole 6-10 cups, but I used about 4 or 5.  I used Crisco Shortening for this...cheaper, and frys better in my opinion.

TIP:  Use a thermometer to bring the oil temperature to 350 degrees.  Don't go higher than this or the outside will brown too fast and the chicken will not cook inside...not good!

Dip you chicken strips - I used tenders, you can used cut up breasts as well - in flour, and then in the batter.


Fry baby, fry.


Don't crowd the chicken in there.  Do only a few pieces at a time.  The more you put in the faster the oil temperature reduces...not good..soggy chicken!  Fry the chicken for about 6-7 minutes, to make sure the chicken is really, really, cooked.

Remove to some paper towels to drain, and repeat with remaining pieces.


Serve them up with your honey mustard "gold" sauce.  Look at these little babies!!!  Oh I can't wait to bite in to one....Heaven!!


Enjoy your own chicken strips, and let me know how you liked them!!

Chicken Crispers
Source: copied verbatim from TopSecretRecipes web site

Ingredients:

Honey Mustard Dressing
2/3 cup mayonnaise
1/4 cup honey
2 tablespoons Dijon mustard
pinch paprika
pinch salt

Batter:

1 egg, beaten
1/4 cup whole milk
3/4 cup chicken broth (Swanson)
1 1/2 teaspoons salt
1/2 teaspoon ground black pepper
1 cup self-rising flour

6 to 10 cups shortening or vegetable oil (amount required by fryer)

10 chicken tenderloins
1/2 cup flour

Instructions:

1. Make honey mustard sauce by combining ingredients in a small bowl. Cover and chill until needed.

2. Heat shortening or oil in fryer to 350 degrees F.

3. Combine beaten egg, milk, chicken broth, salt and pepper in a medium bowl. Whisk for about 30 seconds to
dissolve salt. Whisk in 1 cup self-rising flour. Let batter sit for 5 minutes.

4. When you are ready to fry the chicken, coat each piece with dry flour (1/2 cup in a medium bowl), then dunk the chicken into the batter. Let a little batter drip off the chicken and lower it into the hot oil and fry for 7 to 9 minutes or until it's golden brown.

Depending on the size of your fryer, you should be able to fry 3 or 4 tenderloins at a time.

Drain fried chicken strips on a rack or paper towels for a minute or so, and serve with the honey mustard dressing on the side for dipping.

Serves 4 as an appetizer or 2 as an entree.