Pages

Thursday, March 31, 2011

Brown Sugar Cherry Muffins


I love muffins....can you tell?


Growing up we always made muffins on the weekend.  Our basic recipe has always been an excellent standard sweeter muffin.  These days I like to experiment with that basic recipe and change it up a bit for new combinations.


Here's one I hope you will enjoy, Brown Sugar Cherry Muffins.


Sounds good huh?


So this is a variation on the my basic muffin recipe.  I just swapped out some ingredients and add some dried fruit.  Simple.


Here we go.


You will need the following for the basic recipe:  1 egg, buttermilk, canola oil, all purpose flour, brown sugar, baking powder, and salt .  For this variation we will add: cherries, swap out some all purpose flour for whole wheat flour, and we swapped the milk for buttermilk.

In a large bowl beat 1 egg.  Add buttermilk and oil and mix well.  Add both types of flour, brown sugar, baking powder, and salt.


Mix until moistened.  Don't over mix or you will get tough muffins!  Fold in the dried cherries.


Now spray a non-stick muffin pan with cooking spray.  Spread the batter amongst 6 muffin tins almost all the way full.  That's how I like em!

Bake in a 425 degree preheated oven for about 18-20 minutes (watch these, they get brown quickly).


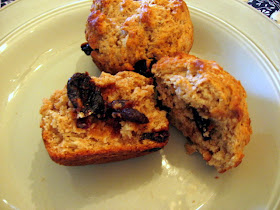
See how pretty!!!


Good tasting and pretty good for you too!


Brown Sugar Cherry Muffins
Serves 6
Cook time 20-25 min

Ingredients:

1 egg
1/2 cup low fat buttermilk
1/4 cup Canola Oil
¾ cups all purpose flour
¾ cups whole wheat flour
1/2 Cup brown sugar
2 t. baking powder
1/2 t. salt
½ cup dried cherries

Directions:

Place egg, buttermilk, and oil in a large mixing bowl and whisk together until light.  Add flour, brown sugar, baking powder, and salt.
Stir until moist.  Don’t overmix…batter should be lumpy and a little thick.

Fold in dried cherries.

Spray a non-stick muffin pan with cooking spray.  Divide batter amongst 6 muffin cups filling most of the way full.

Bake at 425 degrees for 18 -20 min.

Enjoy!

Monday, March 28, 2011

Happy Birthday to MGG!

We celebrated my boyfriend, MGG's, birthday last Saturday in Hollywood.  Boy what a day.  It's been a while since we have been down there and it was so much fun exploring Hollywood Blvd.


From Hollywood and Highland where the Academy Awards are held...


To the Hollywood Wax Museum...


But one of the best part's of the day was the food!  We ate dinner at a Peruvian restaurant, Balcones Del Peru.  What a gem!  The atmosphere is cozy and moody.


The service was outstanding!

The food was exceptional!!

Our appetizer was Papas A La Huancaina,  little boiled potatoes in a spicy huancaina feta cheese sauce with hard boiled eggs and some dressed greens. Completely different from anything I've eaten, and delicious!


MGG had Aji De Gallina,  a spicy dish of shredded chicken in an aji amarillo and bread creamy sauce.  He devoured it!


I had the Pollo Saltado, a dish of chicken, onion, tomatoes, and french fries in a spicy soy based sauce.
Fabulous!


If you are ever in the LA area, stop by Hollywood and take in the sites, and some outstanding food!

Cheers to Balcones Del Peru for the great ambiance, a romantic evening....
and cheers to my baby on his birthday!


My Recipe was Featured!

I've been participating lately in a linky party on Lark's Country Heart blog and Sunday my Triple Chocolate Mousse Cake was the #1 feature.  Woohoo!

A big "THANK YOU" to Lark for having this fun linky party.  Go check out her blog, it's really good!

For my recipe of my Triple chocolate Mousse Cake, click here - Triple Chocolate Mousse Cake


Friday, March 25, 2011

Buttermilk Fried Chicken Breasts

Buttermilk Fried Chicken Breasts - New Version of an Old Fashioned Family Tradition - Slice of Southern

Here's another family staple.  I've altered our family version so that this is a cross between chicken scaloppini and fried chicken.  The buttermilk makes it moist and tangy, the breadcrumbs make it fresh.
It's both quick and easy and oh so good!
Try this version, it's a nice change of pace!

Let's make it!
Take two pieces of plastic wrap and put a chicken breast in between.  Start pounding that chicken, really good!  You want it thin, about 1/4".  Repeat as needed to relieve the day's stress.
Place the chicken in a ziploc bag or a deep dish and add the buttermilk.  Let this marinate about 30 min.
Buttermilk Fried Chicken Breasts - New Version of an Old Fashioned Family Tradition - Slice of Southern

Get a heavy skillet, I use a cast iron one, and put enough oil in it to cover the bottom of the pan about 1/4" up.  You don't need much...just enough to fry well.
Put breadcrumbs in a dish.  Add salt and pepper.  You can add your favorite fried chicken seasoning here as well.  I like it plain...purist you know.
Dredge the chicken in the breadcrumbs.  Make sure to get a good coating on both sides.
Buttermilk Fried Chicken Breasts - New Version of an Old Fashioned Family Tradition - Slice of Southern

Add to the skillet and let cook about 5 min per side.  You want a good golden crust, and make sure the chicken is cooked through.  If it is cooking to fast turn your heat down.
Buttermilk Fried Chicken Breasts - New Version of an Old Fashioned Family Tradition - Slice of Southern

Buttermilk Fried Chicken Breasts - New Version of an Old Fashioned Family Tradition - Slice of Southern

Remove and eat it up!  Serve with some good potatoes, mashed or my potato cakes!
Buttermilk Fried Chicken Breasts - New Version of an Old Fashioned Family Tradition - Slice of Southern

Enjoy!


Buttermilk Fried Chicken Breasts
serves 4
Ingredients: 
4 Boneless Skinless Chicken Breasts
1 c buttermilk
½ c breadcrumbs
Salt and pepper
Canola oil for frying

Directions:

Place one chicken breast between two pieces of plastic wrap and pound to 1/4” thin.  Repeat with other breasts.  ziploc bag, add buttermilk and let marinate for 30 min. 

Add enough oil to a heavy skillet (cast iron is great) to fill about ¼” of the bottom of the pan.  You don’t have to deep fry, or use much oil, to fry.  Heat oil on medium high.

Add breadcrumbs to a pan for dredging.  Add salt and pepper to taste.
Remove chicken from bag and dredge each piece in breadcrumbs, covering both sides.

Add chicken to the hot skillet. Let cook about 5 minutes per side and golden brown.  These chicken breasts are thin so they should cook quickly, but please make sure that they are cooked all the way through.

Serve hot.

Tuesday, March 22, 2011

Mom's Goulash


Mom's Goulash - A family treasure...Slice of Southern


I grew up eating Mom's Goulash. 

When I got old enough to know better I found that Mom's goulash wasn't "real" goulash.  You know, the kind from Hungary?

I tell ya, I'm still traumatized by this!

Goulash originally was a type of soup or stew made with beef and vegetables.  Upon migrating to North America it took on different appearances by adding ground beef for stew meat and the addition of pasta.  In the south, it became a slang for using leftovers with the addition of pasta.

That explains it!  Mom grew up eating Grandma's goulash, most likely leftovers.  Then mom just adapted this in to her amazing version.

This dish is all about the prominent flavor of garlic! (gah lick)

So if you like garlic, this dish will not disappoint!  A quick weeknight meal...try it, you'll like it!

Let's make it!

This is a throw together dish so I'll do my best to capture the ingredients in measurements.

You will need:  pasta, ground sirloin, garlic powder, a 14 ox can of diced tomatoes, one small can of tomato sauce and more garlic powder!

In a skillet brown about 1/2 lb of ground sirloin.  Sprinkle with a good dashing of garlic powder.  I would say about 2 tsp.  Break the meat up in to chunks as it cooks.  Not fine, kinda chunky.

Mom's Goulash - A family treasure...Slice of Southern
In a large soup pot add about 1/2 lb . of pasta.  Mom always used small shells, but I used rotini since that's what I had.  Cook according to package direction at a boil for about 8-11 min.

Mom's Goulash - A family treasure...Slice of Southern

Drain your pasta and return it to the pot.
Add 1 14 oz can of diced tomatoes.
Add 1 small can of tomato sauce - You want just a coating of sauce, not soupy.
Add salt and pepper.
Add about 1 - 2 teaspoons of garlic powder.   
Add the meat. (sorry the shot below didn't have the meat in it yet!)

Mom's Goulash - A family treasure...Slice of Southern

Mix everything together in the pot and cook on simmer for about 10 min until heated through.


Mom's Goulash - A family treasure...Slice of Southern
Serve with some crusty bread and a salad....and taste the comfort food.

There's nothing like Mom's Goulash!  Want some?
Mom's Goulash - A family treasure...Slice of Southern


Mom's Goulash

serves 4

1/2 lb ground sirloin
1/2 lb. pasta (small shells or rotini)
1 14 oz can of diced tomatoes
1 small can of tomato sauce
3-4 tsp of garlic powder
salt and pepper

Brown the ground sirloin in a skillet, breaking meat in to chunky bites.  Sprinkle with 2 tsp of garlic powder.  You want the meat to taste garlicky.

Boil pasta in a pot according to package directions.  Drain and return to pot.  Add tomatoes and sauce.  Add meat and 1 - 2 tsp more of the garlic powder.  Salt and pepper to taste.  Cook on simmer for about 10 min to heat through.  Enjoy!

Saturday, March 19, 2011

Product Review: Williams-Sonoma's Steak Au Poivre Seasoning Paste


I just took another technique class at Williams-Sonoma last weekend on Steak & Chops.  I love these classes! 

One of the steaks featured their product called "Steak Au Poivre Seasoning Paste".  Monique, our chef cooked a flank steak for us using this product.  Since hers was so tasty I quickly bought it and tired it at home during the week.  Boy am I glad I bought this!

It has all the ingredients you would actually use to make homemade Steak Au Poivre.  Here are the ingredients:

Canola oil, black Tellicherry peppercorns, white peppercorns, pink peppercorns, allspice, green peppercorns, kosher salt, granulated garlic.

That's it, nothing but good stuff!

Here's what they say about their seasoning paste:

  • To mellow their heat and enhance their flavor, we gently poach the peppercorns in pure canola oil, creating a rich, savory paste that adheres easily to steak.
  • Easy to use: simply rub the paste into your meat, then pan-fry or grill as usual for a tender, juicy steak with authentic French flavor.
  • 8.5 oz.

  • It's really as simple as they say.  You put about 1 tsp per 8oz of steak.  Rubbing it on both sides.  Then you wrap it in some plastic wrap and let it sit on the counter for about 30 min to allow the flavors to develop and  the meat come to room temperature.

    I used a New York steak.  Cooked it in my skillet.


    Looks nice and coated. Peppercorns adhered well to the steak.  Didn't need any additional oil in the skillet as the paste has oil in it.  This created a nice peppery crust on the outside when searing the steak.

    Once the steak was done I created a Steak Au Poivre sauce using about 1/2 c. of beef broth and  1 Tbl. Brandy (didn't have Cognac!), and 1 Tbl. minced shallots, reducing the sauce by half to intensify the flavors and thicken the sauce.  Then took it off the heat and added 1 T butter. (You could add cream instead of broth if you want.)

    I poured it over the steak.  Took a bite....Heaven!


    And the best part...you use so little...

    Make sure to put the jar in the refrigerator to use for another time!

    This is a definite keeper and all around great buy!

    Make gourmet style food, simple!

    Friday, March 18, 2011

    Potato Cakes


    Did everyone have a happy St. Patrick's Day?
    Did you celebrate?
    Did you wear green?
    Did you get pinched?


    MGG and I had a little dinner which was really nice.   One thing I made was potato cakes.


    You know I always thought my mom held out on us with this dish.  She ate them all the time growing up and we did every once in a while but never enough to say, "Oh, I love potato cakes".


    So on my last visit to Tennessee, where she lives now, we made some.  Boy, how do I love potato cakes!


    Here's my version, which is kind of a shortcut on flavors....I use a flavored cream cheese!  Yes, a flavored cream cheese...!  This gives you the basic flavors of being savory, but's easier to do.


    So if you have left over mashed potatoes...make these!  They are AWESOME!


    So let's make potato cakes!


    You will need:  leftover mashed potatoes, onion and chive cream cheese, egg, panko or regular bread crumbs, and oil to pan fry them in.

    Place your mashed potatoes and flavored cream cheese, mix well.  Then add your egg, and 1/2 cup of panko.  Blend it all up until mixed throughly.  


    Form the mixture in to 3" patties.  Dredge the patties in the other 1/2 cup of panko.


    Heat oil in skillet over medium high heat until hot.  Add patties and cook on each side until golden brown. About 3 minutes per side.


    Remove to a paper towel to drain off any excess grease.  Repeat with any remaining patties.


    My oh my, these are truly comfort food!  Hot, crispy, savory bites of yumminess!


    Excuse me, I have to go make more mashed potatoes now...I have a craving..!
    Enjoy!

    Potato Cakes
    Ingredients
    2 cups mashed potatoes
    1/4 cup of chive and onion cream cheese
    1 cup panko breadcrumbs, divided
    1 large egg

    1/8 cup canola oil, enough to fully coat the bottom of your skillet 
    Directions
    In a bowl, combine your mashed potatoes and the cream cheese.  Mix well.  Then add 1/2 cup panko, and an egg.  Blend until mixed thoroughly.  Shape the potato mixture into 3-inch patties. Dredge the patties in the remaining 1/2 cup panko.
    In a large nonstick skillet over medium heat, add your oil. Add your patties and cook until golden brown, 2 to 3 minutes. Don’t crowd your skillet.  Repeat the procedure if needed, with remaining patties. Serve hot.


    Tuesday, March 15, 2011

    St. Patrick's Day Cheddar Biscuits

    St Patrick's Day Cheddar Biscuits are so much fun to make, and easy too!  Perfect as a side to Irish Stew or other celebration dishes! Slice of Southern

    These are the cutest biscuits!

    I can't take credit for these though...I know, I know...

    But I just had to make them...and share them with you...cause Kraft Foods shared them with me!

    And they are so yummy!

    They are perfect as an accompaniment for your St. Patrick's day meals.  They look like they are topped with tiny shamrocks!  I love it!

    So, bring out the Irish in your and make these...now.


    You will need:  All purpose baking mix, cheddar cheese, herbs, parsley, sour cream, milk, Dijon mustard, and an egg. That's it!

    Place baking mix, cheese, and herbs in a large bowl.  ( I used a combination of parsley and thyme to compliment my dinner, but you can change it up.)

    St Patrick's Day Cheddar Biscuits are so much fun to make, and easy too!  Perfect as a side to Irish Stew or other celebration dishes! Slice of Southern

    Put sour cream and mustard in a small bowl. 

    St Patrick's Day Cheddar Biscuits are so much fun to make, and easy too!  Perfect as a side to Irish Stew or other celebration dishes! Slice of Southern

    Add milk and stir to combine.

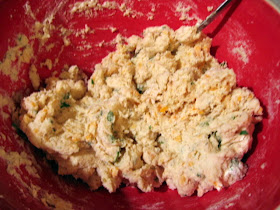
    Add to dry ingredients and stir until just combined and moist.

    St Patrick's Day Cheddar Biscuits are so much fun to make, and easy too!  Perfect as a side to Irish Stew or other celebration dishes! Slice of Southern

    Turn dough out on to a flour dusted board.  Knead about 10 times.

    St Patrick's Day Cheddar Biscuits are so much fun to make, and easy too!  Perfect as a side to Irish Stew or other celebration dishes! Slice of Southern

    Pat in to a circle. the recipe state 1/2 " thick.  I made mine about 1 inch thick.  I like a substantial biscuit!  Cut with a 2" biscuit cutter.  Place on baking sheet.  Recipe says 12 servings, but I got 8 because I made mine thicker.

    St Patrick's Day Cheddar Biscuits are so much fun to make, and easy too!  Perfect as a side to Irish Stew or other celebration dishes! Slice of Southern

    Brush the tops with a beaten egg. 

    St Patrick's Day Cheddar Biscuits are so much fun to make, and easy too!  Perfect as a side to Irish Stew or other celebration dishes! Slice of Southern

    Place a parsley leaf on each biscuit.  Cover with more egg.

    St Patrick's Day Cheddar Biscuits are so much fun to make, and easy too!  Perfect as a side to Irish Stew or other celebration dishes! Slice of Southern

    Bake 12 min.  Mine came out nice and brown at 12 minutes, any more and they would have burned.

    St Patrick's Day Cheddar Biscuits are so much fun to make, and easy too!  Perfect as a side to Irish Stew or other celebration dishes! Slice of Southern


    How adorable are these??? And they taste good too...I was leery when I tasted the dough and it had a strong mustard taste, however, when fully cooked they are mild and savory.

    St Patrick's Day Cheddar Biscuits are so much fun to make, and easy too!  Perfect as a side to Irish Stew or other celebration dishes! Slice of Southern

    St Patrick's Day Cheddar Biscuits are so much fun to make, and easy too!  Perfect as a side to Irish Stew or other celebration dishes! Slice of Southern


    Please make these...you won't be disappointed!

    St. Patrick's Day Cheddar Biscuits
    by Kraft Recipes

    2-1/4 cups all-purpose baking mix
    1/2 cup  KRAFT Shredded Cheddar Cheese
    2 Tbsp. chopped fresh herbs
    1/4 cup  BREAKSTONE'S Sour Cream
    2 Tbsp. GREY POUPON Dijon Mustard
    1/3 cup  milk
    1 egg, beaten
    12   fresh Italian parsley leaves

    HEAT oven to 425°F.
    COMBINE baking mix, cheese and herbs in large bowl. Mix sour cream and mustard in small bowl. Gradually stir in milk. Add to baking mix mixture; stir just until moistened.
    PLACE dough on surface lightly dusted with additional baking mix; knead 10 times. Pat into 1/2-inch-thick circle. Cut with 2-inch biscuit cutter dusted with baking mix. Place biscuits, 2 inches apart, on baking sheet. Brush lightly with egg; top with parsley. Brush with remaining egg.
    BAKE 12 to 15 min. or until lightly browned. Serve warm.